
Taillight and headlight corner tinting!

Newbie
Joined: Sep 2008
Posts: 44
Likes: 0
From: Alabama
Snopro did a real good job on his lights but I dont want to have permanent tinted lights. Is this http://cgi.ebay.com/ebaymotors/ws/eB...8661&viewitem= any good?
Evolved Member
Joined: Oct 2008
Posts: 641
Likes: 0
From: The Salty, UT
eh, i would ge those becasue of the easy install but that 20% dark smoke aint even dark..i got a set of dark smoke from headlightarmor. and it straight looked black from a distance..but it was precut and it was the thick stuff 17-20mm no tint shop would install it for me for legal reasons so i went for it myself..turned out like ****..real hard to do, didnt cover the whole light. and was about 3 times the price of these..if ur not lookin to get tickets but still have tinted tails that u can install yourself with ease id say go for it..good price!


the lancer tail lights have embossed writing from the factory on them so film does look bubbled around that area on the lights if you use that. it's best to take your tail lights out and take them to go get tinted with a light coat of black+clear. looks sexy that way 

Newbie
Joined: Dec 2009
Posts: 19
Likes: 0
From: Portland, OR
i just recently tinted my taillights and headlight coners with this product called Nightshades spray on tint translucent paint...
Step 1: remove two philipshead screws and 10mm nuts holding the outer and inner lighting units and unplug sockets as neccesary...(lights are held in fairly snug and need some wiggling to take off)
Step 2: clean the surface with windex or a good glass cleaner and 70% alcohal solution works good getting grease or sutt off the lens
Step 3: Take the NightShades paint and spray 10-12 inches away untill a light shade appears, let dry and shake can vigorously for one minute then re-apply, this time, apply a rather noticable coat.
Step 4: Apply up to 4 coats for maximum shade and let dry for 1 hour ( preferably in the sunlight in temps of 70 degrees or more)
Step 5: re-assemble lighting units and test for currect coating and visability ( re-coat if needed)
Step 6: Enjoy your sportier lookin ride
headlight corners: tape off selected area and apply these steps but make sure to newspaper these areas!
First off, nicely done. Looks great man.

I'm trying to get the 1/2 of the tail light that's actually on the trunk off. Do I pop off the little rubber pieces holding the paneling in and get to it form under there?


Newbie
Joined: Jun 2009
Posts: 4
Likes: 0
From: San Antonio
After you get the 2 bolts unscrewd and twist and unclip the bulbs, you gotta use a bit of some muscle to just push it out of there from underneath. I used my thumbs to push it through and it popped off. Start with the bigger one, then the smaller one.
Newbie
Joined: Aug 2009
Posts: 80
Likes: 0
From: C-town, Illinois
Yeah, using film is the worst, It's easier on the third brake light cause it's flat, and the reflectors are flat too, but if you use film on the reflector, they still turn red when headlights hit them. If your going to tint any lights, i suggest using nightshades. just wet sand a little, clean em real good, and then light coats of night shade, and then clear coat. you can even put em under a heat lamp to bake the coats on.
Here's my set up. Nightshade+clearcoat tails and film on everything else.
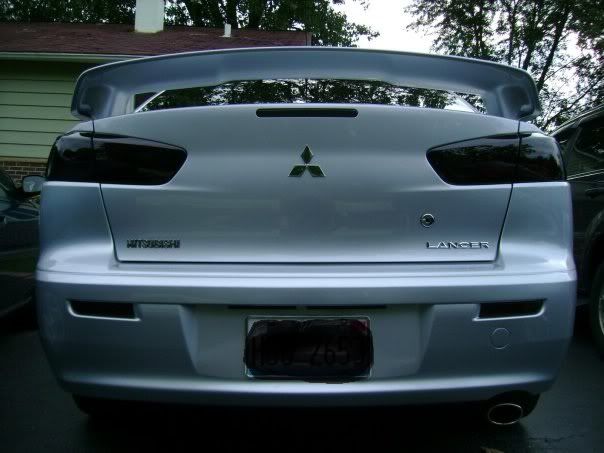
Here's my set up. Nightshade+clearcoat tails and film on everything else.


Newbie
Joined: Aug 2009
Posts: 80
Likes: 0
From: C-town, Illinois
No, I never get pulled over, and I live in a somewhat bad area where cops pull you over for everything. Our tail lights are pretty big and pretty bright, so even with the tint on they still show. I dont think they really pay attention to whats going on outside the car, more about whats going on inside. If you get pulled over for speeding they might slap that on you too just to be dicks, but thats a real dick move.
I also have my front windows tinted to 20% and never get pulled over.
I also have my front windows tinted to 20% and never get pulled over.

Newbie
Joined: Apr 2010
Posts: 20
Likes: 0
From: Canada, Quebec
I want to get my rear reflector and third brake light tinted. But I don't know if I will go for nightshade of get them tinted with a film.
Also how do you remove the side marker in front of the door? I want to get those tinted. I don't like to have white/chrome thing on the outside of my car.
Did someone tried that http://www.flyeyeskit.co.uk/ I may try it to do what I just said for 22 buck it may worth it.
Also how do you remove the side marker in front of the door? I want to get those tinted. I don't like to have white/chrome thing on the outside of my car.
Did someone tried that http://www.flyeyeskit.co.uk/ I may try it to do what I just said for 22 buck it may worth it.

Newbie
Joined: Aug 2009
Posts: 80
Likes: 0
From: C-town, Illinois
If you look at the picture above I used film for my reflectors and third brake light, I would say use film for those because they are flat and the reflectors are hard to get out in order to paint. But since they are flat the film works just fine, plus it wont fade as fast as nightshades will. just use a heat gun in the area's where there is print on the plastic and it will form better. You can get pre-cut film on ebay for those too.


Thread
Thread Starter
Forum
Replies
Last Post
Graphic
Evo How Tos / Installations
29
Jul 23, 2015 11:18 PM
tcon89
Lancer How To Requests / Questions / Tips
2
Aug 27, 2011 03:35 PM