
The ForeSTAR Project


Thread Starter
Newbie
Joined: Jun 2012
Posts: 50
Likes: 0
From: Bham WA
Okay I finally had some time to get on the comp for a bit. Got a bunch of work done to the foz the last couple weeks. Been working late and I have had to wait for a few parts on the GC to arrive so I make some good headway on the project.
Last finished off the parts a bunch of Willaim yummy TSS-Fab parts getting installed in the rear. Now it was time to work on the front.
Cross member and front coils in a freshly painted engine bay:

Then my day was happily interrupted by the arival of some parts. Got my Twinscroll 20G w/ 3" inlet and rear downpipe flage. I am hoping this will be a nice strong setup with my engine mods that are soon to come. I guess bloush makes upgrade for these too so if it dosen't make the power curve I want I can send if off to them for some additional love. Good part though. Really nice fittings and hardware. Should be getting the equal length header in the next couple days so I can cut it apart to make my custom mounted short pipe turbo kit.


Last finished off the parts a bunch of Willaim yummy TSS-Fab parts getting installed in the rear. Now it was time to work on the front.
Cross member and front coils in a freshly painted engine bay:
Then my day was happily interrupted by the arival of some parts. Got my Twinscroll 20G w/ 3" inlet and rear downpipe flage. I am hoping this will be a nice strong setup with my engine mods that are soon to come. I guess bloush makes upgrade for these too so if it dosen't make the power curve I want I can send if off to them for some additional love. Good part though. Really nice fittings and hardware. Should be getting the equal length header in the next couple days so I can cut it apart to make my custom mounted short pipe turbo kit.
Thread Starter
Newbie
Joined: Jun 2012
Posts: 50
Likes: 0
From: Bham WA
Next was getting the rest of the Front suspension in the foz. Got one side on and fitted the wheel.

Looked at the fitment and the wheel arch and since it was more square then say an more rounded Impreza one I just grabed is and started stretching it. I put a spacer on the lower mounted at the door to space it out to get some airflow for the wheel well and it is totally going to tuck. I pulled is 3" and it looks great. Gave me the idea to get another pair and ise them on the rear for my rear flares I am excited to start that in a couple more weeks.


Nice pics of the wheels on one side. I think they look preatty good.
Looked at the fitment and the wheel arch and since it was more square then say an more rounded Impreza one I just grabed is and started stretching it. I put a spacer on the lower mounted at the door to space it out to get some airflow for the wheel well and it is totally going to tuck. I pulled is 3" and it looks great. Gave me the idea to get another pair and ise them on the rear for my rear flares I am excited to start that in a couple more weeks.
Nice pics of the wheels on one side. I think they look preatty good.
Thread Starter
Newbie
Joined: Jun 2012
Posts: 50
Likes: 0
From: Bham WA
Put in the a smaller non-abs Brighton Brake Booster and installed the pedals in the interior. I mounted it upside down to relocate the vacuum line port lower and out of the way. Not sure if I can do that or not but since there is only air in there I figure I wan always swap it if it dosen't work. Makes for a much cleaner look and a nice addition to my list of mods I can do for engine tucking jobs.

The weather was actually good so I managed to get under the Legacy to get the last few parts I needed from her for this project. Spent the rest of the day getting the engine and trans in. Its actually starting to look like a car again.

Set my intake manifold on and set the turbo where I was thinking of putting it. Should be perfect fit. I'll be cutting a duct in the light and making a sealed air box. This is going to remove about 4" of pipe out of my up-pipe on both runners for faster spool and as you can see, the intercooler pipine is pretty short. The fender linner will also be installed to keep excess water and debree off the up-pipe. I'll also be able to run the Wastegate dump tube out of the side of the bumper if I ever want to upgrade which would be awsome.

On the cold side there is a bit of an issue. The manifolds inlet will need to be mofied to fit the drive by wire throttle body and I am going to re-weld the intercoolers end tank to include the pipe all the way to TB to remove a coupler. The intercooler pipe will be less then 12" long and there will only be 2 couplers fromt he turbo to throttle body. Just like a Tmic but this dosen't have the heat sock issues. This should make for a much more dependable setup in terms of maintanence and flow. I am ether going to put the BOV just before the throttle body or on the end tank itself once everything is located I will knoe where I have the room. Also coming is Killer-B's Relocated Oil Filler Neck to get it ouf of the way and I can just bent the dip stick tube.

The last thing I did was set the tranny with the stock crossmember and then held it with a jack stand to remove the OE cross member and then fab up the new TSS-Fab / me custom solid tranny mount. He bent me the center pipe and end caps and I tack them on and got the forwad mount finished. I will be adding 2 more attachment points once a couple more of his goodies get here so I can install them and check fitment. Then its off to powder coating.

Once the A-arms and couple other bits get here I will be finishing the tranny mount and making my steering angle kit. Then while those parts are at powder coating I can start removing the excess wire from the harness and start putting the interior back together. A few of my parts I had for sell are going to be selling end of this week so stay tuned because I bunch or parts are going to be getting ordered over the next week or 2 so I can really start pushing for the home stretch.
I hope you have all enjoyed what I have been posting thus far.
Johann
The weather was actually good so I managed to get under the Legacy to get the last few parts I needed from her for this project. Spent the rest of the day getting the engine and trans in. Its actually starting to look like a car again.
Set my intake manifold on and set the turbo where I was thinking of putting it. Should be perfect fit. I'll be cutting a duct in the light and making a sealed air box. This is going to remove about 4" of pipe out of my up-pipe on both runners for faster spool and as you can see, the intercooler pipine is pretty short. The fender linner will also be installed to keep excess water and debree off the up-pipe. I'll also be able to run the Wastegate dump tube out of the side of the bumper if I ever want to upgrade which would be awsome.
On the cold side there is a bit of an issue. The manifolds inlet will need to be mofied to fit the drive by wire throttle body and I am going to re-weld the intercoolers end tank to include the pipe all the way to TB to remove a coupler. The intercooler pipe will be less then 12" long and there will only be 2 couplers fromt he turbo to throttle body. Just like a Tmic but this dosen't have the heat sock issues. This should make for a much more dependable setup in terms of maintanence and flow. I am ether going to put the BOV just before the throttle body or on the end tank itself once everything is located I will knoe where I have the room. Also coming is Killer-B's Relocated Oil Filler Neck to get it ouf of the way and I can just bent the dip stick tube.
The last thing I did was set the tranny with the stock crossmember and then held it with a jack stand to remove the OE cross member and then fab up the new TSS-Fab / me custom solid tranny mount. He bent me the center pipe and end caps and I tack them on and got the forwad mount finished. I will be adding 2 more attachment points once a couple more of his goodies get here so I can install them and check fitment. Then its off to powder coating.
Once the A-arms and couple other bits get here I will be finishing the tranny mount and making my steering angle kit. Then while those parts are at powder coating I can start removing the excess wire from the harness and start putting the interior back together. A few of my parts I had for sell are going to be selling end of this week so stay tuned because I bunch or parts are going to be getting ordered over the next week or 2 so I can really start pushing for the home stretch.
I hope you have all enjoyed what I have been posting thus far.
Johann
Thread Starter
Newbie
Joined: Jun 2012
Posts: 50
Likes: 0
From: Bham WA
Hey all. Update time. Started the day by getting the rear diff and remainder of the suspension installed.


Then I installed my Girodisc 2pc front and rear rotors and custom painted STi calipers. The calipers are off the Celaru cuz nobody wanted to buy them painted this way so I sold my green ones off the Legacy. I know I don't work for them anymore but they are some of the best rotors out there and this whole project is about getting the most out of every little part.

Got the wheels installed over the brakes and ran into a bit of a problem. Rear wheels fit great but the front not so much. Im going to need about a 15mm spacer to clear the face of the caliper. Not a big deal since I was wanting to run a spacer in the front anyways to promote oversteer but they touch on the hoop as well. Not by very much. The casting of the calipers puts 2 cast marks on the top of the caliper. They stick up about 1/8" higher then the rest of the caliper so the only logical thing to do is grind them down a bit. We have done it a few times at Giro to get upgraded brake kits to fit behind stock older Ferrari wheels. After they are ground down I should have just over 1/8" of clearence on the hoop so that should be enough. Brakes look pretty big in there given the tight fit haha.
Front:

Rear:

Last was the fender... Had to pull it another inch to clear the wheels/ tires since they had to be spacered out. Basically make a larger spacer for the back of the fender. I am going to hammer the inside of the fender today and finish them. A lot farther then I wanted to go but if I can still run the stock fenders and help some air flow out of the wheel well then so be it.

Last I took 2 step back shots before the GC8 was pushed back into the shop.


The goals for today:
Get the fenders finished up and spaced out.
Grind the Front Calipers Down
Fabricate the seat brackets and install them
Fabricate Bracket to install drive-by-wire gas pedal
Cut and for Mariner front bumper
And maybe if I have more time...
Install non/abs master cylinder
Install dash support brace
Fit STi dash
Install Steering Column
Sit in it and pretend I'm driving it...
Bwabwabwabwa, BWAAAAAA!!! Screeeeech!!, PSSSSHT!, BwaaaAAAAA!
Johann
Then I installed my Girodisc 2pc front and rear rotors and custom painted STi calipers. The calipers are off the Celaru cuz nobody wanted to buy them painted this way so I sold my green ones off the Legacy. I know I don't work for them anymore but they are some of the best rotors out there and this whole project is about getting the most out of every little part.
Got the wheels installed over the brakes and ran into a bit of a problem. Rear wheels fit great but the front not so much. Im going to need about a 15mm spacer to clear the face of the caliper. Not a big deal since I was wanting to run a spacer in the front anyways to promote oversteer but they touch on the hoop as well. Not by very much. The casting of the calipers puts 2 cast marks on the top of the caliper. They stick up about 1/8" higher then the rest of the caliper so the only logical thing to do is grind them down a bit. We have done it a few times at Giro to get upgraded brake kits to fit behind stock older Ferrari wheels. After they are ground down I should have just over 1/8" of clearence on the hoop so that should be enough. Brakes look pretty big in there given the tight fit haha.
Front:
Rear:
Last was the fender... Had to pull it another inch to clear the wheels/ tires since they had to be spacered out. Basically make a larger spacer for the back of the fender. I am going to hammer the inside of the fender today and finish them. A lot farther then I wanted to go but if I can still run the stock fenders and help some air flow out of the wheel well then so be it.
Last I took 2 step back shots before the GC8 was pushed back into the shop.
The goals for today:
Get the fenders finished up and spaced out.
Grind the Front Calipers Down
Fabricate the seat brackets and install them
Fabricate Bracket to install drive-by-wire gas pedal
Cut and for Mariner front bumper
And maybe if I have more time...
Install non/abs master cylinder
Install dash support brace
Fit STi dash
Install Steering Column
Sit in it and pretend I'm driving it...
Bwabwabwabwa, BWAAAAAA!!! Screeeeech!!, PSSSSHT!, BwaaaAAAAA!
Johann
Thread Starter
Newbie
Joined: Jun 2012
Posts: 50
Likes: 0
From: Bham WA
Hey all. Its update time!!
Started the day by starting on that list I made myself in the last post.
First up was fitting the wheels. Got the spacers ordered but there was still the issue of the caliper touching the hoop of the wheel. Got out my grinder and 120g sanding disc and had my way with the calipers...

I have about and 1/8" of clearence now with the caliper and the hood and these is still planty of material on the caliper. I only had to grind down the taper of the cast lines to get them to work.
Next up was the fenders. I had already pull these poor guys 3" inches to get them to fit just the wheels. Now with spacers I had to pull them another inch. Started by flatening the inside lip of the fender at the door gap. Then I drilled out the M6 fender mount point on the chassis to weld in a M8 nut so I could use a larger stronger bolt. Made the spacer out of a 1/2" piece of square tubing and a washer.

(note the spacer is mounted diagnally for better air flow) Haha every little bit counts right... Got the fender right where I wanted it and luckally they are going to work. I have no idea how but these forester fenders are very resiliant. 4" of pull and they still look great.


Started the day by starting on that list I made myself in the last post.
First up was fitting the wheels. Got the spacers ordered but there was still the issue of the caliper touching the hoop of the wheel. Got out my grinder and 120g sanding disc and had my way with the calipers...
I have about and 1/8" of clearence now with the caliper and the hood and these is still planty of material on the caliper. I only had to grind down the taper of the cast lines to get them to work.
Next up was the fenders. I had already pull these poor guys 3" inches to get them to fit just the wheels. Now with spacers I had to pull them another inch. Started by flatening the inside lip of the fender at the door gap. Then I drilled out the M6 fender mount point on the chassis to weld in a M8 nut so I could use a larger stronger bolt. Made the spacer out of a 1/2" piece of square tubing and a washer.
(note the spacer is mounted diagnally for better air flow) Haha every little bit counts right... Got the fender right where I wanted it and luckally they are going to work. I have no idea how but these forester fenders are very resiliant. 4" of pull and they still look great.
Thread Starter
Newbie
Joined: Jun 2012
Posts: 50
Likes: 0
From: Bham WA
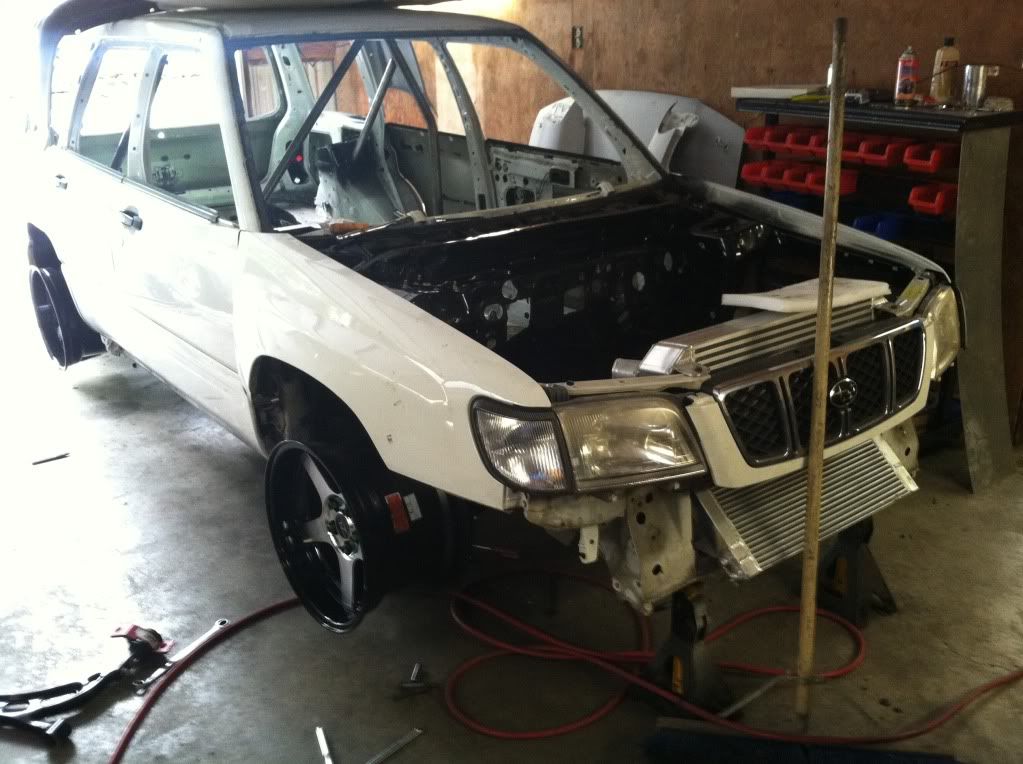
Next was probubly the most challenging part of this project. A fellow member on this forum was the insporation of this idea.
I saw a pic of EmaciatedCow black forester with this bumper that I had never sean before on a Forester. It fit so well at first I thought it was stock but then I realized it was from another car. Way larger air gap, it hangs lower for better aerodynamics and it was plastic so it was light and could take a beating. I searched the internet and parking lots for weeks trying to figure out what the hell it came off of and I fould it was off a Mercury Mariner. Bought the bumper and stuck it on and I knew it needed some modifications but the extent wasn't apperent untill then. Now I am going to show you the step by step of how I fitted this bumper to my Foz.
First up I cut the bumper in half... (right off the bat there is no going back haha)

Then I set the passgenger half on the Forester and traced it on the fender.

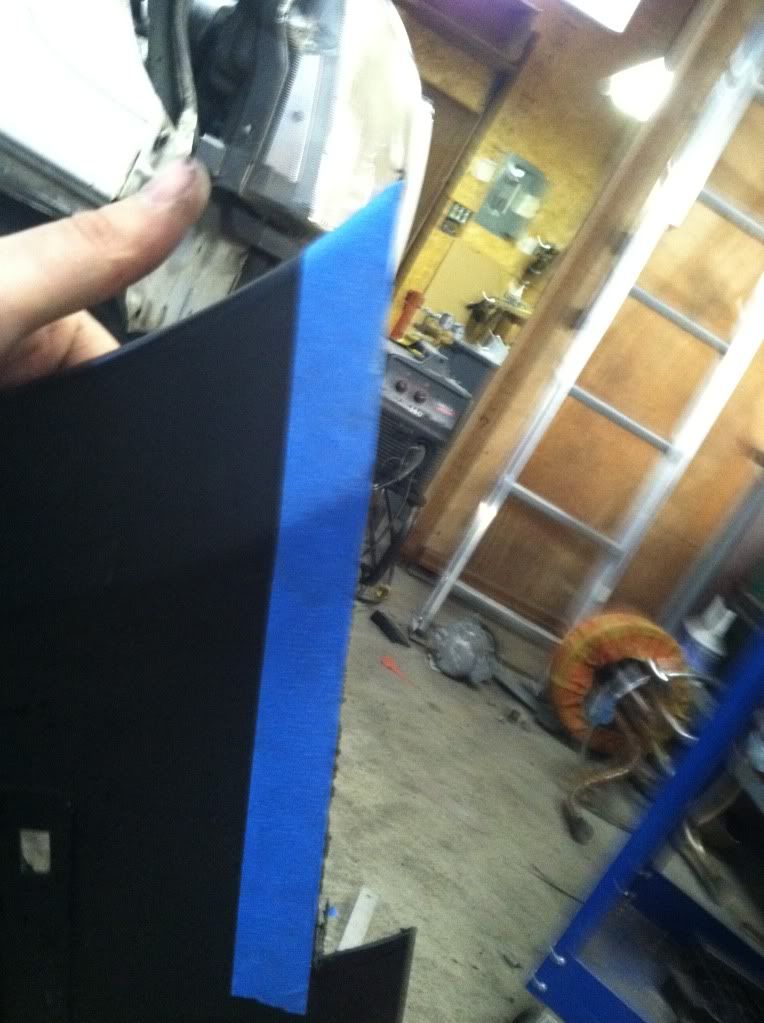
Then I took some masking tape and put it on the fender and traced the mark onto it. Looking back I would have put the tape on first so I didn't have to draw on the fender...

Trimmed it with a razor blade.

Removed the tabe and then applied the template onto the bumper.

Then trimmed the bumper (to start 1/4" inside of the templates edge)
I saw a pic of EmaciatedCow black forester with this bumper that I had never sean before on a Forester. It fit so well at first I thought it was stock but then I realized it was from another car. Way larger air gap, it hangs lower for better aerodynamics and it was plastic so it was light and could take a beating. I searched the internet and parking lots for weeks trying to figure out what the hell it came off of and I fould it was off a Mercury Mariner. Bought the bumper and stuck it on and I knew it needed some modifications but the extent wasn't apperent untill then. Now I am going to show you the step by step of how I fitted this bumper to my Foz.
First up I cut the bumper in half... (right off the bat there is no going back haha)
Then I set the passgenger half on the Forester and traced it on the fender.
Then I took some masking tape and put it on the fender and traced the mark onto it. Looking back I would have put the tape on first so I didn't have to draw on the fender...
Trimmed it with a razor blade.
Removed the tabe and then applied the template onto the bumper.
Then trimmed the bumper (to start 1/4" inside of the templates edge)
Thread Starter
Newbie
Joined: Jun 2012
Posts: 50
Likes: 0
From: Bham WA
Next is where it gets fun. After years of putting things into cars that originally shouldn't have, I would like to say I am well on my way of becoming an expert at Frankenstein type mods.
Next I cut the fender at the front.

Then I cut the fender 2 more times on the side.

Then used those cuts to pull and flex the fender to fit the countures of the new bumper as best I could.

Surprizingly after a bit of work the bumper was fitting almost perfect..


Everywhere axcept for here...

Next I cut the fender at the front.
Then I cut the fender 2 more times on the side.
Then used those cuts to pull and flex the fender to fit the countures of the new bumper as best I could.
Surprizingly after a bit of work the bumper was fitting almost perfect..
Everywhere axcept for here...
Thread Starter
Newbie
Joined: Jun 2012
Posts: 50
Likes: 0
From: Bham WA
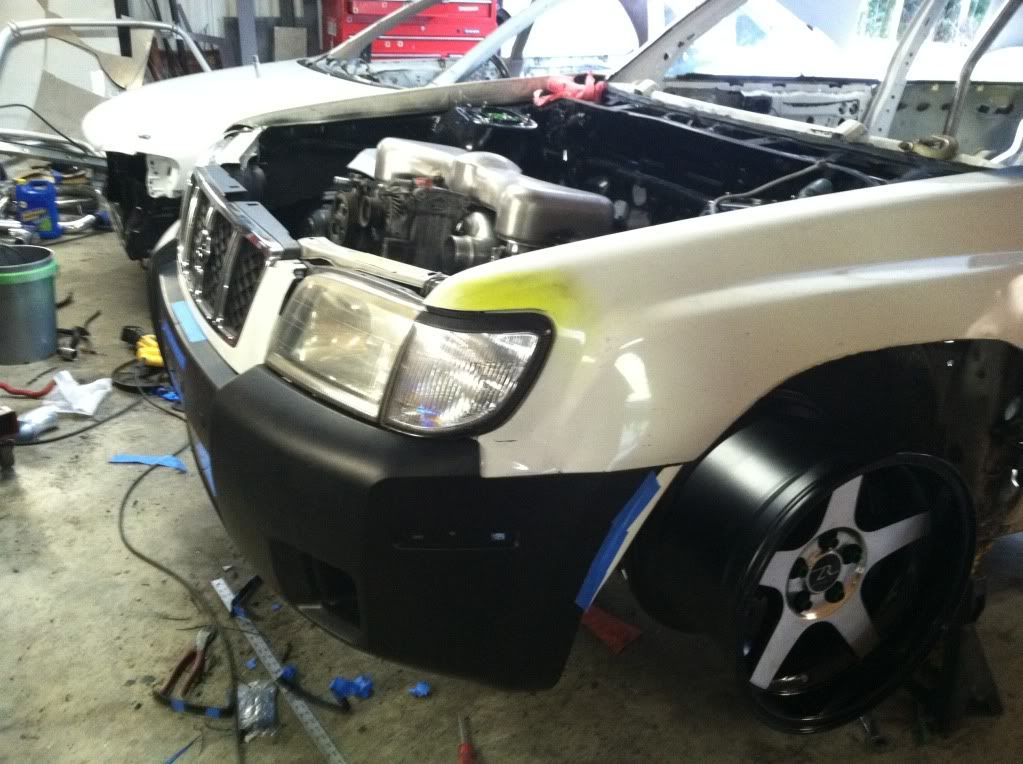
So cutting the fender was out of the question. After all the pulling and stretching I had to do to them to fit those wheels cutting any material out of them would ruin them and make them flimsy. So... I grabbed the stock bumper and made a filler piece.


40% there and looking pretty good.


Next I took the passenger side off and did these same steps to the driver side.

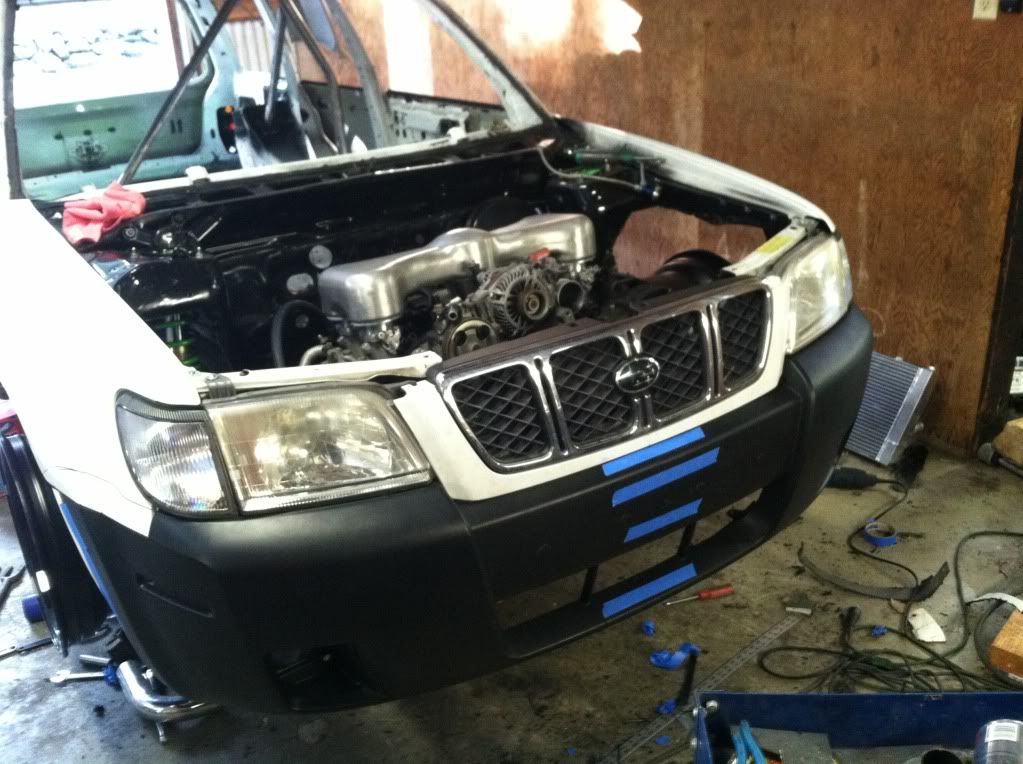
Now originally I started by cutting the bumper in half. The reason for this is because the bumper was about 2" to wide for the Foz. After the Drivers side was finished and fitting I re-installed the Passenger side.
Obviously there was some over lap. It went from this...

and after making the center line and being VERY careful with the cutting wheel to this..


Well there you have it. Mariner bumper on a Forester.
If you see thisEmaciatedCow, i'd love to hear your thoughts on how I did this and what you did to fit yours. Next to finish this off I will be making upper and lower supports so mount the bumper to the chassis securly and I am still toying with a few ideas of how to connect the 2 halfs of the bumper together. I don't want to mold it because I want to be able to replace just one side it I mess it up. Get more bang for my buck if I need to get another bumper at some point. So I just need to find some nice smooth mount fasteners.
More updates coming soon. Parts are flying in, so that means more progress. I need to make a ton of progress on the GC8 this week so I'll be working double shifts to keep the Forester going strong.
Mount the Seats
Install the Dash
Run the Brake Lines
Fabricate Turbo Kit
Fabricate Intercooler pipes
Fabricate quick steering kit... etc
Many of these mods I have to do on the GC8 so I will try to get both done on the same day to not get burned out. Stay tuned much more to come. This project is really coming together and the fast pace is really jazzing me up.
Johann
40% there and looking pretty good.
Next I took the passenger side off and did these same steps to the driver side.
Now originally I started by cutting the bumper in half. The reason for this is because the bumper was about 2" to wide for the Foz. After the Drivers side was finished and fitting I re-installed the Passenger side.
Obviously there was some over lap. It went from this...
and after making the center line and being VERY careful with the cutting wheel to this..
Well there you have it. Mariner bumper on a Forester.
If you see thisEmaciatedCow, i'd love to hear your thoughts on how I did this and what you did to fit yours. Next to finish this off I will be making upper and lower supports so mount the bumper to the chassis securly and I am still toying with a few ideas of how to connect the 2 halfs of the bumper together. I don't want to mold it because I want to be able to replace just one side it I mess it up. Get more bang for my buck if I need to get another bumper at some point. So I just need to find some nice smooth mount fasteners.
More updates coming soon. Parts are flying in, so that means more progress. I need to make a ton of progress on the GC8 this week so I'll be working double shifts to keep the Forester going strong.
Mount the Seats
Install the Dash
Run the Brake Lines
Fabricate Turbo Kit
Fabricate Intercooler pipes
Fabricate quick steering kit... etc
Many of these mods I have to do on the GC8 so I will try to get both done on the same day to not get burned out. Stay tuned much more to come. This project is really coming together and the fast pace is really jazzing me up.
Johann
Thread Starter
Newbie
Joined: Jun 2012
Posts: 50
Likes: 0
From: Bham WA
Hey to the few that seam to go on here... Update time!!!
Cleaned the crap out of the shop yesterday to make more room in the shop for the foz and GC8 fab time and even cleaned up the back to recive the next in my crazy project ideas. Buddy of mine picked up and AE86 coupe and we are going to put an EZ30R in it. Custom tube chassis front end the works... I probubly post a build thread for that in a couple weeks.
Anywho after all the cleaning was finished I got to get some work done to the foz. Got the dash support brace and steering column installed.

Then I make a custom bracket that made it so I could bolt on the STi Drive-By-Wire gas pedal on to my firewall.

Then broke out some new parts and make the drivers side seat bracket..

and installed the seat. Spent about 10 mins playing speed racer and then went to bed.

This week is going to be a busy one for both the Forester and the GC8. Updates will be posted daily as deadlines for both cars draws near.
Johann
Cleaned the crap out of the shop yesterday to make more room in the shop for the foz and GC8 fab time and even cleaned up the back to recive the next in my crazy project ideas. Buddy of mine picked up and AE86 coupe and we are going to put an EZ30R in it. Custom tube chassis front end the works... I probubly post a build thread for that in a couple weeks.
Anywho after all the cleaning was finished I got to get some work done to the foz. Got the dash support brace and steering column installed.
Then I make a custom bracket that made it so I could bolt on the STi Drive-By-Wire gas pedal on to my firewall.
Then broke out some new parts and make the drivers side seat bracket..
and installed the seat. Spent about 10 mins playing speed racer and then went to bed.
This week is going to be a busy one for both the Forester and the GC8. Updates will be posted daily as deadlines for both cars draws near.
Johann
Thread Starter
Newbie
Joined: Jun 2012
Posts: 50
Likes: 0
From: Bham WA
Next it was one to some fab work. I got these tie rod links online. They are from a nissan 240sx. Right size, right thread pitch and perfect to fine tune adjustments.


Although you can't tell from this pic they are about 1" shorter then the stock links and can't be used to fit the hub in the stock location. But thats not why I got them...
Started making my own quick steer kit. By moving the tie rod location in closer to the hub you get an increased steering rate. This will allow me to corner in Auto X without having to go hand over hand as much and help lower run times. Yes it will feel a bit heavier and it will put a slightly high amount of strain on the pump but the pros still greatly outweigh the cons.
Started by cutting out my upper and lower pices..
Thread Starter
Newbie
Joined: Jun 2012
Posts: 50
Likes: 0
From: Bham WA
The a couple cuting discs and a hours later they look like this.


Once the A-arms are in I can set the angle of the steering rods. I will need to spacer them down to match them.
Next I finally got my tires mounted. Yokahama S Drives 275/40/17 to commuting to the track and for non-slick use.

These things are huge. (next to some 245/40/18s)


Installed on the rear:


Once the A-arms are in I can set the angle of the steering rods. I will need to spacer them down to match them.
Next I finally got my tires mounted. Yokahama S Drives 275/40/17 to commuting to the track and for non-slick use.
These things are huge. (next to some 245/40/18s)
Installed on the rear:
Thread Starter
Newbie
Joined: Jun 2012
Posts: 50
Likes: 0
From: Bham WA
Next up it was A-Arm time. Gots these crazy arms from Willaim at TSS-Fab. These were a colaberation between the two of us and this is the first prototype set.

These arms have spherical joints both ends so the first thing I had to make was some new ball joints that could fit them. I took some Whiteline Roll Center joints that my freind cross threaded and cut them apart..

Next I got a huge 7/8"x5" bolt to fit inside the body. First I had to grind the head to get it to fit.

Here is it next to the original before welding. Its long long because I want the ball joint to not be seating in threads so this will be cut down. The oringinal Whiteline one looks so wimpy.. haha

Couple welding pics...


These arms have spherical joints both ends so the first thing I had to make was some new ball joints that could fit them. I took some Whiteline Roll Center joints that my freind cross threaded and cut them apart..
Next I got a huge 7/8"x5" bolt to fit inside the body. First I had to grind the head to get it to fit.
Here is it next to the original before welding. Its long long because I want the ball joint to not be seating in threads so this will be cut down. The oringinal Whiteline one looks so wimpy.. haha
Couple welding pics...
Thread Starter
Newbie
Joined: Jun 2012
Posts: 50
Likes: 0
From: Bham WA
Here it is shaved down w/ spacers installed with the new arm..


Then the front wheel went on to check the fit.


And lastly before I got I did get a couple more parts in... Got in my pair of aftermarket front fenders. A little cutting and fitting in here is a couple teaser shots of whats to come. They are mounted 1.5" lower then the OE flare to tuck the rear tire for better air flow. These will be bolted on and I will be modifying the door to bring the original flare farther forward. They will be bolted on but they are metal so they are strong.


Anyways hope this will hold you guys over for a few days while I puck top get the GC8 finished up to get painted.
Johann
Then the front wheel went on to check the fit.
And lastly before I got I did get a couple more parts in... Got in my pair of aftermarket front fenders. A little cutting and fitting in here is a couple teaser shots of whats to come. They are mounted 1.5" lower then the OE flare to tuck the rear tire for better air flow. These will be bolted on and I will be modifying the door to bring the original flare farther forward. They will be bolted on but they are metal so they are strong.
Anyways hope this will hold you guys over for a few days while I puck top get the GC8 finished up to get painted.
Johann
Thread Starter
Newbie
Joined: Jun 2012
Posts: 50
Likes: 0
From: Bham WA
Hey its update time!!!
I'll start off with the pics of it on the ground and the ride height pretty much set.


Sat there and looked at it for a while and then it was back on the jack stands...
First thing I tackled was making some modifications to my quick steer brakets. Because the TSS-FAB front crossmemeber has a 2nd higher mounting point for the A-Arm to allow a stock height suspension angle but with the car lowered 3-4" the tie rod were no longer at the same angle and the as the wheel traveled up and down it was towing in and out.

So I lowered its mouting point to match the arm and now the tire stays strait. Everything is welded together to make it as stong as possible and I also added a few extra pieces to make it stronger where it mounts to the hub.
I'll start off with the pics of it on the ground and the ride height pretty much set.
Sat there and looked at it for a while and then it was back on the jack stands...
First thing I tackled was making some modifications to my quick steer brakets. Because the TSS-FAB front crossmemeber has a 2nd higher mounting point for the A-Arm to allow a stock height suspension angle but with the car lowered 3-4" the tie rod were no longer at the same angle and the as the wheel traveled up and down it was towing in and out.
So I lowered its mouting point to match the arm and now the tire stays strait. Everything is welded together to make it as stong as possible and I also added a few extra pieces to make it stronger where it mounts to the hub.
Thread Starter
Newbie
Joined: Jun 2012
Posts: 50
Likes: 0
From: Bham WA
So my shop is getting pretty cluttered with parts. GC8 parts, ForeSTAR parts, Corollarussan parts etc so I had to make some space and install the fuel cell. I really wanted to use the stock fuel level gauge so I didn't have a unworking gauge in my cluster. So first I removed the fuel pump carrier and shortened it to the fuel cells hieght.

Then I cut the mounting flange out of a spare OEM fuel tank and then installed it into the cell.

Made a couple carrier pieces and done... Mounted it just behind the sway bar on the passenger side to help with the weight distribution.


The new filler point. I have a flush mount filler cap that will be installed in the corner in the lexan looks pretty good.
Next I finished up the tranny crossmeber by adding in the 2 rear mount points for the tranny.

and then to finish yesterday out I cut and modified the header to fit my forward mount turbo kit. This is an un-equal length twin scroll setup so it should sound pretty interesting to say the least. Removed 2 90deg bends and only added about 2" of pipe so flow is much better and with how much that will be removed from the up-pipe it will be a vast improvment over the stock location.


Stay tuned I'll have more updates tomorrow. I have a crapload of parts coming into me this week and with the GC8 gone for 2-3 weeks a lot of time to make up some ground.
Johann
Then I cut the mounting flange out of a spare OEM fuel tank and then installed it into the cell.
Made a couple carrier pieces and done... Mounted it just behind the sway bar on the passenger side to help with the weight distribution.
The new filler point. I have a flush mount filler cap that will be installed in the corner in the lexan looks pretty good.
Next I finished up the tranny crossmeber by adding in the 2 rear mount points for the tranny.
and then to finish yesterday out I cut and modified the header to fit my forward mount turbo kit. This is an un-equal length twin scroll setup so it should sound pretty interesting to say the least. Removed 2 90deg bends and only added about 2" of pipe so flow is much better and with how much that will be removed from the up-pipe it will be a vast improvment over the stock location.
Stay tuned I'll have more updates tomorrow. I have a crapload of parts coming into me this week and with the GC8 gone for 2-3 weeks a lot of time to make up some ground.
Johann