
The ForeSTAR Project


Thread Starter
Newbie
Joined: Jun 2012
Posts: 50
Likes: 0
From: Bham WA
The ForeSTAR Project
Hey all. I know this is a Evo forum and I have stayed away for a long but a few of my Evo friends have convinced me to post my lastest build here. I used to work for Girodisc and some of you may remember a couple of the cars I have posted on here.
I built the Girodisc EVO X:

And the project that was posted under that name the Celaru STi:

I'd like to say now before we get started that both these projects and any others posted while I was working at Girodisc were my personal projects that I posted under their name to boost the shops image.
Anyway...
The car used to be a buddies of mine. About 5 years ago after my wagon was killed. I bought an 03 Wagon to rebuild it. Since I still had all the go fast bits out of my wagon I sold and installed all the parts into this Forester. My buddy drove it around for a long time trouble free and it was very dependable. Recently he decided it was time for him to swap up to an STi. He wanted something stock and fast so I offered to buy his Forester to use as my dedicated Auto X/ Track Car.
I had been Auto Xing the Legacy for a while now and it was performing great but the ride was a bit hard, the gearing was way to low for good freeway runs and yes it was fast and relatively comfortable, but it wasn't really what I envisioned the car to be. So this winter the Forester is going to get the full race car treatment and parts will be coming off the Legacy so I can soften the Legacy back up so its a better hwy cruiser/ dd.
So on to the build. The Class I like to Auto X in is C1 XP an for track use I will probably start by just doing club days. Here is the current parts list that I have.
Engine:
STI Long Block
CP 10:1 Pistons
Eagle Rods
Killer Bee Oil Pickup
Cosworth Oil Baffle
4qt Accusump
Unorthodox Crank Pulley
Unorthodox Alternator Pulley
Unorthodox P/S Pulley
Custom Modded Tomei Replica Manifold
Injector Dynamics 1000cc Injectors
Turbo/ Exhaust:
20g XT 7cm w/ 3" Inlet
Custom Forward Facing Turbo Setup
Custom V-Mount Intercooler Setup
Custom Side Exit Exhaust
Drivetrain/ Brakes:
Ver 7 RA Spec-C Non-Dccd 6mt
05 STi 5x114.3 Hubs
ACT Prolite Flywheel
Exedi Certametallic Clutch
Agency Power Short Shifter
Driveshaft Shop Aluminum 1pc Driveshaft
STi Brembo Brake Calipers
Girodisc 2pc Front Rotors
Girodisc 2pc Rear Rotors
Girodisc SS Lines
Girodisc Maxi Pads
Custom ABS Delete
Custom Brake Lines
Suspension:
Stance XR Coilovers
Perrin Rear Stiff Sway Bar Mounts
TSS Fab Custom Front Crossmemeber
TSS Fab Custom A-Arms
TSS Fab Custom Tranny X-Member
TSS Fab Custom Rear T-Bar
TSS Fab Custom Rear X Member
TSS Fab Adjustable Control Arms
TSS Fab Adjustable Lateral Links
Custom Quick Steer Links
Custom Steering Rod Ties
Custom Stitch Welded Chassis
Custom Smooth Bottom Paneling
Whiteline Steering Rack Bushings
Whiteline 24mm Front Sway Bar
Whiteline 27mm Rear Sway Bar
TSS-Fab Front Endlinks
TSS-Fab Rear Endlinks
Kartboy Shifter Bushings
Kartboy Subframe Lock Nuts
Wheels/ Tires:
Daily: Replica Wheels 17x10.5 +27 on 275 40 17 Yokahama S Drives
Race: Replica Wheels 17x10.5 +27 on 275/35/18 Hankook Z214
Exterior/ Weight Reduction/ Safety:
Lexan Windows
Gutted Front Doors
Bolt On Rear Door Skins
Gutted Hatch
VIS Carbon Fiber 02 Forester Tracer Hood
Custom Fitted 06 Mercury Mariner Front Bumper
Custom Aluminum Rear Diffuser
Custom Carbon Rear Spoiler
Custom Aall Metal Fender Flares
6pt Roll Cage
NRG FRP Bucket Seats
STi Dash
Shaved Harness
Fusebox/ Battery/ ABS Pump Located in Cabin
etc....
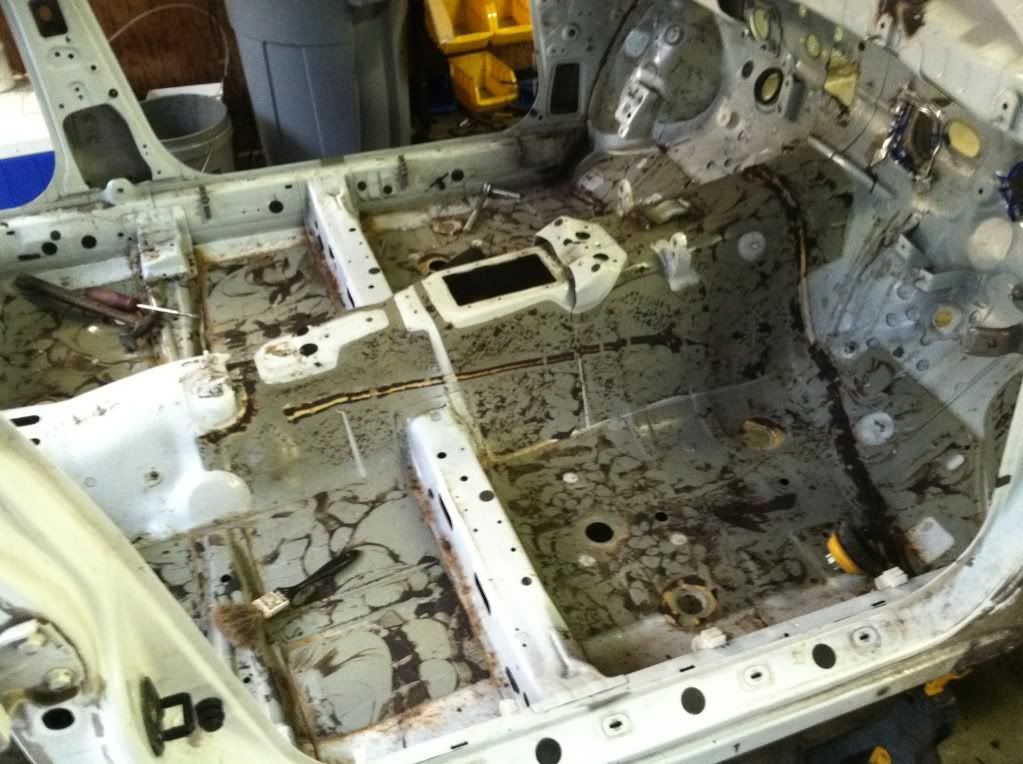
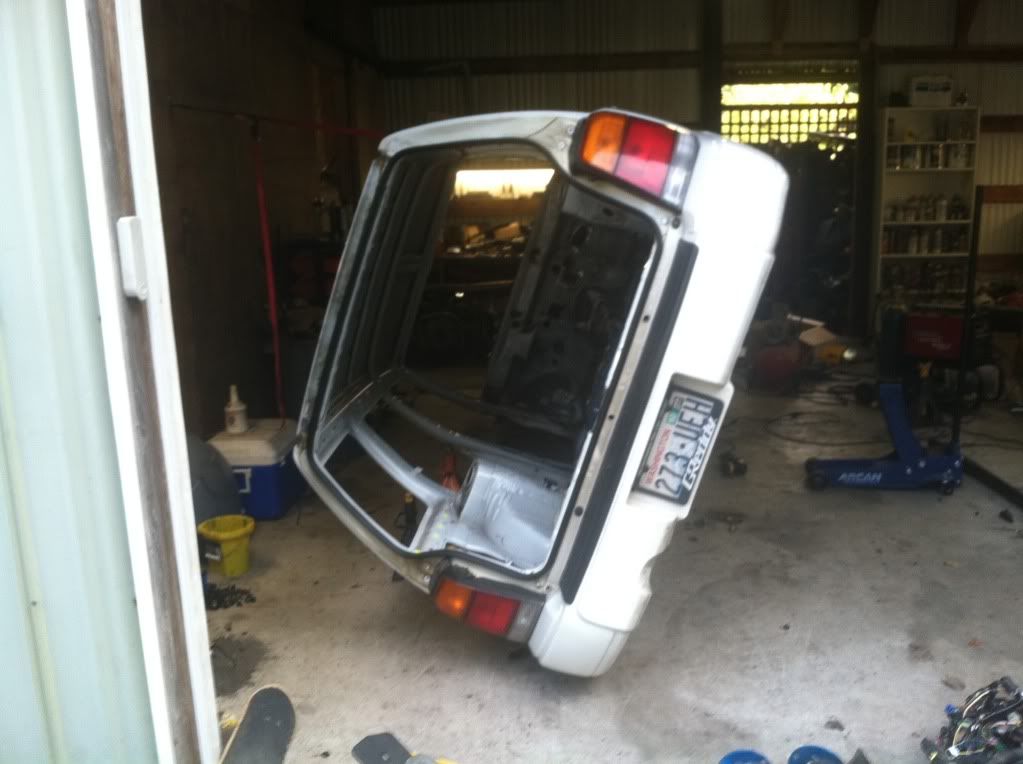
So I started the Project Yesterday by starting the tear down. Many of the original parts are going to be sold off and some of it already is. What I don't sell I will use the replace the Auto X parts coming off the Legacy.
Here is what She looked like before I started:


And 2 hours Later...


Johann
I built the Girodisc EVO X:
And the project that was posted under that name the Celaru STi:
I'd like to say now before we get started that both these projects and any others posted while I was working at Girodisc were my personal projects that I posted under their name to boost the shops image.
Anyway...
The car used to be a buddies of mine. About 5 years ago after my wagon was killed. I bought an 03 Wagon to rebuild it. Since I still had all the go fast bits out of my wagon I sold and installed all the parts into this Forester. My buddy drove it around for a long time trouble free and it was very dependable. Recently he decided it was time for him to swap up to an STi. He wanted something stock and fast so I offered to buy his Forester to use as my dedicated Auto X/ Track Car.
I had been Auto Xing the Legacy for a while now and it was performing great but the ride was a bit hard, the gearing was way to low for good freeway runs and yes it was fast and relatively comfortable, but it wasn't really what I envisioned the car to be. So this winter the Forester is going to get the full race car treatment and parts will be coming off the Legacy so I can soften the Legacy back up so its a better hwy cruiser/ dd.
So on to the build. The Class I like to Auto X in is C1 XP an for track use I will probably start by just doing club days. Here is the current parts list that I have.
Engine:
STI Long Block
CP 10:1 Pistons
Eagle Rods
Killer Bee Oil Pickup
Cosworth Oil Baffle
4qt Accusump
Unorthodox Crank Pulley
Unorthodox Alternator Pulley
Unorthodox P/S Pulley
Custom Modded Tomei Replica Manifold
Injector Dynamics 1000cc Injectors
Turbo/ Exhaust:
20g XT 7cm w/ 3" Inlet
Custom Forward Facing Turbo Setup
Custom V-Mount Intercooler Setup
Custom Side Exit Exhaust
Drivetrain/ Brakes:
Ver 7 RA Spec-C Non-Dccd 6mt
05 STi 5x114.3 Hubs
ACT Prolite Flywheel
Exedi Certametallic Clutch
Agency Power Short Shifter
Driveshaft Shop Aluminum 1pc Driveshaft
STi Brembo Brake Calipers
Girodisc 2pc Front Rotors
Girodisc 2pc Rear Rotors
Girodisc SS Lines
Girodisc Maxi Pads
Custom ABS Delete
Custom Brake Lines
Suspension:
Stance XR Coilovers
Perrin Rear Stiff Sway Bar Mounts
TSS Fab Custom Front Crossmemeber
TSS Fab Custom A-Arms
TSS Fab Custom Tranny X-Member
TSS Fab Custom Rear T-Bar
TSS Fab Custom Rear X Member
TSS Fab Adjustable Control Arms
TSS Fab Adjustable Lateral Links
Custom Quick Steer Links
Custom Steering Rod Ties
Custom Stitch Welded Chassis
Custom Smooth Bottom Paneling
Whiteline Steering Rack Bushings
Whiteline 24mm Front Sway Bar
Whiteline 27mm Rear Sway Bar
TSS-Fab Front Endlinks
TSS-Fab Rear Endlinks
Kartboy Shifter Bushings
Kartboy Subframe Lock Nuts
Wheels/ Tires:
Daily: Replica Wheels 17x10.5 +27 on 275 40 17 Yokahama S Drives
Race: Replica Wheels 17x10.5 +27 on 275/35/18 Hankook Z214
Exterior/ Weight Reduction/ Safety:
Lexan Windows
Gutted Front Doors
Bolt On Rear Door Skins
Gutted Hatch
VIS Carbon Fiber 02 Forester Tracer Hood
Custom Fitted 06 Mercury Mariner Front Bumper
Custom Aluminum Rear Diffuser
Custom Carbon Rear Spoiler
Custom Aall Metal Fender Flares
6pt Roll Cage
NRG FRP Bucket Seats
STi Dash
Shaved Harness
Fusebox/ Battery/ ABS Pump Located in Cabin
etc....
So I started the Project Yesterday by starting the tear down. Many of the original parts are going to be sold off and some of it already is. What I don't sell I will use the replace the Auto X parts coming off the Legacy.
Here is what She looked like before I started:
And 2 hours Later...
Johann
Thread Starter
Newbie
Joined: Jun 2012
Posts: 50
Likes: 0
From: Bham WA
Got some more work done. Engine is ready to pull, suspension is ready to come out and I got some more work done on the interior.

Here's a pic of the shop. The car next to it is getting a few parts of the fozzy to help pay for the initial cost of buying it and then its getting a nice helping of Johann flare.
Smooth Engine Bay
Tucked Brake Lines
Tucked Wiring
Custom Roll Cage
Full WRX Wiring Swap
Full WRX Dash Conversion
Ver 7 JDM STi Motor Swap
05 STi Brembo Brake Conversion
Custom Fender Flares
18x10 Rota SVNr w/ 255/35/18

I'll post up some pics when its closer to getting put back together.
Here's a pic of the shop. The car next to it is getting a few parts of the fozzy to help pay for the initial cost of buying it and then its getting a nice helping of Johann flare.
Smooth Engine Bay
Tucked Brake Lines
Tucked Wiring
Custom Roll Cage
Full WRX Wiring Swap
Full WRX Dash Conversion
Ver 7 JDM STi Motor Swap
05 STi Brembo Brake Conversion
Custom Fender Flares
18x10 Rota SVNr w/ 255/35/18
I'll post up some pics when its closer to getting put back together.
Thread Starter
Newbie
Joined: Jun 2012
Posts: 50
Likes: 0
From: Bham WA
Got a bit of work done to the fozzy the last few days. Finished stripping it out and its ready to be put on her side so I can strip all the undercoating off and stitch weld it. I have to spend this week working on the GC sitting next to it but maybe this weekend I'll start stripping the underside down.


Yesterday took an 8hr drive in the Zombie Killa to go pick up some parts for her. Picked up an 05 STi engine, a full harness, gas tank, steering column, dash etc...
I'll be tearing into this harness in a week or so and taking all the covering off it so I can start cutting out all the crap I don't need.
Johann
Thread Starter
Newbie
Joined: Jun 2012
Posts: 50
Likes: 0
From: Bham WA
Got my ol trusty hammer and big screw driver and got to work on the sound proofing.
Next wheel be taking a wire wheel to all of it and getting the remainder off. I'll do that once all the metal that I am going to remove is off so I am not wasting time cleaning parts I don't even plan to keep. After I finished I removed the windshield and side windows. This is the result of a couple hours of work...
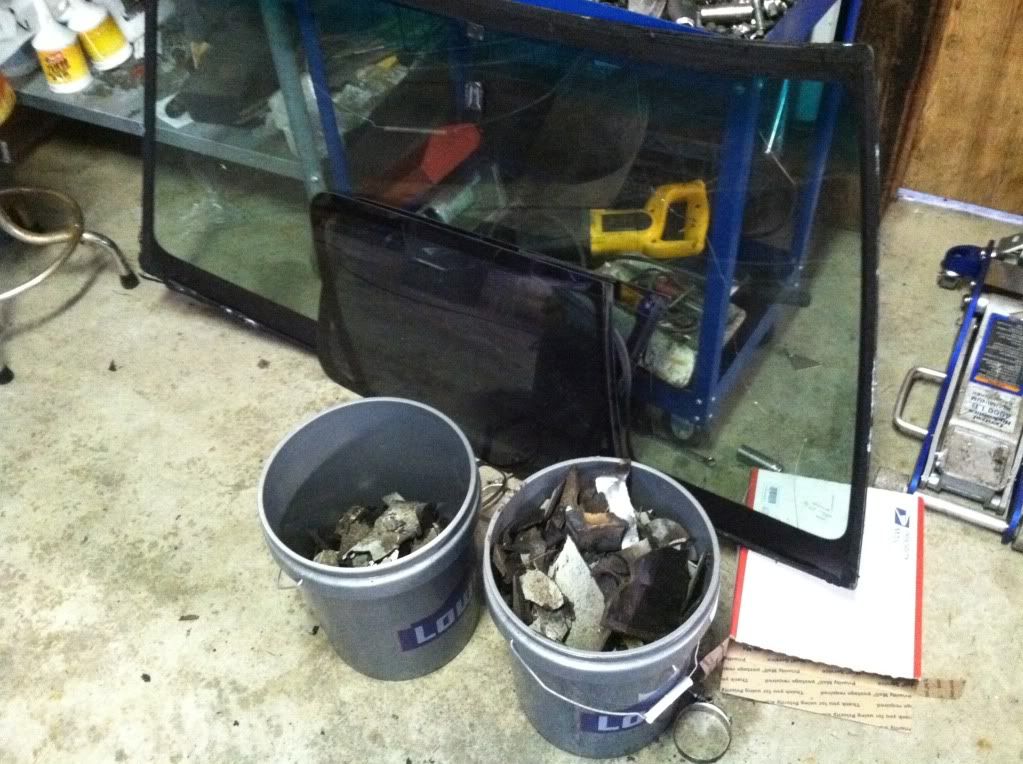
After I finished I weighed the sound proofing and amazing I removed 49lbs of weight alone. The glass as another 55lbs so total for the day was 104lbs! Not to shabby.
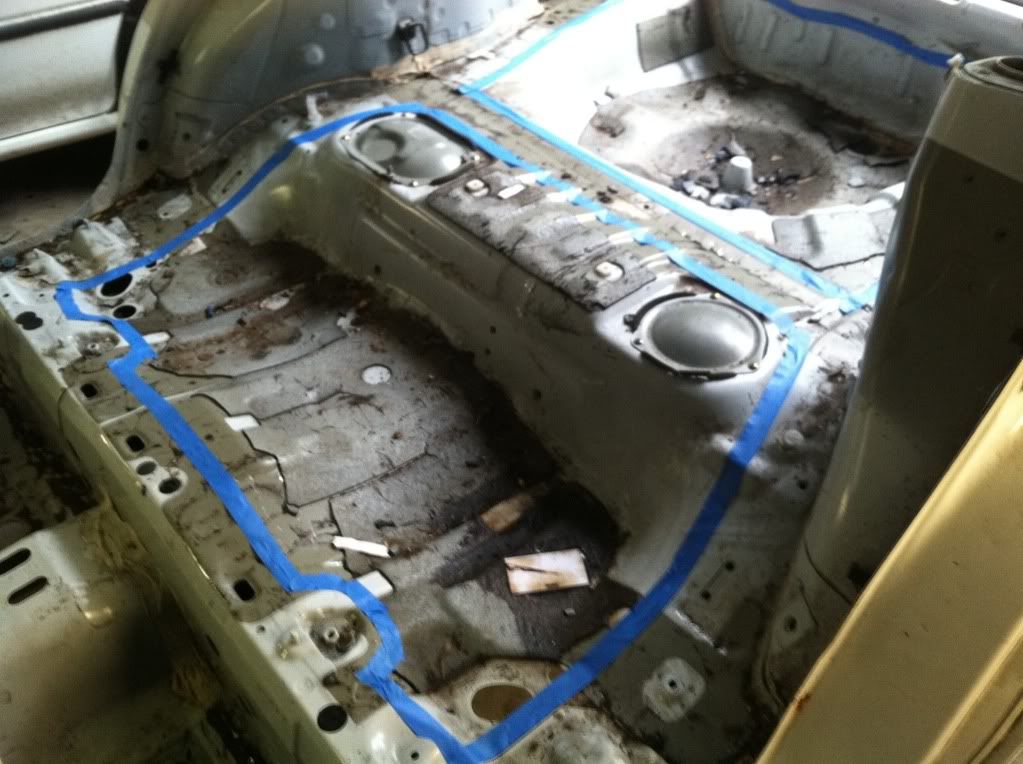
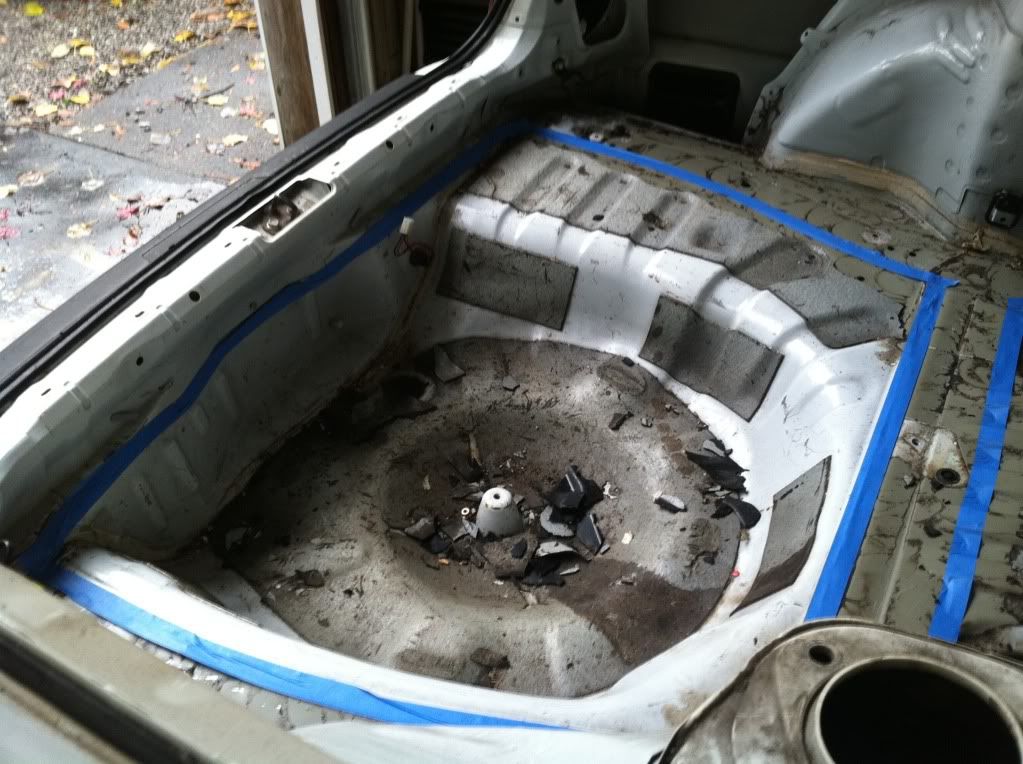
Next I marked the 2 floor pieces that I am going to remove and replace with some much lighter aluminum. pieces. I am leaving the stock gas tank cradle strap points for now. I have my new spot-weld bits ordered up so I can get the pieces inside removed. I am confident I can pull another 100 or so pounds out of the chassis before I even start pulling off undercoating pieces out of the engine bay.
Johann
Next wheel be taking a wire wheel to all of it and getting the remainder off. I'll do that once all the metal that I am going to remove is off so I am not wasting time cleaning parts I don't even plan to keep. After I finished I removed the windshield and side windows. This is the result of a couple hours of work...
After I finished I weighed the sound proofing and amazing I removed 49lbs of weight alone. The glass as another 55lbs so total for the day was 104lbs! Not to shabby.
Next I marked the 2 floor pieces that I am going to remove and replace with some much lighter aluminum. pieces. I am leaving the stock gas tank cradle strap points for now. I have my new spot-weld bits ordered up so I can get the pieces inside removed. I am confident I can pull another 100 or so pounds out of the chassis before I even start pulling off undercoating pieces out of the engine bay.
Johann
Thread Starter
Newbie
Joined: Jun 2012
Posts: 50
Likes: 0
From: Bham WA
Got a bit of work done this weekend. My buddy (the previous owner) said if he could help that he would so I cashed in on some volunteer work so I could work on the GC. Need to start removing all the undercoating from the underside and laying on my back is not very fun. So we made a poor-mans lift. The car actually balances at his angle but I strapped it to make sure. Soon i'll have pics of the stripped underside and I have been trying to keep all the debris so I can weigh it. They say its around 40-50lbs if you take it all off and I intend to so I guess we'll see. Then it will be stitch welding time!

I need to get the GC ready to head off to paint on the 14th but once that's done the Forester will get about 2 weeks of strait work so I can get the chassis done and hopefully painted so I can start making it a roller again. I have some parts ordered up and on there way so fabrication time will begin shortly after the GC is finished.
I need to get the GC ready to head off to paint on the 14th but once that's done the Forester will get about 2 weeks of strait work so I can get the chassis done and hopefully painted so I can start making it a roller again. I have some parts ordered up and on there way so fabrication time will begin shortly after the GC is finished.
Thread Starter
Newbie
Joined: Jun 2012
Posts: 50
Likes: 0
From: Bham WA
So the GC8 Project is off to paint which is going to give me a couple weeks to give the forester some love. Spend about half the day after the GC left getting started on more chassis fun.
Started be removing some of the undercoating:


So far from what I have removed (about 30%) its about 8lbs. So when its all finished the removal of the undercoating will drop about 30lbs but the real reason for this is to get at the panels to stitch weld them. So a couple pounds added back in but for a rigid chassis its worth it.
I finished the day off by busting out my new spot weld removal bits and they work great. Got a few of the pieces off that I will not be neededing:

Just in this pile here is 19lbs of un-needed metal. I have at least another 20lbs to pull off the passenger side and then I will be removing their drivers side counterparts and with the addition of the pieces of the floor I marked for removal it should get me a total of around 80-110lbs dropped off the car. This does not include any of the front core support that has yet to be removed. Willain at TSS-Fab has started work on my cross-members. I will be getting the full monty of stronger lighter crossmembers so once those are here I can remove the suspsnsion and drivetrain pieces off the Legacy and get this back into a roller. By they time the GC will be back so I will be pushing hard to finished that so I can get a payday and start ordering more parts and materials.
More updates soon to follow.
Johann
Started be removing some of the undercoating:
So far from what I have removed (about 30%) its about 8lbs. So when its all finished the removal of the undercoating will drop about 30lbs but the real reason for this is to get at the panels to stitch weld them. So a couple pounds added back in but for a rigid chassis its worth it.
I finished the day off by busting out my new spot weld removal bits and they work great. Got a few of the pieces off that I will not be neededing:
Just in this pile here is 19lbs of un-needed metal. I have at least another 20lbs to pull off the passenger side and then I will be removing their drivers side counterparts and with the addition of the pieces of the floor I marked for removal it should get me a total of around 80-110lbs dropped off the car. This does not include any of the front core support that has yet to be removed. Willain at TSS-Fab has started work on my cross-members. I will be getting the full monty of stronger lighter crossmembers so once those are here I can remove the suspsnsion and drivetrain pieces off the Legacy and get this back into a roller. By they time the GC will be back so I will be pushing hard to finished that so I can get a payday and start ordering more parts and materials.
More updates soon to follow.
Johann
Thread Starter
Newbie
Joined: Jun 2012
Posts: 50
Likes: 0
From: Bham WA
Okay I finally have time to get to this. So I got some more of the undercoating off.

Managed to cut out the pieces in the floor I wanted to remove.

So far we are at 86lbs for the scrap metal that has been removed off the chassis.

Next I am going to take as much off the Legacy as I can so next week when I get it back into a roller and off its side.
Johann
Managed to cut out the pieces in the floor I wanted to remove.
So far we are at 86lbs for the scrap metal that has been removed off the chassis.
Next I am going to take as much off the Legacy as I can so next week when I get it back into a roller and off its side.
Johann
Trending Topics
Thread Starter
Newbie
Joined: Jun 2012
Posts: 50
Likes: 0
From: Bham WA
Hey all. So after a couple days of some of the most tedious work I will be doing on this project the underside has been stripped and the chassis stitch welded. A nice coat of gloss black paint finishes her off. Bring on the TSS- Fab Parts!


Johann
Johann
Thread Starter
Newbie
Joined: Jun 2012
Posts: 50
Likes: 0
From: Bham WA
Okay update time. I have been having some problems with my photobucket account but it has been resloved so this will be a big update.
We'll start with the more lightening. The front doors w/ glass weighed in at 81lbs each. Very heavy. After some magic with the cuting disc and saw I managed to get that down to a respectable 20lbs a piece.

Hinges and latch still installed so tghey function as working doors. The rear doors and hatch are a different story. Because of my class the doors must function as doors but they do not need handles and latches so the can be bolted to the chassis. So I removed everything to make them a skin and just kept the mounting point for the hinges so once unbloted they could still swing open. The rear doors came in at 55lbs each stock. Dropped that to 7lbs a piece but I still need to add a pound of lexan.

The Hatch came in at 57lbs and I got that to 12lbs but this will get some lexan as well. So total weight savings give or take a pound after lexan will be around 259lbs total.


Not to shabby. Still have another 40-50lbs from the chassis to pull so it will be on a nice hefty diet. Not to mention everything thats going back in is getting the Atkins aswell. Wiring, dash, seats, battery, crossmembers, driveshaft, brakes, engine parts etc..
And she still looks pretty much stock... for now lol.

Johann
We'll start with the more lightening. The front doors w/ glass weighed in at 81lbs each. Very heavy. After some magic with the cuting disc and saw I managed to get that down to a respectable 20lbs a piece.
Hinges and latch still installed so tghey function as working doors. The rear doors and hatch are a different story. Because of my class the doors must function as doors but they do not need handles and latches so the can be bolted to the chassis. So I removed everything to make them a skin and just kept the mounting point for the hinges so once unbloted they could still swing open. The rear doors came in at 55lbs each stock. Dropped that to 7lbs a piece but I still need to add a pound of lexan.
The Hatch came in at 57lbs and I got that to 12lbs but this will get some lexan as well. So total weight savings give or take a pound after lexan will be around 259lbs total.
Not to shabby. Still have another 40-50lbs from the chassis to pull so it will be on a nice hefty diet. Not to mention everything thats going back in is getting the Atkins aswell. Wiring, dash, seats, battery, crossmembers, driveshaft, brakes, engine parts etc..
And she still looks pretty much stock... for now lol.
Johann
Thread Starter
Newbie
Joined: Jun 2012
Posts: 50
Likes: 0
From: Bham WA
Next I finally got to the point were I could do some fab work and get some parts in. First part on the list is the v-mount. Its a pretty nice bid of kit. Radiator comes with an oil cooler built into the bottom rows. It retains the lower radiator hose location and comes with an extention piece to modify the upper rad hose. Taped mounting brakets for the dual 12" fans and a nice assortment of mounting brackets. Also came with an aluminum overflow tank. Intercooler pipes are nice as well. Correct sizing and also comes with an intake pipe.


Now this was designed to bolt into a wrx/sti so obviously there is a little modding needed to fit the Forester so after drilling some holes and making a mounting tab it fit snug as a bug. Still have to do some more mounting and there will be some other modding too but it fits really nice.


Once I get my bumper in a week or 2 I can do the aluminum bumper support and air ducting. I'll be closing everything off so the air can't go anywhere but into the rad and intercooler with some nice streemline pieces. Much like I did for my old Ae86 v-mount...

So next I'll be doing some more tedious stuff while I wait for some parts to get here. Cleaning up the window flanges so I can get them ready for lexan. Removing the last pieces of metal out of the interior and cleaning it up to paint. Modding the firewall and tubing the front. Cutting out the rear for wider tires. Got the parts off the Legacy but most of them are going to powdercoat along with the TSS crossmembers. Once William has them done it will be a fast frenzy to get the car into a roller and have the suepsnion and drivetrain finished. So Hopfully before the new year the cars underside will be pretty much buttoned up and even more hopfully some of the parts I have for sale will sell so I can get some of the bigger items orded like the turbo setup so I can do all that fab work. The list is long, but I am determined to get this done before the end of Jan so long as funds are availible. If any of you are looking for parts check out me for sale threads or pm me if I don't have it I can find it. Keep the ForeSTAR build thread moving! lol
Johann
Now this was designed to bolt into a wrx/sti so obviously there is a little modding needed to fit the Forester so after drilling some holes and making a mounting tab it fit snug as a bug. Still have to do some more mounting and there will be some other modding too but it fits really nice.
Once I get my bumper in a week or 2 I can do the aluminum bumper support and air ducting. I'll be closing everything off so the air can't go anywhere but into the rad and intercooler with some nice streemline pieces. Much like I did for my old Ae86 v-mount...
So next I'll be doing some more tedious stuff while I wait for some parts to get here. Cleaning up the window flanges so I can get them ready for lexan. Removing the last pieces of metal out of the interior and cleaning it up to paint. Modding the firewall and tubing the front. Cutting out the rear for wider tires. Got the parts off the Legacy but most of them are going to powdercoat along with the TSS crossmembers. Once William has them done it will be a fast frenzy to get the car into a roller and have the suepsnion and drivetrain finished. So Hopfully before the new year the cars underside will be pretty much buttoned up and even more hopfully some of the parts I have for sale will sell so I can get some of the bigger items orded like the turbo setup so I can do all that fab work. The list is long, but I am determined to get this done before the end of Jan so long as funds are availible. If any of you are looking for parts check out me for sale threads or pm me if I don't have it I can find it. Keep the ForeSTAR build thread moving! lol
Johann
Thread Starter
Newbie
Joined: Jun 2012
Posts: 50
Likes: 0
From: Bham WA
Okay so after a long delay I have a good sized update. I have been really busy with other cars, winter apocolypse and just no time to sit down at the computer to post. We last left off with the V-Mount and weight reduction. I finished up the last of the weight loss in the engine bay. Removing the pitch mount location, fender wells, and center of the core suport to give more air to the V-Mount.

The engine will be on some custom solid motor and tranny mounts so there is no need for the pitch mount. The fender wells I cut out because the car is going to be tubed but not in the way ots normally done. I have decided to try something new and take some large plastic barrels and cut the tube piece out of them. They will be bolted on. I'll do some strengthing to the frame and tower to make the lip for the tube to bolt to but there is very little flex now that its stitch welded. They will be light. Cheap to replace if they get torn out and best of all much quieter then a steal or aluminum tub.
Next it was roll cage and interior time. Upon my last visit to William at TSS-Fab to drop off the rest of my suspsion bits before my crossmember head to power he bent me up a few pieces of DOM pipe to make my cage.

Next was to clean off all the rements of the sound proofing. The last step before paint will be some carb cleaner and scuff. I'll be covering the floor pan with traction tape once the cage is finished and seat mounts are welded in.

Trimmed and fitted the hoop. Like a glove Willaim really knows his stuff.

Next was to install the side intrusion beams. Willaim had the idea of going on the outside of the B-pillar and welding it like the new Mini WRC car. So I started by notching the B-Pillar.

The engine will be on some custom solid motor and tranny mounts so there is no need for the pitch mount. The fender wells I cut out because the car is going to be tubed but not in the way ots normally done. I have decided to try something new and take some large plastic barrels and cut the tube piece out of them. They will be bolted on. I'll do some strengthing to the frame and tower to make the lip for the tube to bolt to but there is very little flex now that its stitch welded. They will be light. Cheap to replace if they get torn out and best of all much quieter then a steal or aluminum tub.
Next it was roll cage and interior time. Upon my last visit to William at TSS-Fab to drop off the rest of my suspsion bits before my crossmember head to power he bent me up a few pieces of DOM pipe to make my cage.
Next was to clean off all the rements of the sound proofing. The last step before paint will be some carb cleaner and scuff. I'll be covering the floor pan with traction tape once the cage is finished and seat mounts are welded in.
Trimmed and fitted the hoop. Like a glove Willaim really knows his stuff.
Next was to install the side intrusion beams. Willaim had the idea of going on the outside of the B-pillar and welding it like the new Mini WRC car. So I started by notching the B-Pillar.
Thread Starter
Newbie
Joined: Jun 2012
Posts: 50
Likes: 0
From: Bham WA
Next up was notching the door so it would fit. I wanted the bar to be as high as it could so I cut and reworked the door latch. Took some work but it works like a charm. Just can lock the doors anymore...

Made a small based stud pipe for the front mount. It will later tie intop the dash support beam.

Front door notched and fits like a glove.


You can see that the bar takes up almost no interior space so the drive and passenger will have lots of room and distance between the seat and the bar.


This design is great because it not only give more space it also ties the b-pillar in to help with side impact on top of adding a ton of stiffness to the chassis.
Next up was the rear bars and the cross bar.

I'll be getting some smaller diameter pipe to make a harness bar, a welded rear strut tower/ x-brace, and a x-brace to tie the to rear bars. I don't need a cage for Auto-X but I want it for club days and track events. I weighs about 70lbs with the other pieces I havent installed included so its pretty light as well. Better safe then sorry.
X-members from TSS-Fab are done with some possible custom additions to come later. Suspension pieces are at powder with the TSS goodies. Wheels are ordered on on there way so I can make it al roller as soon as the suspension parts come back. I'll be ordering some seats probubly next week. Once the cage is done and the seats are hear I can finished the interior fab and paint interior and cage. Then it will be onto wiring and stripping the harness down. Dash install and all that and once the suspension pieces come in its full throttle to get the suspension, tranny, and engine in so I can get it into a roller to make the fender flares and turbo/ exhaust system. Its going to get hot in here in the next few weeks.
Stay tuned.
Johann
Made a small based stud pipe for the front mount. It will later tie intop the dash support beam.
Front door notched and fits like a glove.
You can see that the bar takes up almost no interior space so the drive and passenger will have lots of room and distance between the seat and the bar.
This design is great because it not only give more space it also ties the b-pillar in to help with side impact on top of adding a ton of stiffness to the chassis.
Next up was the rear bars and the cross bar.
I'll be getting some smaller diameter pipe to make a harness bar, a welded rear strut tower/ x-brace, and a x-brace to tie the to rear bars. I don't need a cage for Auto-X but I want it for club days and track events. I weighs about 70lbs with the other pieces I havent installed included so its pretty light as well. Better safe then sorry.
X-members from TSS-Fab are done with some possible custom additions to come later. Suspension pieces are at powder with the TSS goodies. Wheels are ordered on on there way so I can make it al roller as soon as the suspension parts come back. I'll be ordering some seats probubly next week. Once the cage is done and the seats are hear I can finished the interior fab and paint interior and cage. Then it will be onto wiring and stripping the harness down. Dash install and all that and once the suspension pieces come in its full throttle to get the suspension, tranny, and engine in so I can get it into a roller to make the fender flares and turbo/ exhaust system. Its going to get hot in here in the next few weeks.
Stay tuned.
Johann
Thread Starter
Newbie
Joined: Jun 2012
Posts: 50
Likes: 0
From: Bham WA
Hey all. So after a long wait I finally have some parts in. Got my solid motor mounts. My buddy had some made for his car (GC8 w/ 618 whp) and had an extra set made to I jumped on them. So sick.

Also my new seats came in. NRG FRP large bucket seats. They fit 34-36 waist and they are super comfy. They are not the end all be all racing seat but with a limited buget they fit the bill and will get me going. They really are well made.

New bumper. 05-07 Mercury Mariner. It will take some work to get it to fit but its going to look sweet when its done. Much larger air gap and lower then the OE bumper. Also plastic so it should be able to take a beating. Also cheaper and lighter then a crappy fiberglass forester knock off.

And I saved the best for last. My TSS-Fab Crossmembers and powdercoated suspension parts. These things are so badass.

They allow me to lower my car almost 3" and still retain the stock suspension geometry. Way lighter and stronger then stock and all the links have high quality joints. I also have a tranny crossmember but it needs to be finished on the car before it gets a florecent powdercoating. Couple other parts from TSS are still in the works. Custom A-Arms w/ caster adjustment, custom front hubs with inset tie rod mounts to get faster steering, and custom rear hubs that will utilize the front 05+ bolt on hub. These are going to be a lifesaver at the track and it also relocates the strut mounting location over the center line of the axle for more strength. These are going to be some really sick pieces and I can't wait to see what Willaim comes up with.
So I am not sure when I am going to get these installed as I am waiting for a couple back ordered joints and for one of my dampers to come back from a rebuild but if you're bored you can bounce back over to my swapped widebody GC build as I finally got that back at the shop to finish up. More updates soon. I hope to order a couple more big parts once a couple other ones sell.
Johann
Also my new seats came in. NRG FRP large bucket seats. They fit 34-36 waist and they are super comfy. They are not the end all be all racing seat but with a limited buget they fit the bill and will get me going. They really are well made.
New bumper. 05-07 Mercury Mariner. It will take some work to get it to fit but its going to look sweet when its done. Much larger air gap and lower then the OE bumper. Also plastic so it should be able to take a beating. Also cheaper and lighter then a crappy fiberglass forester knock off.
And I saved the best for last. My TSS-Fab Crossmembers and powdercoated suspension parts. These things are so badass.
They allow me to lower my car almost 3" and still retain the stock suspension geometry. Way lighter and stronger then stock and all the links have high quality joints. I also have a tranny crossmember but it needs to be finished on the car before it gets a florecent powdercoating. Couple other parts from TSS are still in the works. Custom A-Arms w/ caster adjustment, custom front hubs with inset tie rod mounts to get faster steering, and custom rear hubs that will utilize the front 05+ bolt on hub. These are going to be a lifesaver at the track and it also relocates the strut mounting location over the center line of the axle for more strength. These are going to be some really sick pieces and I can't wait to see what Willaim comes up with.
So I am not sure when I am going to get these installed as I am waiting for a couple back ordered joints and for one of my dampers to come back from a rebuild but if you're bored you can bounce back over to my swapped widebody GC build as I finally got that back at the shop to finish up. More updates soon. I hope to order a couple more big parts once a couple other ones sell.
Johann
Thread Starter
Newbie
Joined: Jun 2012
Posts: 50
Likes: 0
From: Bham WA
Got a pic from Willaim at TSS of his top secret A-Arms hes makin me. Looks like these he'll be adding them to his line of other parts so at some point you to can be as cool as me. 

These will have adjustable caster and even a bit of camber as well. They will also have built in roll centers for lowered cars and include tie rods for the steering knuckle. There are a couple other parts he got up his sleeve as well so stay tuned.
Johann
These will have adjustable caster and even a bit of camber as well. They will also have built in roll centers for lowered cars and include tie rods for the steering knuckle. There are a couple other parts he got up his sleeve as well so stay tuned.
Johann
Thread Starter
Newbie
Joined: Jun 2012
Posts: 50
Likes: 0
From: Bham WA
Hey all. I have been working double shifts the past couple days. All day on the GC8 project and then a few hours on the foz to help get some progress done.
Got the rear hubs and diff out of the lego the other day so I started installing all the pretty suspension parts.
Started by re-assembling my coilovers:

Then I worked some weight out of the rear hub by cutting the dust sheild off. I want to do more but William and I have a couple ideas so I don't want to put a ton of time into these. Managed to pull 3.2lbs out of each one.

Then I lightly installed all the rear TSS-Fab goodies. Everything fit great. This stuff is so much lighter then the stock stuff.


and to add the cherry on top I installed one of the wheels to see what I would be working with in terms of fitment. Got a couple spacers to mimic the thickness of the rotor hat and BAM!


They look great but it looks like I am going to have to make a 1.5-2" flare to tuck these once the 275/40/17s are put on. I need to look around I don't know if I want to do a metal flare or a frp one. Bolt on or mold in. lol Needless to say I'll be spending a lot of time browsing the web looking for some or car I can jack parts off of to make mine wider for cheap haha.


Tomorrow I am going to try to find time to get the front xmember in and the drivers side fenderwells cleaned and painted. I haven't gotten around to it since I couldn't reach them when the foz on its side.
Johann
Got the rear hubs and diff out of the lego the other day so I started installing all the pretty suspension parts.
Started by re-assembling my coilovers:
Then I worked some weight out of the rear hub by cutting the dust sheild off. I want to do more but William and I have a couple ideas so I don't want to put a ton of time into these. Managed to pull 3.2lbs out of each one.
Then I lightly installed all the rear TSS-Fab goodies. Everything fit great. This stuff is so much lighter then the stock stuff.
and to add the cherry on top I installed one of the wheels to see what I would be working with in terms of fitment. Got a couple spacers to mimic the thickness of the rotor hat and BAM!
They look great but it looks like I am going to have to make a 1.5-2" flare to tuck these once the 275/40/17s are put on. I need to look around I don't know if I want to do a metal flare or a frp one. Bolt on or mold in. lol Needless to say I'll be spending a lot of time browsing the web looking for some or car I can jack parts off of to make mine wider for cheap haha.
Tomorrow I am going to try to find time to get the front xmember in and the drivers side fenderwells cleaned and painted. I haven't gotten around to it since I couldn't reach them when the foz on its side.
Johann