
The ForeSTAR Project


Thread Starter
Newbie
Joined: Jun 2012
Posts: 50
Likes: 0
From: Bham WA
Hey guys its update time!!! YAAAAY!!!!
ahem... Okay so we last left off with the header but I couldn't mount the turbo untill the coupler that I orderd arived so I started working on the bumper. Drilled out some holes and use an aluminum plate to hold the 2 halfs together.


I'll use a tiny bit of filler or a trim pirce to help fill the gap a little but it came out looking pretty good. Then my hose coupler arived!!
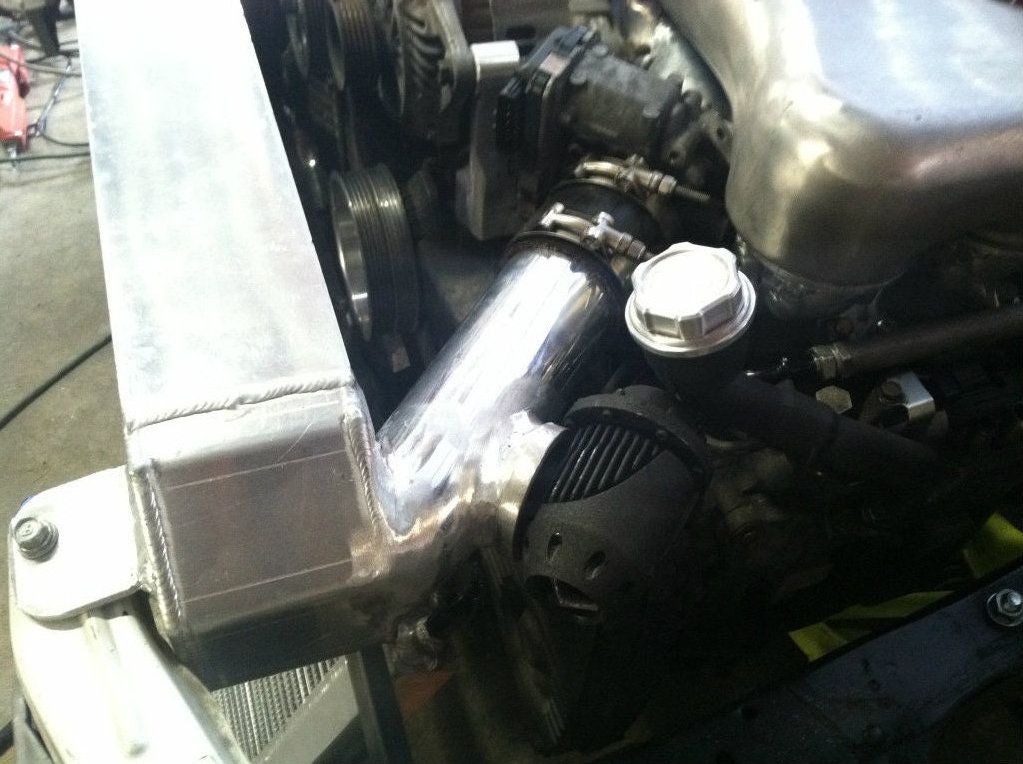
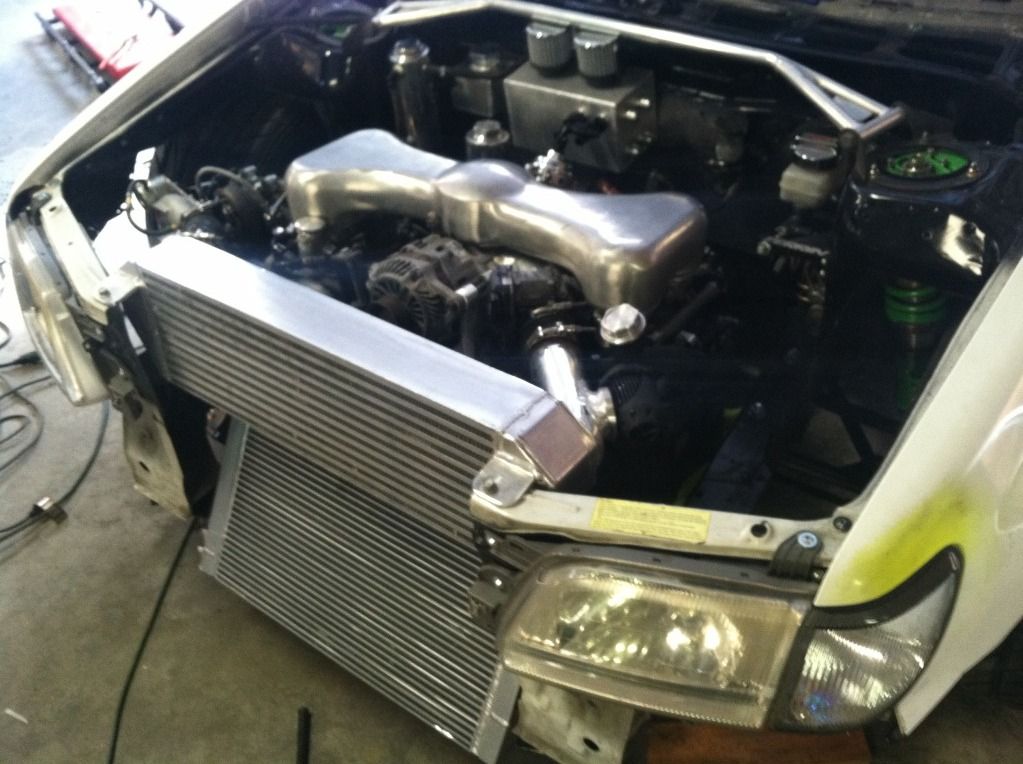
Mounted and intercooler and turbo.


It fits in there pretty good with about 3" to spare when the tire is at full look at ride hieght. Im not to worried about burning the tire because it not like I am going to be racing at full lock so...
Then I fabed up the new up-pipe.

This is what was lefter over from the original header after I was done.

Thats about 17" of pipe. I added 10" to is what was actually removed was 7" or roughly 16.83 cu/in. Any reduction in the length/ volume of the up-pipe will increase spool so I think will be a pretty good improvment.
Lastly I finished out the day but fabricating the lower bumper and radiator mount.

Because the bumper hangs alot lower the the original I had to drop the radiator about 3" so I had to cut out the lower core support. This piece is a bolt on so it can be removed fix or gain extra room for removing the engine. The middle brace will be next along with the ducting to force all the incoming air into the v-mount's intercooler and radiator as well as locate the upper bumper mount.
Next up I'll be doing the downpipe and I really want to make a custom strut bar so I'm going to heat to the metal yard and rummage through their scrap. More parts arive every day so the updates will keep coming.
Johann
ahem... Okay so we last left off with the header but I couldn't mount the turbo untill the coupler that I orderd arived so I started working on the bumper. Drilled out some holes and use an aluminum plate to hold the 2 halfs together.
I'll use a tiny bit of filler or a trim pirce to help fill the gap a little but it came out looking pretty good. Then my hose coupler arived!!
Mounted and intercooler and turbo.
It fits in there pretty good with about 3" to spare when the tire is at full look at ride hieght. Im not to worried about burning the tire because it not like I am going to be racing at full lock so...
Then I fabed up the new up-pipe.
This is what was lefter over from the original header after I was done.
Thats about 17" of pipe. I added 10" to is what was actually removed was 7" or roughly 16.83 cu/in. Any reduction in the length/ volume of the up-pipe will increase spool so I think will be a pretty good improvment.
Lastly I finished out the day but fabricating the lower bumper and radiator mount.
Because the bumper hangs alot lower the the original I had to drop the radiator about 3" so I had to cut out the lower core support. This piece is a bolt on so it can be removed fix or gain extra room for removing the engine. The middle brace will be next along with the ducting to force all the incoming air into the v-mount's intercooler and radiator as well as locate the upper bumper mount.
Next up I'll be doing the downpipe and I really want to make a custom strut bar so I'm going to heat to the metal yard and rummage through their scrap. More parts arive every day so the updates will keep coming.
Johann
Thread Starter
Newbie
Joined: Jun 2012
Posts: 50
Likes: 0
From: Bham WA
Hey all time for another update.
Started the day by cutting off the front fender rear flares to modify the door. If you can remember from earlier pics the fenders flare and the doors flare did not match. The door flare curved down into the new fenders flare and looked funny.

So I spent a good part of the day trying to fix that... First I cut off the flare from being tacked on the car.

Then i grabbed my ace up my sleave. Bought 2 of these from a wreaking yard. 98-01 Forester gas filler doors.

Then cut the front part of the doors flare off.

Trimmed up the filler door. I bet you guys can see where this is going....

and tada! Fixed.

I was going to bolt the flares on but upon attempting that I realized is didn't look like I wanted to so I am going to weld them on. I can't finish them untill I cut out the quarters for the wheels so I will try to get that done early next week and get the flares on for good. Dispite that I was kinda irritated that the bolt on idea was a flop so I finished off the day by adding some awsome to the front end...

grrrrrr

Well thats all I got for now. More soon.
Started the day by cutting off the front fender rear flares to modify the door. If you can remember from earlier pics the fenders flare and the doors flare did not match. The door flare curved down into the new fenders flare and looked funny.
So I spent a good part of the day trying to fix that... First I cut off the flare from being tacked on the car.
Then i grabbed my ace up my sleave. Bought 2 of these from a wreaking yard. 98-01 Forester gas filler doors.
Then cut the front part of the doors flare off.
Trimmed up the filler door. I bet you guys can see where this is going....
and tada! Fixed.
I was going to bolt the flares on but upon attempting that I realized is didn't look like I wanted to so I am going to weld them on. I can't finish them untill I cut out the quarters for the wheels so I will try to get that done early next week and get the flares on for good. Dispite that I was kinda irritated that the bolt on idea was a flop so I finished off the day by adding some awsome to the front end...
grrrrrr
Well thats all I got for now. More soon.
Thread Starter
Newbie
Joined: Jun 2012
Posts: 50
Likes: 0
From: Bham WA
Its that time again. Got lots of pics for this one.
Started the day off the the UPS guy.
Got this racing heater/ blower motor setup. This little guy weighs 5lbs vs the stock combined 47lbs of the heater and blower assy. Should be enough to defrost my windows...

Then I got my little cute braille battery. 21lbs not the lightest they sell but it was what they recomended for a car with 10:0:1 comp. Still much lighter then an OE one.

Then it was back to that rear flare. After deciding to weld it on I took it back off the cut the quarter panel out. Made sure there was plenty of room for that tire not to rub.

Then I tacked the flare on for the last time and cut it at the door line so it would open. Next was getting the harware install to hold it closed. Used some M6 nuts w/ a stainless thin walled pipe to make the little spacers.

And then use some M6 tapered screws and made them flush mount in the door.

Next I was getting a little bored so I broke out my new saw and started fabbing my down pipe.

Nice closeup of the collecter for the wastegate. No screamer pipe on this car...

Fits with plenty of room to spare. Pretty strait as far as down pipes go.

And plenty of ground clearence as well.

Started the day off the the UPS guy.
Got this racing heater/ blower motor setup. This little guy weighs 5lbs vs the stock combined 47lbs of the heater and blower assy. Should be enough to defrost my windows...
Then I got my little cute braille battery. 21lbs not the lightest they sell but it was what they recomended for a car with 10:0:1 comp. Still much lighter then an OE one.
Then it was back to that rear flare. After deciding to weld it on I took it back off the cut the quarter panel out. Made sure there was plenty of room for that tire not to rub.
Then I tacked the flare on for the last time and cut it at the door line so it would open. Next was getting the harware install to hold it closed. Used some M6 nuts w/ a stainless thin walled pipe to make the little spacers.
And then use some M6 tapered screws and made them flush mount in the door.
Next I was getting a little bored so I broke out my new saw and started fabbing my down pipe.
Nice closeup of the collecter for the wastegate. No screamer pipe on this car...
Fits with plenty of room to spare. Pretty strait as far as down pipes go.
And plenty of ground clearence as well.
Thread Starter
Newbie
Joined: Jun 2012
Posts: 50
Likes: 0
From: Bham WA
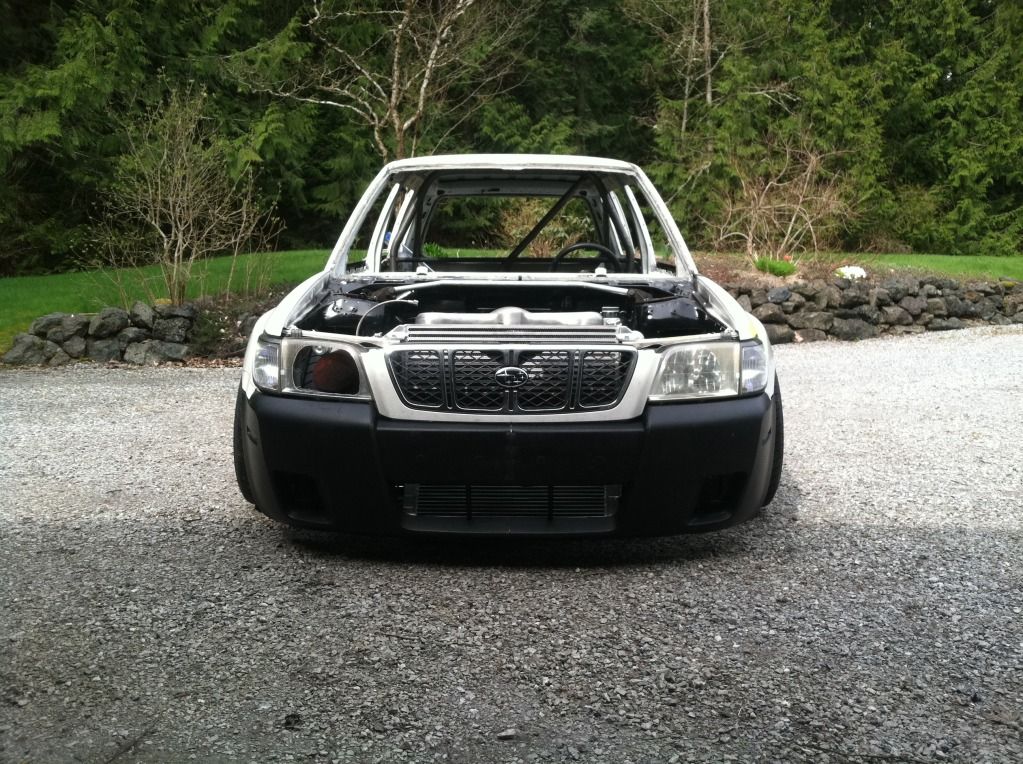
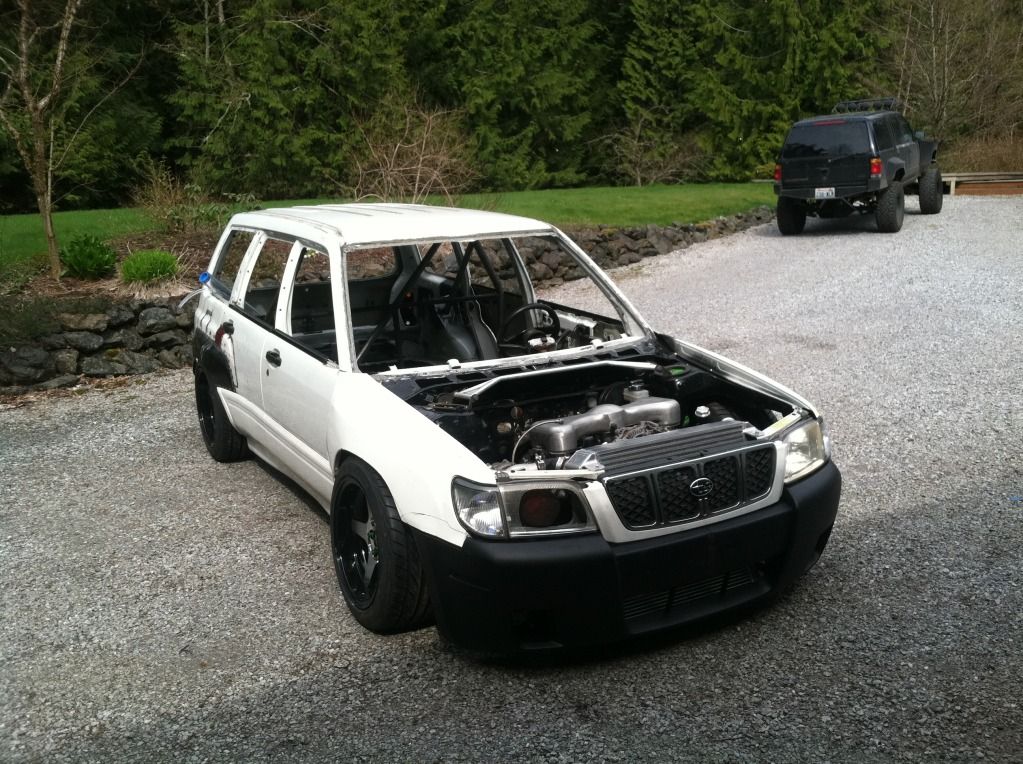
I also finished removing all the window urethane and cleaned all the window flanges to get ready for the lexan. Made a mess. So this moring I rolled her outside for the first time since she went in for a little spring cleaning. Thought it would be a good idea to take some nice glamor shots.. Enjoy!


Thread Starter
Newbie
Joined: Jun 2012
Posts: 50
Likes: 0
From: Bham WA
Its that time again. Didn't get as much done yesterday as I wanted I was feeling a little under the weather. However I did get the muffler and exhaust pretty much finished.
Started by mounting the muffler..

The reason for it exiting here is ground clearence. With how low the car is running the pipe under the rear CV would only leave about 2" of clearence so thats no good. I mounted the muffler tip a little higher then where I originally wanted it because I didn't want to have to stick the pipe 4-5" out to avoid burning up the paint on the side of the door. I'm going to make an aluminum heat sheid for around the muffler but I can still open and close the door without taking it out for maintanence.


Then I ran the rest of the exhaust. I have at least 4" of ground clearence along the entire underside of the car cept for the front bumper which is 3"

Made a little cut here to curve in a little faster to leave room for the aluminum 1pc driveshaft.

and finally the rear of the exhaust

The hole in the floor as well as the exposed exhaust/ muffler is getting covered in an aluminum firewall as well as getting wrapped. I'll be getting the aluminum for the floor pieces later today to start fabrication on them tomorrow.
Johann
Started by mounting the muffler..
The reason for it exiting here is ground clearence. With how low the car is running the pipe under the rear CV would only leave about 2" of clearence so thats no good. I mounted the muffler tip a little higher then where I originally wanted it because I didn't want to have to stick the pipe 4-5" out to avoid burning up the paint on the side of the door. I'm going to make an aluminum heat sheid for around the muffler but I can still open and close the door without taking it out for maintanence.
Then I ran the rest of the exhaust. I have at least 4" of ground clearence along the entire underside of the car cept for the front bumper which is 3"
Made a little cut here to curve in a little faster to leave room for the aluminum 1pc driveshaft.
and finally the rear of the exhaust
The hole in the floor as well as the exposed exhaust/ muffler is getting covered in an aluminum firewall as well as getting wrapped. I'll be getting the aluminum for the floor pieces later today to start fabrication on them tomorrow.
Johann
Thread Starter
Newbie
Joined: Jun 2012
Posts: 50
Likes: 0
From: Bham WA
Hey all. Got some more work done. Yesterday I spent most of the day getting a bunch of mock up pieces made from cardboard.
Firewall...

Rear floor panel...

I have a couple other but they are not worth showing yet. Next I spent some time and cleaned up the remainder of the sound crap off the interior to get it ready to paint once I finish the rest of the bits.

Then I started work on fitting the dash. Just getting rid of the bits...


Some of the more experienced know but when doing a dash swap from GC8 to WRX there is this really ugly gap at the door jam. This Forester actually had a GC8 dash in it from factory so the WRX swap is essensially the same. However... I know few tricks to eliminate that gap.. Fits like factory.


Yesterday I worked from 8am to 1am and got a bunch done. Time consuming but every hour is an hour closer to finishing. I was contimplating what to do with the forward floor panal and it hit me so I started getting that all taken care of.
First I started with the framing.

Then I made the upper cover plate.

Unfortunetly at this time it was about 7:00 and getting to dark for good pics but I finished cutting up a bunch of pieces to finish it. I still need to get a bit more aluminum sheeting for the muffler cover but tomorrow when I post my update you'll get a another look at one of my super mega funtime special ideas...
More soon today is going to be abother productive day.
Johann
Firewall...
Rear floor panel...
I have a couple other but they are not worth showing yet. Next I spent some time and cleaned up the remainder of the sound crap off the interior to get it ready to paint once I finish the rest of the bits.
Then I started work on fitting the dash. Just getting rid of the bits...
Some of the more experienced know but when doing a dash swap from GC8 to WRX there is this really ugly gap at the door jam. This Forester actually had a GC8 dash in it from factory so the WRX swap is essensially the same. However... I know few tricks to eliminate that gap.. Fits like factory.
Yesterday I worked from 8am to 1am and got a bunch done. Time consuming but every hour is an hour closer to finishing. I was contimplating what to do with the forward floor panal and it hit me so I started getting that all taken care of.
First I started with the framing.
Then I made the upper cover plate.
Unfortunetly at this time it was about 7:00 and getting to dark for good pics but I finished cutting up a bunch of pieces to finish it. I still need to get a bit more aluminum sheeting for the muffler cover but tomorrow when I post my update you'll get a another look at one of my super mega funtime special ideas...
More soon today is going to be abother productive day.
Johann
Thread Starter
Newbie
Joined: Jun 2012
Posts: 50
Likes: 0
From: Bham WA
Update time!!!!!!
Started my day off on the right foot with gift from the UPS guy. FITTINGS!!!

Still missing a few that were back orderd but this is going to make working and fixing this beast a breeze. No more crappy hose clamps or torn hoses from barb fittings. All of the hoses have been consolodated to 4 sizes: Vacuum lines, -6an (3/8), -8an (1/2), and -10 (5/8). These are push lock style fittings so trackside replacing of hoses will be a snap and minimal tools will be required. I have an array of steel and aluminum weld bungs to convert the verious barb fittings over. Mapping out hoses and figuring out the required fittings is a pain in the *** but these guys had them all and the pricing was great. They even have the an/ metric fittings to replace bango or tapped holes in the block and manifold. Great place for one stop shopping when needing fittings. I have to have a few of my tanks rewelded with the new bungs so these will have to wait a bit before I can install them all. I am going to try and prep them this week along with the modifications I need to do to my intake manifold and intercooler.
Anyways back to some progress pics. Finished up the forward floor panel.

Super seceret cubby...


The battery fuse boxes and bulk of the harness will go here. Great for weight distribution. All on the passenger side by the axle and same level as the floor to lower the center of gravity. Still need to finish a few things up and paint the steel but I'll do all that once the cage interior is ready for paint. The battery itself is actually bolted to the steel square tubing on resting on the floor. Don't want my battery falling out from under the car... Still a ways to go yet.
Got the firewall piece cut and just set it in the there for now.

I'll be finishing this up and mounting all my crap to it today.

and finally the rear piece. I have a couple little things to finish up here as well. Going to make a couple cover panels that will cover the fillter next and sender unit to protect them if something lands on them. I should be able to run all the interior lines soon as well once I finish the firewall for the muffler.
I still have a crap load of stuff to do but I'd say progress is going well. I am hoping to have everything fabbed and ready to be puilled for paint, and powdercoating before the end of the month so fingers crossed.
Johann
Started my day off on the right foot with gift from the UPS guy. FITTINGS!!!
Still missing a few that were back orderd but this is going to make working and fixing this beast a breeze. No more crappy hose clamps or torn hoses from barb fittings. All of the hoses have been consolodated to 4 sizes: Vacuum lines, -6an (3/8), -8an (1/2), and -10 (5/8). These are push lock style fittings so trackside replacing of hoses will be a snap and minimal tools will be required. I have an array of steel and aluminum weld bungs to convert the verious barb fittings over. Mapping out hoses and figuring out the required fittings is a pain in the *** but these guys had them all and the pricing was great. They even have the an/ metric fittings to replace bango or tapped holes in the block and manifold. Great place for one stop shopping when needing fittings. I have to have a few of my tanks rewelded with the new bungs so these will have to wait a bit before I can install them all. I am going to try and prep them this week along with the modifications I need to do to my intake manifold and intercooler.
Anyways back to some progress pics. Finished up the forward floor panel.
Super seceret cubby...
The battery fuse boxes and bulk of the harness will go here. Great for weight distribution. All on the passenger side by the axle and same level as the floor to lower the center of gravity. Still need to finish a few things up and paint the steel but I'll do all that once the cage interior is ready for paint. The battery itself is actually bolted to the steel square tubing on resting on the floor. Don't want my battery falling out from under the car... Still a ways to go yet.
Got the firewall piece cut and just set it in the there for now.
I'll be finishing this up and mounting all my crap to it today.
and finally the rear piece. I have a couple little things to finish up here as well. Going to make a couple cover panels that will cover the fillter next and sender unit to protect them if something lands on them. I should be able to run all the interior lines soon as well once I finish the firewall for the muffler.
I still have a crap load of stuff to do but I'd say progress is going well. I am hoping to have everything fabbed and ready to be puilled for paint, and powdercoating before the end of the month so fingers crossed.
Johann
Thread Starter
Newbie
Joined: Jun 2012
Posts: 50
Likes: 0
From: Bham WA
Hey all iiiiiiiiiiiits UPDATE TIME!!!!
Started the day getting everything that needs TIG welding ready to go. My buddy is going to TIG them for me since I don't have a welder (yet) while I finish up other things.
I got this Throttle body flange from my buddy Mike at PIA. Just had it laying around... I start with him whenever I need a strange part lol.

Finished up modifying the crappy replica manifold to get it over to the win side. I use an aluminum spool gun to tack the parts in place so they could be TIGed. Welds are ugly but they hold.

Then moved onto the coldside intercooler pipe...

BOV has a home now.

Nice full shot. Look at how short my piping whooo doggy!!

After that all the parts came off and I dropped them off at my buddies. Other parts that joined them were my P/S and coolant tank (getting JIC fittings welded in), and my coolant manifold (getting a filler port for the v-mount installed)
So with those parts off and gone it was time to keep busy with everything else. I started off by shaving my alternator braket down. Because racecar, it only needs to hold the alternator.


My P/S pump with new converted fittings gets installed...

and the rest of my day was used up running the brake/ clutch lines. Not using ABS on this car so I have a non-ABS pump and bias block. Installed them nice and clean like....

and finally the clutch line. Originally it runs on the firewall but I need the room for other crap so I ran a new line..

Well thats all I got for now. More soon I still have plenty to do...
Johann
Started the day getting everything that needs TIG welding ready to go. My buddy is going to TIG them for me since I don't have a welder (yet) while I finish up other things.
I got this Throttle body flange from my buddy Mike at PIA. Just had it laying around... I start with him whenever I need a strange part lol.
Finished up modifying the crappy replica manifold to get it over to the win side. I use an aluminum spool gun to tack the parts in place so they could be TIGed. Welds are ugly but they hold.
Then moved onto the coldside intercooler pipe...
BOV has a home now.
Nice full shot. Look at how short my piping whooo doggy!!
After that all the parts came off and I dropped them off at my buddies. Other parts that joined them were my P/S and coolant tank (getting JIC fittings welded in), and my coolant manifold (getting a filler port for the v-mount installed)
So with those parts off and gone it was time to keep busy with everything else. I started off by shaving my alternator braket down. Because racecar, it only needs to hold the alternator.
My P/S pump with new converted fittings gets installed...
and the rest of my day was used up running the brake/ clutch lines. Not using ABS on this car so I have a non-ABS pump and bias block. Installed them nice and clean like....
and finally the clutch line. Originally it runs on the firewall but I need the room for other crap so I ran a new line..
Well thats all I got for now. More soon I still have plenty to do...
Johann
Thread Starter
Newbie
Joined: Jun 2012
Posts: 50
Likes: 0
From: Bham WA
Hey guys sorry about that. I had to put the Foz on the back burner for a week so I could get a few quick $$ makin jobs to pay the bills. However I did manage to get some time in this last week and weekend on the Foz before another job showed back up.
While I was taking a break on the Foz a buddy of mine TIGed up some parts for me since I don't have a tig. My P/S rez, coolant tank, radiator, and my coolant manifold. I ended up welding the intercooler and intake manifold myself with my spool gun. Welds were ugly but they had good penetration so I just grinded them down.
BOV and intercooler pipe finished up and installed..
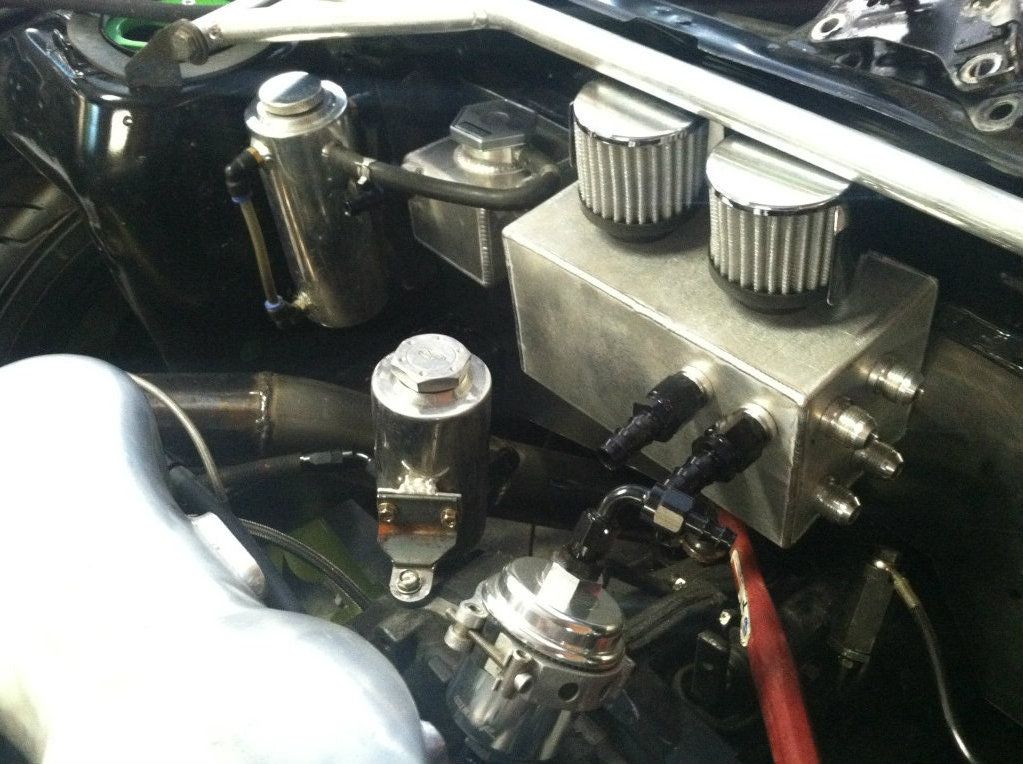
Next was starting on getting all my lines finished. For my lines I have welded on AN adapters with puch-lock fittings to make maintainance easier. So I started with mounting all my crap.
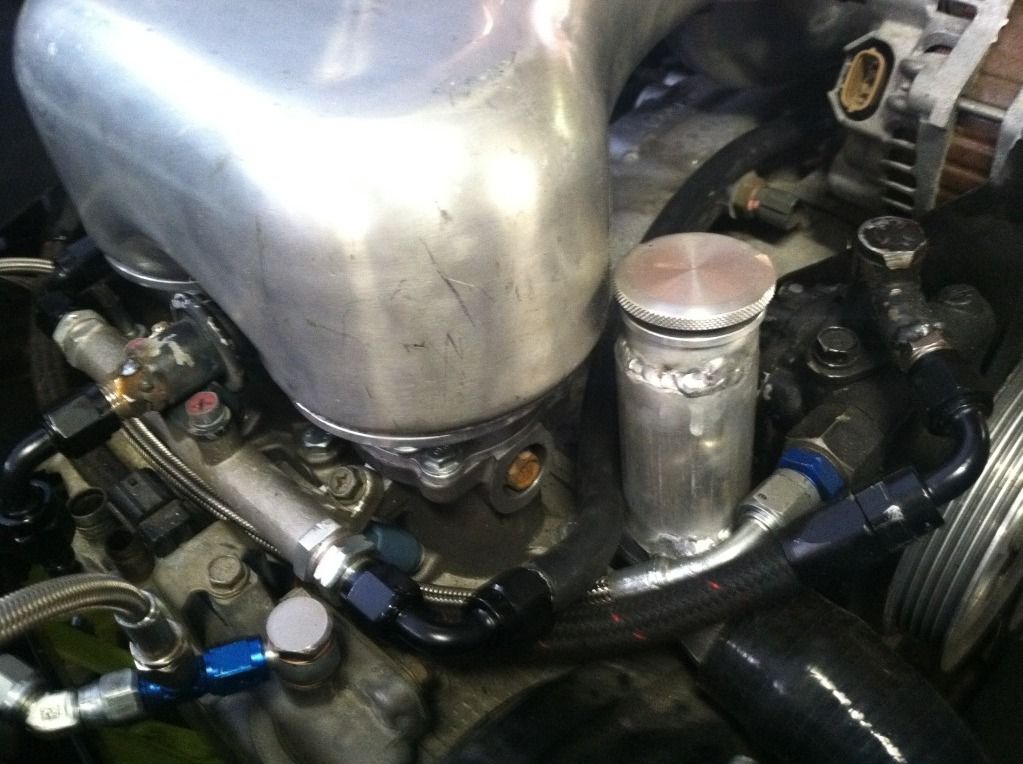
For the coolant manifold because I have a V-Mount and the radiator is so low I welded in a fillter cap into it. This is just a threaded cap not a pressyre cap the coolant tank has that. Its like an 02 wrx setup.
Got some of the lines for the turbo figured out..
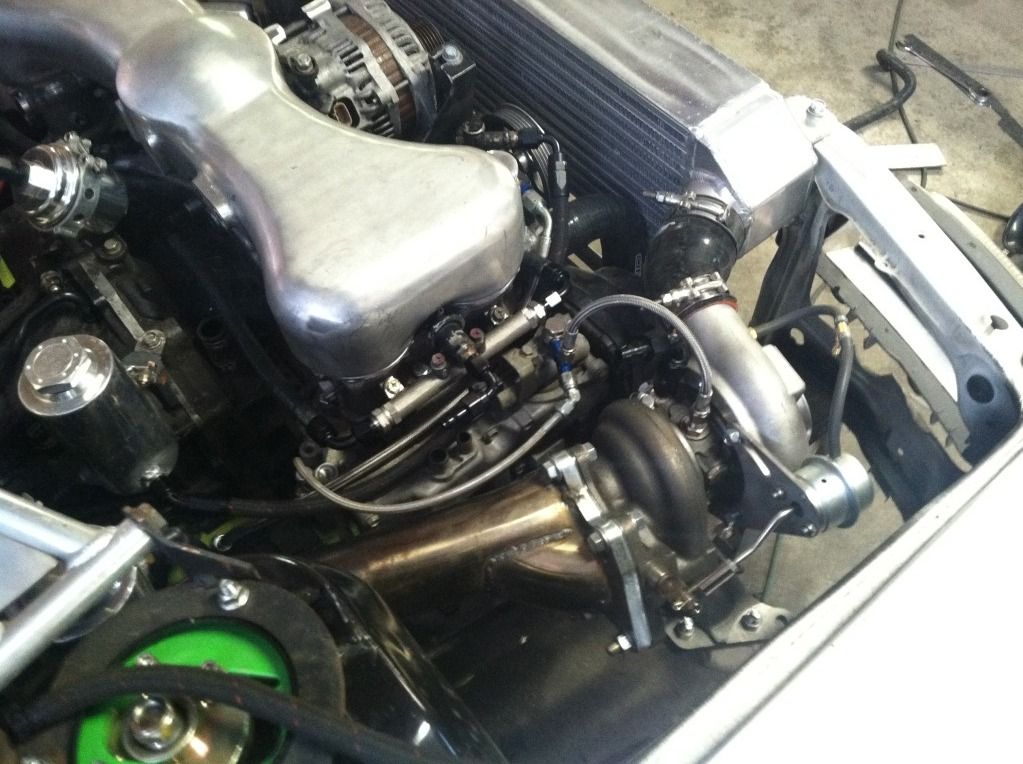
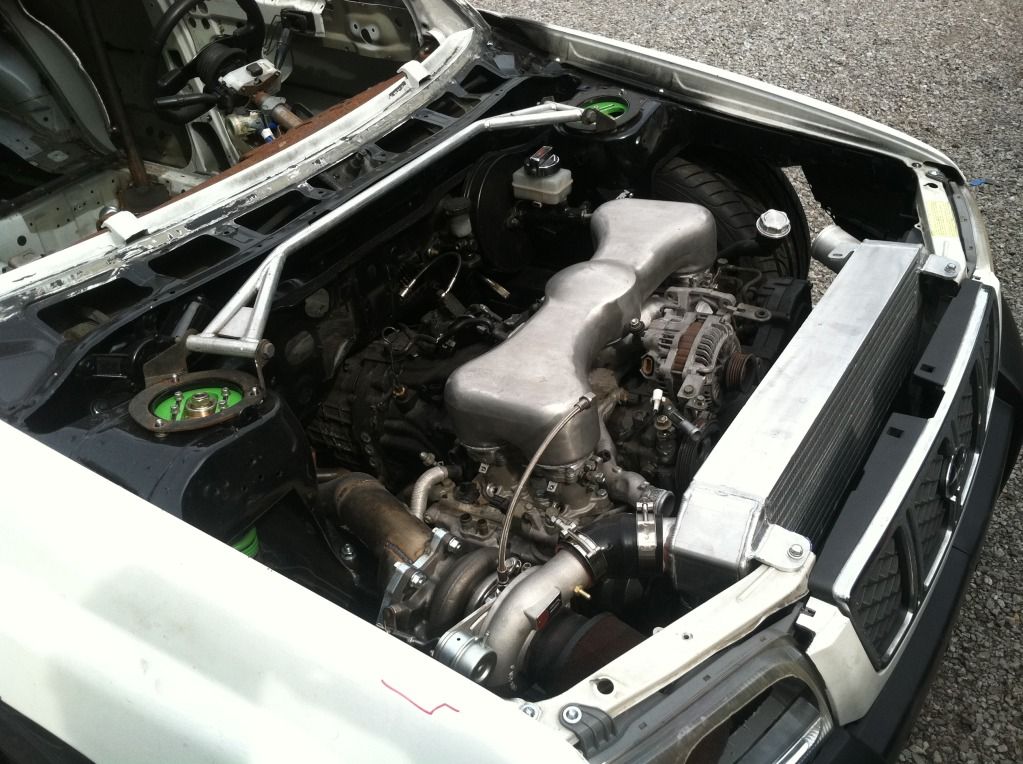
And stepped back for a nice engine shot..
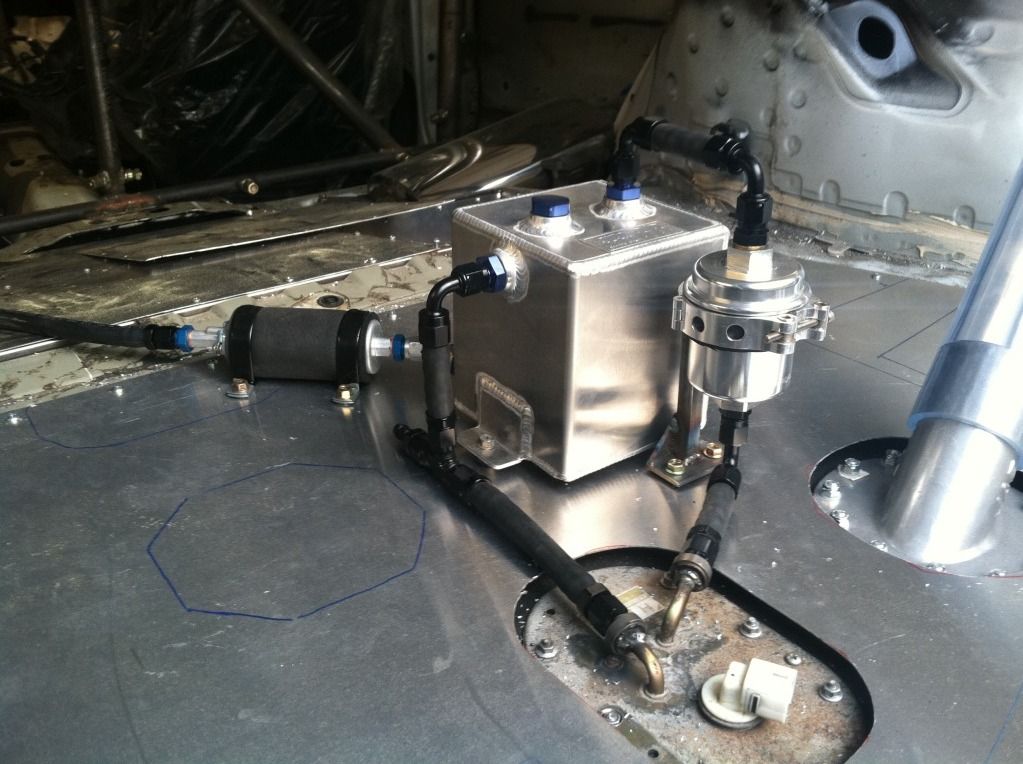
Last I got a good amount of the fuel lines and pieces mounted for the fuel delivery system.
So the GC8 project I have been working on is back from what was sopposed to be getting painted but its taking too long to I told them to give it back after it was jammed so I could finish it and get paid. I'll be working on that most of the week but I will still be putting in the weekends on the Foz to keep it moving along. Once the GC is done I'll have the time and most importantly the money to get the engine built and order the last few parts I need to actually finish this thing.
While I was taking a break on the Foz a buddy of mine TIGed up some parts for me since I don't have a tig. My P/S rez, coolant tank, radiator, and my coolant manifold. I ended up welding the intercooler and intake manifold myself with my spool gun. Welds were ugly but they had good penetration so I just grinded them down.
BOV and intercooler pipe finished up and installed..
Next was starting on getting all my lines finished. For my lines I have welded on AN adapters with puch-lock fittings to make maintainance easier. So I started with mounting all my crap.
For the coolant manifold because I have a V-Mount and the radiator is so low I welded in a fillter cap into it. This is just a threaded cap not a pressyre cap the coolant tank has that. Its like an 02 wrx setup.
Got some of the lines for the turbo figured out..
And stepped back for a nice engine shot..
Last I got a good amount of the fuel lines and pieces mounted for the fuel delivery system.
So the GC8 project I have been working on is back from what was sopposed to be getting painted but its taking too long to I told them to give it back after it was jammed so I could finish it and get paid. I'll be working on that most of the week but I will still be putting in the weekends on the Foz to keep it moving along. Once the GC is done I'll have the time and most importantly the money to get the engine built and order the last few parts I need to actually finish this thing.
Thread Starter
Newbie
Joined: Jun 2012
Posts: 50
Likes: 0
From: Bham WA
I got some work done over the weekend. Got my fuel lines pretty much ran. Ran a few of the coolant lines for the turbo but I am still waiting on a few fittings to come in to do the oil breather and oil cooler lines. SHould have those any day now. So I decided to start into the wiring a bit. First was to remove all the crap I wasn't going to need out of the harness.

ABS, Airbags, Heater/ Blower motor, Alarm, Keyless Entry, Fogs, Cruse Control, Door wiring (windows/ locks), and DCCD (my tranny dosen't have it.
There is about 10lbs of wiring right there. Next will be to drastically shorten the harness to fit everything on one consoldated location. I'll have one harness going to rear for taillights and fuel pump, one going forward for headlights and radiator fans. The ECU will go under the middle of the dash along with the OBD2 Plug and then foward to the engine. FInally I'll have one more strand going to the cluster. I should probubly get another 40lbs out of this thing easy and bot the engine and interior fuse boxes will be going in the box with the battery. So there is still a long way to go with this wiring.
Not a ton of stuff left I am on the last page of my To-Do list... It was 5 pages long when I started... The GC8 is coming together well so I'll be back on this project full time soon.
Johann
Thread Starter
Newbie
Joined: Jun 2012
Posts: 50
Likes: 0
From: Bham WA
Hey all. Work on the GC8 has slowed the progress of the Fozz but I am pulling double shifts and working late into the night to get stuff done.
Last night I was up till 2 finishing up the rest of routing the hoses.
Oil Cooler:

I was going to weld steal bungs to each breather but it was going to be kinda chunky so I fabed this up to inegrate them together.

Welded the bung on the oil return for the turbo..

Re-instralled the valve covers after sanding down the breather fitting thing...

Here is what the bay looks like with about 90% of the hosing ran. Pretty clean I think.

I also managed to install the flex pipe and the last vband in my turboback exhaust and get everything welded up. Tomorrow my spare STi block is going to be machined so get ready for all new fancy internals so while its gone I will be tearing the engine bay down for paint/ powder/ and finish welding. The next update I'll be finishing up the sheet metal in the engine bay and over the muffler as well as fabrication on a rear diffuser and trailor hitch attachment as well as new aluminum bumper beams, ducting for the v-mount, cutting out the lexan etc.... Stay tuned.
Johann
Last night I was up till 2 finishing up the rest of routing the hoses.
Oil Cooler:
I was going to weld steal bungs to each breather but it was going to be kinda chunky so I fabed this up to inegrate them together.
Welded the bung on the oil return for the turbo..
Re-instralled the valve covers after sanding down the breather fitting thing...
Here is what the bay looks like with about 90% of the hosing ran. Pretty clean I think.
I also managed to install the flex pipe and the last vband in my turboback exhaust and get everything welded up. Tomorrow my spare STi block is going to be machined so get ready for all new fancy internals so while its gone I will be tearing the engine bay down for paint/ powder/ and finish welding. The next update I'll be finishing up the sheet metal in the engine bay and over the muffler as well as fabrication on a rear diffuser and trailor hitch attachment as well as new aluminum bumper beams, ducting for the v-mount, cutting out the lexan etc.... Stay tuned.
Johann
Thread Starter
Newbie
Joined: Jun 2012
Posts: 50
Likes: 0
From: Bham WA
So I was up late last night working again and I got some more done. Started to finish up the front end.
Made some little brackets:

Then installed my thick walled 1.5"x3" piece of aluminum square tubing as my new beam..

Its mounted a little higher because the car is so low. I'll be adding some strength to frame rails to tie them together. Only 4.5lbs for the complete beam. I'll be able to mount the middle of the bumper to it as well as my front plate, tow hook, and v-mount ducting.
and thats what I started next. I managed to get the two lower side pieces for the ducting finished up.


I'll be adding nutzerts to it to mount the aluminum sheet to finish it off. I also got about 70% of the piece to make my rear strut bar done so I can get that in and start finishing the interior welding for paint.
Johann
Made some little brackets:
Then installed my thick walled 1.5"x3" piece of aluminum square tubing as my new beam..
Its mounted a little higher because the car is so low. I'll be adding some strength to frame rails to tie them together. Only 4.5lbs for the complete beam. I'll be able to mount the middle of the bumper to it as well as my front plate, tow hook, and v-mount ducting.
and thats what I started next. I managed to get the two lower side pieces for the ducting finished up.
I'll be adding nutzerts to it to mount the aluminum sheet to finish it off. I also got about 70% of the piece to make my rear strut bar done so I can get that in and start finishing the interior welding for paint.
Johann
Thread Starter
Newbie
Joined: Jun 2012
Posts: 50
Likes: 0
From: Bham WA
Hey all. Got a good update. Just been super busy and haven't found time to get on the comp to post up.
Got the Driver side cash bar in and finished welding up the cage... Finally!!

Then moved on to making my rear strut bar.

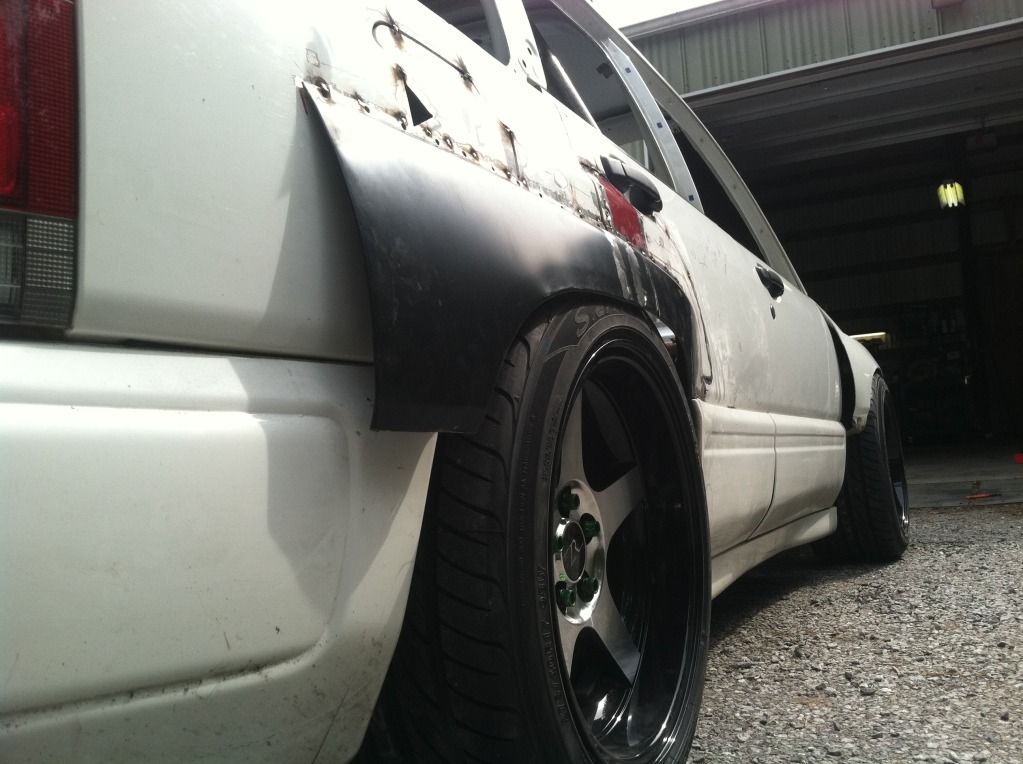
After that I finished tacking up the driver side fender flare. Still have to a couple more things to it before finish welding both sides so I can get some body filler on it but that probubly wont be till next week.

Once the flares were on both sides I finally got to remove the rear bumper and that 52lbs rear bumper beam. I have officially pulled all the weight I can out of these beast. Cut the bumper out to make way for my new aluminum bumper beam, and rear diffuser/ underspoiler.

Then the UPS guy came by and brought me many things. New lugs, hood pins, hood dampers, tow hooks, and all the way from Japan.... My new grill. The one I got came with the headlights and it was trimmed on the sides and it was really buging me and I figure if I am going to paint this with good paint I might as well paint all the parts I actually want on it once..
So Sexy


And lastly another pic of her rolled out with her new wares.

Next up:
I'll be finishing the rear diffuser and getting the wing mounted. Mounting the heater and finishing off the inerior sheet metal so I can get everything inside painted. From there all the parts to be ether, finish welded, painted, or powdercoated will be coming off as well as the engine to make way for its new forged 10:1 comp shortblock and bodywork and paint will commence. GC8 is like 95% finished so I have been working hard to hopfully have both cars as the Big NW Meet on the 14th of next month.
Johann
Got the Driver side cash bar in and finished welding up the cage... Finally!!
Then moved on to making my rear strut bar.
After that I finished tacking up the driver side fender flare. Still have to a couple more things to it before finish welding both sides so I can get some body filler on it but that probubly wont be till next week.
Once the flares were on both sides I finally got to remove the rear bumper and that 52lbs rear bumper beam. I have officially pulled all the weight I can out of these beast. Cut the bumper out to make way for my new aluminum bumper beam, and rear diffuser/ underspoiler.
Then the UPS guy came by and brought me many things. New lugs, hood pins, hood dampers, tow hooks, and all the way from Japan.... My new grill. The one I got came with the headlights and it was trimmed on the sides and it was really buging me and I figure if I am going to paint this with good paint I might as well paint all the parts I actually want on it once..
So Sexy
And lastly another pic of her rolled out with her new wares.
Next up:
I'll be finishing the rear diffuser and getting the wing mounted. Mounting the heater and finishing off the inerior sheet metal so I can get everything inside painted. From there all the parts to be ether, finish welded, painted, or powdercoated will be coming off as well as the engine to make way for its new forged 10:1 comp shortblock and bodywork and paint will commence. GC8 is like 95% finished so I have been working hard to hopfully have both cars as the Big NW Meet on the 14th of next month.
Johann
Thread Starter
Newbie
Joined: Jun 2012
Posts: 50
Likes: 0
From: Bham WA
I'll have those both finished ether today or tomorrow. The rear diffusor main plate will be at around a 25 deg angle and it will have an underspoiler around 15 deg. My spoiler I am making adjustable from 5-20 deg so I can dial it in once I get up to speed.
For now I only have one pic. I just finished this installment of work to the GC project I have been working on so now it goes to paint giving me some time to really push on the Forester to finish up the bulk of the project.
Picked these up from Glen at Prosport Gauges...

I got 7 Guages:
Boost
Fuel Press
Oil Press
Air/ Fuel Ratio
x2 EGT
Volts
T4 Sized Turbo Blanket
50' of Exhaust Wrap
These are all there new EVO series which has a sweep and a digital read out for quick reference when at speed at the track. All premium senders so they are small which is good because I have limited space. I got 2 EGT gauges. One for the exhaust and a while back I used one of there older EGT gauges to make a Brake Temp Guage. These new EVO series gauges have a faster sender so I should get faster results. I take the sender and drill into the pad material and it tells me the brake pad temp. The plus with this is that if I have a pad that has a max operating temp of 1100 deg and my gauge is reading close or above that I can ether change my braking style or swap in some hotter pads. This will help me run the best pad for the verious tracks I attend.
I'll have some more detailed pics of them when I get ready to install them sometime next week. Also for anyone looking at their turbo blankets wondering what size they need the T3 sized one works perfectly on WRX turbos and STi Vf39s or 16gs. The T4 size that I got is a pretty good fit for the Twinscroll turbos VF36,37s
Heres a pic of the T3 on a VF39/ 16g that I just installed on the GC I'm working on.

Johann
For now I only have one pic. I just finished this installment of work to the GC project I have been working on so now it goes to paint giving me some time to really push on the Forester to finish up the bulk of the project.
Picked these up from Glen at Prosport Gauges...
I got 7 Guages:
Boost
Fuel Press
Oil Press
Air/ Fuel Ratio
x2 EGT
Volts
T4 Sized Turbo Blanket
50' of Exhaust Wrap
These are all there new EVO series which has a sweep and a digital read out for quick reference when at speed at the track. All premium senders so they are small which is good because I have limited space. I got 2 EGT gauges. One for the exhaust and a while back I used one of there older EGT gauges to make a Brake Temp Guage. These new EVO series gauges have a faster sender so I should get faster results. I take the sender and drill into the pad material and it tells me the brake pad temp. The plus with this is that if I have a pad that has a max operating temp of 1100 deg and my gauge is reading close or above that I can ether change my braking style or swap in some hotter pads. This will help me run the best pad for the verious tracks I attend.
I'll have some more detailed pics of them when I get ready to install them sometime next week. Also for anyone looking at their turbo blankets wondering what size they need the T3 sized one works perfectly on WRX turbos and STi Vf39s or 16gs. The T4 size that I got is a pretty good fit for the Twinscroll turbos VF36,37s
Heres a pic of the T3 on a VF39/ 16g that I just installed on the GC I'm working on.
Johann