project:BDR 2006 Evo STU build thread

 Dec 19, 2012, 08:40 PM
#318
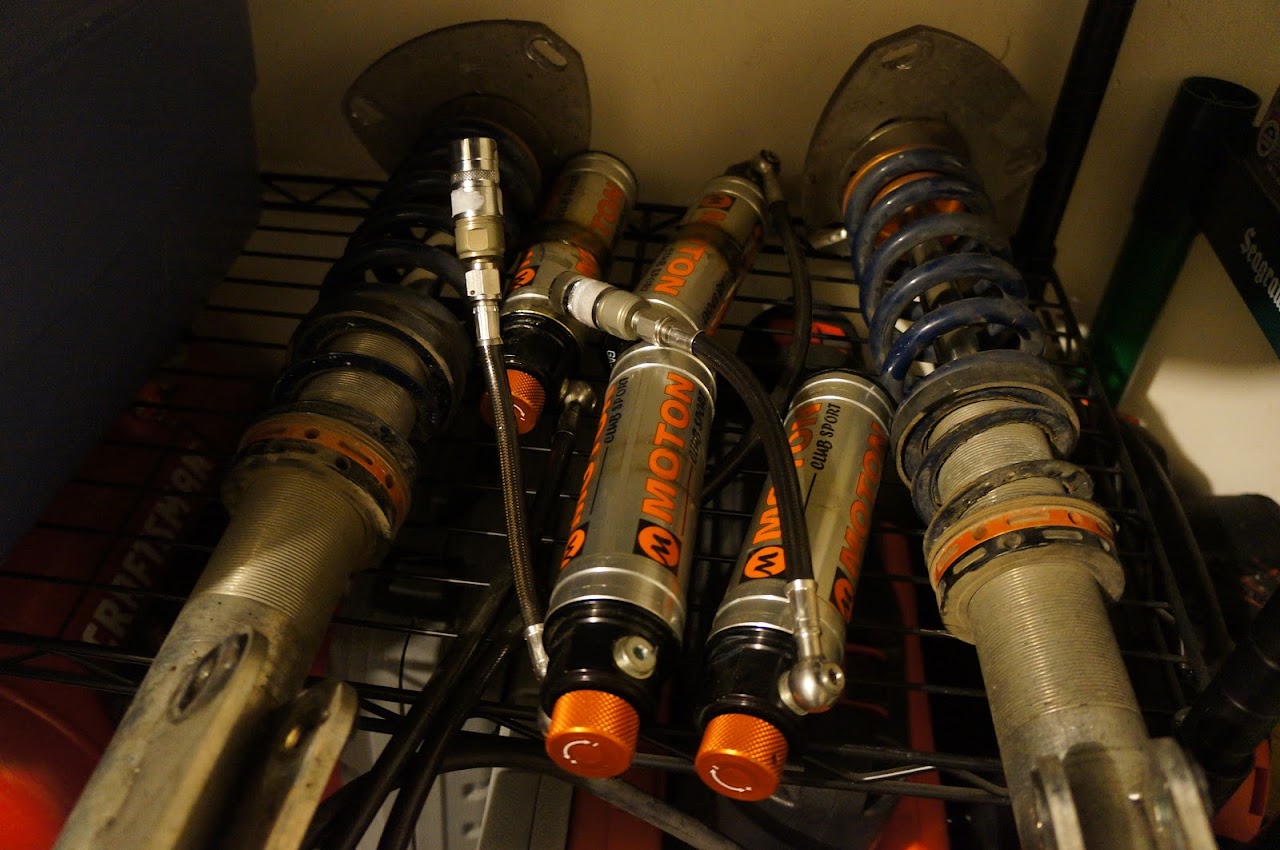
I have the Bilsteins back on the car, with some fresh Swift Spec R springs. I figure if the rebuild takes too long, might as well have something pretty performance oriented on there for early season events. I took some pictures of the Moton setup on the car, mostly just to remember where all the zip ties go, but want to share that with folks for feedback and see what everyone else is doing for the reservoir hoses.
In other news, Blipshift came out with a pretty awesome shirt


Suspension should get shipped out to PSI soon for the rebuild. Going to see if the DDP's are worth the hype, and pick up some bearings for the front while I'm at it (to get rid of the spring bind I got occasionally). Only 3 more months
 Dec 20, 2012, 12:13 PM
#319
Evolving Member
 ...that and installing cruise control! w00t.
Dec 20, 2012, 01:14 PM
...that and installing cruise control! w00t.
Dec 20, 2012, 01:14 PM
#324
Evolving Member
edit, turns out our issue wasn't coil bind or anything to do with the springs or top-hats
the binding, in our case, sounds subtly like spring steel trying to rip itself apart (it’s not subtle), you can also feel it in the steering wheel, and if you jack up the car you might also see it cause the spring/coilover to “pop” when going into droop… happens for us when it’s hot out, which I’m guessing is due to heat expansion
the binding, in our case, sounds subtly like spring steel trying to rip itself apart (it’s not subtle), you can also feel it in the steering wheel, and if you jack up the car you might also see it cause the spring/coilover to “pop” when going into droop… happens for us when it’s hot out, which I’m guessing is due to heat expansion
Last edited by 4wd4me; Apr 24, 2013 at 09:50 AM.
Dec 21, 2012, 06:30 AM
#325

Installed cruise the 2nd week after I bought my EVO... absolute necessity for a DD I think. Let me know if you have any questions going into that project, I learned a few tricks going through it, then helping another guy install his after mine.
Cheers!
Let me know if you have any questions going into that project, I learned a few tricks going through it, then helping another guy install his after mine.Cheers!
Jan 7, 2013, 08:23 PM
#327
I have almost-typed the suspension writeup like 7 times. Keep getting interrupted. The shocks were mailed off to PSI today though, so hopefully I'll get them by mid-Feb or so. I might not even bother getting the car aligned on the stock struts.
Jan 10, 2013, 06:02 PM
#328
Suspension setup
Finally!
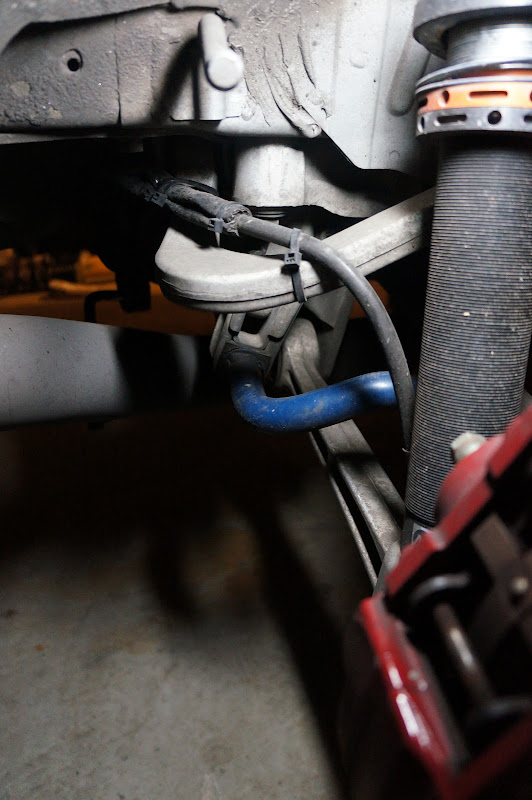
Here are some shots of the suspension on the car, shortly before removal, with attention to where the zip ties/insulation are and need to be. YMMV Note that a shop did the install - a) I didn�t have the stuff to make the camber plates work and didn�t want to figure it out, b) I had no idea how to route the reservoir hoses safely.
Brace yourself if you are rocking the 56k, this is a Vorshlag-level post in terms of pictures
Driver front
Here it is with the new brake brackets and the... 3rd? 4th? brake line on the front. Mostly just showing off the brackets.

Currently, zip ties only in the general area of the tie rod end. After pulling the shocks off I noticed that there was some abrasion on the line where it went past the metal wall (top of this photo). I am going to put some insulation on that area when the shocks go back on.

Passenger front
Again, showing off the brake brackets (can you tell I�m glad to have them?)

Two zip ties on the tie rod itself, and two zip ties on the tie rod end. Not sure why this is different than driver front - maybe the zip ties died?

Same issue with metal contact on the lines (again, need insulation).

Engine bay
Distance shot. Thanks to jamal from NASIOC for the hellafunctional stickers

Closeup of the clamps that keep the reservoirs on the strut tower bar.

Driver rear
Two zipties on the upper arm.

Closeup of lines going into the spare tire well.

Passenger rear
One zip tie to keep things in place, and some insulation to help avoid the line getting crunched.
Closeup of it going into the spare tire well.

Trunk
One zip tie on the strut bar, one zip tie through the carpet liner.


Reservoirs quick-disconnected!

Finally!
Here are some shots of the suspension on the car, shortly before removal, with attention to where the zip ties/insulation are and need to be. YMMV
Note that a shop did the install - a) I didn�t have the stuff to make the camber plates work and didn�t want to figure it out, b) I had no idea how to route the reservoir hoses safely. Brace yourself if you are rocking the 56k, this is a Vorshlag-level post in terms of pictures
Driver front
Here it is with the new brake brackets and the... 3rd? 4th? brake line on the front. Mostly just showing off the brackets.
Currently, zip ties only in the general area of the tie rod end. After pulling the shocks off I noticed that there was some abrasion on the line where it went past the metal wall (top of this photo). I am going to put some insulation on that area when the shocks go back on.
Passenger front
Again, showing off the brake brackets (can you tell I�m glad to have them?)
Two zip ties on the tie rod itself, and two zip ties on the tie rod end. Not sure why this is different than driver front - maybe the zip ties died?
Same issue with metal contact on the lines (again, need insulation).
Engine bay
Distance shot. Thanks to jamal from NASIOC for the hellafunctional stickers
Closeup of the clamps that keep the reservoirs on the strut tower bar.
Driver rear
Two zipties on the upper arm.
Closeup of lines going into the spare tire well.
Passenger rear
One zip tie to keep things in place, and some insulation to help avoid the line getting crunched.
Closeup of it going into the spare tire well.
Trunk
One zip tie on the strut bar, one zip tie through the carpet liner.
Reservoirs quick-disconnected!
Jan 10, 2013, 06:04 PM
#329
The rebuild
The suspension is en route to PSI. When they get back, they’ll be:
* freshly serviced
* sporting the double digressive pistons
* have bearings on the front
The new pistons definitely add cost, but if I can get more adjustability *and* more streetability... that’s kind of the holy grail. I was also very surprised when I asked for the old dyno sheets and they looked almost linear (see post 314). The reason this was so surprising is stuff like this:
https://www.facebook.com/notes/holli...25364764214164
Maybe I am making too big a deal of the dyno chart I was given (since it was from a while ago and it’s unclear what the settings were) - but from what little I know, the graphs for the DDP’s look good and I my hope for this year is to really play with settings trying to get this thing dialed in. Last year I really didn’t change things much because I was worried about chasing my tail and getting to Nationals and having no clue what to do. Odds are I won’t be in Lincoln this year so I can spend this time on setup without any of that pressure. The power stuff is pretty much handled, so the tweaking should be all that’s really left.
Swift Spec R’s - quick impressions
I was really happy with the stock MR suspension. It’s an excellent daily setup. But figuring that if my rebuild takes too long, I might have to autocross like this, I decided to pick up some Swift Spec R springs (MR-specific) using some Amazon points I acquired (thanks MAP for selling on Amazon!).
Here’s the explanation of the differences between the MR-specific springs and the regular Spec R springs. It’s not really for the differences in the cars, but for the differences in the shocks:
https://www.evolutionm.net/forums/8826670-post11.html
The most annoying thing about the springs is that the fronts have very few coils (Swift is fairly obsessed with using the least coils possible - upsides and downsides), so getting the spring compressors on and off is a pain in the ***. There’s a narrow window for getting them on there, and trying to put them at 12 and 6 on the spring is pretty much impossible. Other than that, no issues with the install. I followed the instructions here - http://www.evomoto.com/tech_articles..._article_id=22
I did not cut the bumpstops - nothing in the instructions said to.
Initial impressions - these are kind of harsh. Like, almost as harsh as my race setup. If I was driving the car more often I would sell these and get Sports. Spring rates:
https://www.evolutionm.net/forums/ev...rt-spec-r.html
https://www.evolutionm.net/forums/5550818-post8.html
(Reading the thread, I see Andrew from GTWORX recommending to cut some of the bumpstop off. Doh! I’ll do that next offseason...)
That’s a lot of rate for a non-race spring. But, the upside is the car will be less crippled if I do end up autocrossing with the car this way. When I put the camber bolts back in, I put them in the -2 position, and I’m sure I’ll get some camber out of the lowering as well. I’m not entirely sure if I’m even going to align the car like this though - I’m hoping the real suspension is back soon enough
Here is, as the kids say, the "stance"

The suspension is en route to PSI. When they get back, they’ll be:
* freshly serviced
* sporting the double digressive pistons
* have bearings on the front
The new pistons definitely add cost, but if I can get more adjustability *and* more streetability... that’s kind of the holy grail. I was also very surprised when I asked for the old dyno sheets and they looked almost linear (see post 314). The reason this was so surprising is stuff like this:
https://www.facebook.com/notes/holli...25364764214164
Moton's big claim to fame has been massive low-speed compression through highly digressive valving.
Swift Spec R’s - quick impressions
I was really happy with the stock MR suspension. It’s an excellent daily setup. But figuring that if my rebuild takes too long, I might have to autocross like this, I decided to pick up some Swift Spec R springs (MR-specific) using some Amazon points I acquired (thanks MAP for selling on Amazon!).
Here’s the explanation of the differences between the MR-specific springs and the regular Spec R springs. It’s not really for the differences in the cars, but for the differences in the shocks:
https://www.evolutionm.net/forums/8826670-post11.html
The most annoying thing about the springs is that the fronts have very few coils (Swift is fairly obsessed with using the least coils possible - upsides and downsides), so getting the spring compressors on and off is a pain in the ***. There’s a narrow window for getting them on there, and trying to put them at 12 and 6 on the spring is pretty much impossible. Other than that, no issues with the install. I followed the instructions here - http://www.evomoto.com/tech_articles..._article_id=22
I did not cut the bumpstops - nothing in the instructions said to.
Initial impressions - these are kind of harsh. Like, almost as harsh as my race setup. If I was driving the car more often I would sell these and get Sports. Spring rates:
https://www.evolutionm.net/forums/ev...rt-spec-r.html
https://www.evolutionm.net/forums/5550818-post8.html
Swift Sport (non-MR) 269lbs front, 319lbs rear,
Swift Sport Spec-R (non-MR) 358lbs front, 381lbs rear
Swift Sport Spec-R (non-MR) 358lbs front, 381lbs rear
That’s a lot of rate for a non-race spring. But, the upside is the car will be less crippled if I do end up autocrossing with the car this way. When I put the camber bolts back in, I put them in the -2 position, and I’m sure I’ll get some camber out of the lowering as well. I’m not entirely sure if I’m even going to align the car like this though - I’m hoping the real suspension is back soon enough
Here is, as the kids say, the "stance"
Jan 10, 2013, 06:12 PM
#330
 But I don't know of anything better.
 the binding, in our case, sounds subtly like spring steel trying to rip itself apart (it�s not subtle), you can also feel it in the steering wheel, and if you jack up the car you might also see it cause the spring/coilover to �pop� when going into droop� happens for us when it�s hot out, which I�m guessing is due to heat expansion
Performance Shock sells this kit with Torrington bearings-
http://performanceshock.com/index.ph...roducts_id=733
I saw your and Rick's discussion in the CiroDesign camber plate thread and it sounds like the Torringtons are the best bang for buck solution. On my WRX, I did have to re-grease the various parts of the plates to keep the sproing away about once a year - that's acceptable levels of maintenance for me. Certainly better than the binding!
Last edited by Butt Dyno; Jan 11, 2013 at 08:53 PM. Reason: fixing quote tags