
RaceKern.com 2012

Cool, thanks for the info! Post up a pic of that control arm if you'd like. 
For now I'm happy with the 10.5" wheels and since I'm fixing body damage and using a body kit that didn't quote additional clearance, I wanted to play it safe this year. Once the new panels are made, I'll have a much better idea of what I can stuff under the car...of course there's the whole issue of weight/drag vs. grip benefit to weigh as well, and most on here seemed to think that 285 is about the most you need on an Evo.
On the springs, I'm running a 6" tall spring with 2.5" tall helper/tenders to make sure the wheels get pushed into the ground until they bottom out. Guessing that's going to mean that I'm not able to sneak the tire under the springs.
Dave
The reason why people say a 285 is the widest you need is because they haven't been able to fit wider tires on there.
The section width of a 295 hoosier is 0.1" wider than a 285...and it's much taller in OD. which is what the Evo has problems fitting. The front tires need to be the 24.9" OD in order to clear the front bumper and the rear of the front fender well. The use of the Perrin PSRS and camber/caster plates allow you to place the front tire right where it gets the most clearance fore and aft...and just happens to be with the addition of a bunch of caster! great things.
The next problem is Hoosier doesn't make a 305/30/18. They make a 315/30/18. Which means you need to jump from a 10.5" wheel with a 285 wide tire to an 11.5" wheel with a 315. Most people can't fathom putting an 11.5" wheel on an Evo...and thus the saying...a 285 is all you really need (can fit) on an Evo.
For me... I would and will run a 315 hoosier as soon as I make room in the back of my Evo for it. I know I can fit it up front, I just need to work the rear suspension and fender well to fit an 11.5" wheel. You have the advantage of having a widebody (something I don't want to do) so you have a whole extra inch...which means you're there already! To me I'd rather have the grip. The extra mass of the wheel/tire combo will be peanuts when you consider how much power you're making.


Dave
Hopefully you've already checked out part 1 where I showed just how much work went into getting the Evo's body all cleaned up. This installment will cover what is involved with building the mold.
First I filled the door jams with foam and taped it all off:

Then the whole area got waxed and buffed - 8 times!?! Thanks Allison! Next we lined the area we'd be working with using clay to keep the resin from getting everywhere. Finally PVA mold release was sprayed across the whole area.

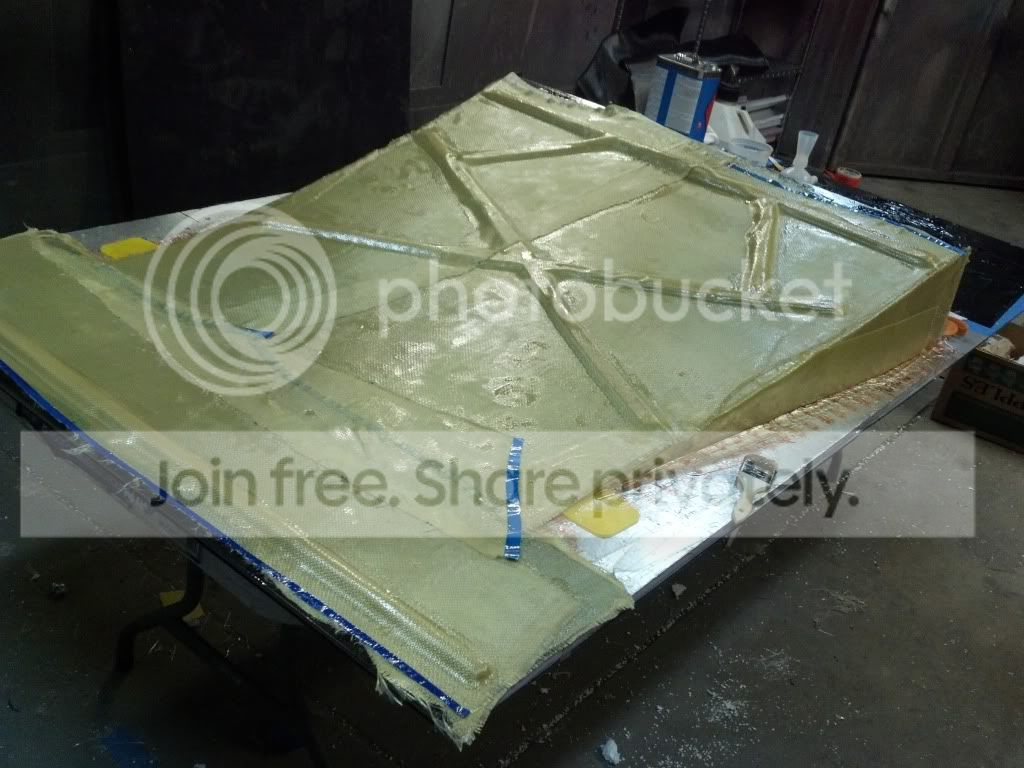
Fiberglass work begins:

Just about done with the first layer:

Finishing up the fourth and final layer:

After letting it dry for a week, we set about removing it from the car. Just one little hiccup, and it fell off onto the ground:

Got the rough edges trimmed up and spent some time washing off the mold release and any leftover bits of clay:

Last step is to make sure the mold doesn't try and twist when we're actually making parts, so we built a frame for it and bonded it right to the ouside of the mold. This picture is about half way done, we put more glass down so its on there rock solid now:

Thanks for checking it out - next up - making lightweight parts!
Dave
First I filled the door jams with foam and taped it all off:
Then the whole area got waxed and buffed - 8 times!?! Thanks Allison! Next we lined the area we'd be working with using clay to keep the resin from getting everywhere. Finally PVA mold release was sprayed across the whole area.
Fiberglass work begins:
Just about done with the first layer:
Finishing up the fourth and final layer:
After letting it dry for a week, we set about removing it from the car. Just one little hiccup, and it fell off onto the ground:
Got the rough edges trimmed up and spent some time washing off the mold release and any leftover bits of clay:
Last step is to make sure the mold doesn't try and twist when we're actually making parts, so we built a frame for it and bonded it right to the ouside of the mold. This picture is about half way done, we put more glass down so its on there rock solid now:
Thanks for checking it out - next up - making lightweight parts!
Dave
Very nice, what did you do with your inner fender steel to secure the panel? I had. Subaru 99 widebody 22b kit and it was disgustingly open and airy. I sold it before i drove for lack of knowledge on bodt work ..

Nothing has been done on that aspect yet. I'm thinking I'll back cut the inner fender and splay it apart and then bend it outwards. Then I'll probably need to weld in some additional metal to come all the way out to the widebody. I'm guessing I'll use some sort of door seal so that I get a water/dust tight seal.
Dave
Ever since I built a fiberglass hood for our 323 GTX, I've always thought composites were pretty neat...even though my first effort wasn't pretty. This year with guidance and advice from some friends, I've jumped in with both feet. I've posted up some updates on the widebody panels, but have also been doing some other work. Unfortunately this the "fail" thread, so if you're thinking about tackling a similar project, hopefully this will help save you some time and money.
I had a bunch of kevlar left over from doing underbody protection on the rally cars, so figured I'd give it a try for the rear diffuser. Figured it'd hold up better to tire blast (think little grains of sand and pebbles) than the carbon...its a real pain in the butt to cut:

Here it is after the first layer was down, wetted out using polyester impact resin:

Adding core material in hopes of stiffening it up:

And here it is with the 2nd and hopefully final layer complete:
As I was working on this piece on my own, I added less hardner to the resin so I'd have a bit longer working time. Unfortunately, I think when I did the side plates I didn't use enough, because after 36 hours, they were still a tad sticky and floppy.
Next up is a flat bottom to feed clean air to the diffuser. Once again, we used kevlar for the ground-facing side and are using balsa to help give it some strength. Here's our first stab at this huge panel (~50" x 70"):

After letting that cure overnight, it had pretty good stiffness one direction, but was a floppy mess in the other. Knowing that the panel will be bolted along the sides (in the 50" direction), I didn't see much need to reinforce it there. So, I added another couple strips of balsa core to the center:

So, this being the "fail" post, what did I learn:
1) The kevlar didn't seem to stiffen up very well.
2) Adding complex shapes of core makes draping the fabric tricky.
3) Fabric not draping well leads to the first layer pulling off the smooth bottom surface.
4) Standard layup is difficult to do well (vs. say vacuum bagging)
5) I could continue to add material to stiffen it up further, but that adds weight.
So, with those lessons learned, it was time to experiment a little. I mixed up some more resin and some small strips of kevlar and carbon. I made one with two layers of kevlar, one with two layers of carbon, one with two layers of carbon and soft foam core, and one with two layers of carbon and cardboard core. I also made a big panel consisting of two layers of carbon and balsa core running the entire width/length of the sheet.

Once it was all wetted out, I put a 2nd piece of plastic on top and added some weight to keep it all pressed together nicely during the curing process:

So, as it stands now, I'm going to make an attempt at new pieces if time allows. I'll be using foam core throughout the panels, using epoxy resin, and carbon fiber. Stay tuned for pics & thanks for reading!
Dave
I had a bunch of kevlar left over from doing underbody protection on the rally cars, so figured I'd give it a try for the rear diffuser. Figured it'd hold up better to tire blast (think little grains of sand and pebbles) than the carbon...its a real pain in the butt to cut:
Here it is after the first layer was down, wetted out using polyester impact resin:
Adding core material in hopes of stiffening it up:
And here it is with the 2nd and hopefully final layer complete:
As I was working on this piece on my own, I added less hardner to the resin so I'd have a bit longer working time. Unfortunately, I think when I did the side plates I didn't use enough, because after 36 hours, they were still a tad sticky and floppy.
Next up is a flat bottom to feed clean air to the diffuser. Once again, we used kevlar for the ground-facing side and are using balsa to help give it some strength. Here's our first stab at this huge panel (~50" x 70"):
After letting that cure overnight, it had pretty good stiffness one direction, but was a floppy mess in the other. Knowing that the panel will be bolted along the sides (in the 50" direction), I didn't see much need to reinforce it there. So, I added another couple strips of balsa core to the center:
So, this being the "fail" post, what did I learn:
1) The kevlar didn't seem to stiffen up very well.
2) Adding complex shapes of core makes draping the fabric tricky.
3) Fabric not draping well leads to the first layer pulling off the smooth bottom surface.
4) Standard layup is difficult to do well (vs. say vacuum bagging)
5) I could continue to add material to stiffen it up further, but that adds weight.
So, with those lessons learned, it was time to experiment a little. I mixed up some more resin and some small strips of kevlar and carbon. I made one with two layers of kevlar, one with two layers of carbon, one with two layers of carbon and soft foam core, and one with two layers of carbon and cardboard core. I also made a big panel consisting of two layers of carbon and balsa core running the entire width/length of the sheet.
Once it was all wetted out, I put a 2nd piece of plastic on top and added some weight to keep it all pressed together nicely during the curing process:
So, as it stands now, I'm going to make an attempt at new pieces if time allows. I'll be using foam core throughout the panels, using epoxy resin, and carbon fiber. Stay tuned for pics & thanks for reading!
Dave
Dave,
buy a vacuum pump and at least bag it. I don't suggest trying VARTM, but at least bag the laminate. Also use Epoxy Resins... Polyester resins are crap. Vacuum bagged epoxy laminates that require an elevated cure temperature would seem to be more of what you want. You're going to exceed the TG (glass transition) of the Polyester resin with the temperatures it will see and your laminate is going to sag/fold/fail/not be nice. Also by bagging the laminate you can achieve a much better Fiber Volume Fraction (FVF) and your specific stiffness of the laminate will improve!
Core thickness gives stiffness. I recommend coring the entire laminate, not just strips that make it look like underhood bracing. I would also recommend using actual core like Hexcel/Honeycomb. This makes your laminates thicker, but they're also much stiffer for the weight.
Google : Gurit guide to composites. It'll teach you everything you need to know.
Even with all the work in the last writeup, the molds still needed a little bit of TLC before we could make parts. More sanding was done on the surface of the mold and I laid down some primer and then did a wet sand to get it smooth again. Here it is all done:

After realizing that the sharp edges were prone to catching the dry cloth, we taped up all the edges. We also determined that the molds weren't really suitable for vacuum bagging, so we decided it would make life much easier to cut the carbon cloth into several pieces so it'd be easier to work with and ensure it contoured to the surface. Here's a shot of the cloth pieces all laid up in the spots where they'll end up:

And here's the inside layer:

Here's a shot of us just about finished up. We've laid in some peel ply, so if the panel isn't stiff enough, we can go back later and add some more material.

So, how'd it all turn out? Its not perfect by any means, but its a panel in the correct size and shape which is lighter than what it's replacing. We'll probably end up covering it up with vinyl and/or graphics, so fitment is more important than looks.

Thanks for reading!
Dave
After realizing that the sharp edges were prone to catching the dry cloth, we taped up all the edges. We also determined that the molds weren't really suitable for vacuum bagging, so we decided it would make life much easier to cut the carbon cloth into several pieces so it'd be easier to work with and ensure it contoured to the surface. Here's a shot of the cloth pieces all laid up in the spots where they'll end up:
And here's the inside layer:
Here's a shot of us just about finished up. We've laid in some peel ply, so if the panel isn't stiff enough, we can go back later and add some more material.
So, how'd it all turn out? Its not perfect by any means, but its a panel in the correct size and shape which is lighter than what it's replacing. We'll probably end up covering it up with vinyl and/or graphics, so fitment is more important than looks.
Thanks for reading!
Dave
Dave


Thanks! To be honest I probably wouldn't have attempted it had I known how long it was actually going to take. The nice thing about having some extra time before the race is that now I can spend some time making the parts look a little nicer. Functionally they're good enough...but you have to stand back 20 feet for it to look good.
Dave
Dave
 . And sadly it looks like you'll have even more time now. Any word on a resched date?
yep looks really bad the situation in Colorado. How much time they have to reschedlure? I mean for priveteers is much harder to reorgenize everything then for a pro teams(usually). Hope fully it will be not a big mess. Maybe they will offer a free run for those who cant make it this year for the next event?
One of the areas I'm really trying to focus in on this year is improving the Evo's handling. Last year we swapped to some road race dampers but got rained out on our one planned testing day, so when we showed up for Pikes Peak week, the car was far from ideal. We managed to make it work reasonably well, but I know there's more time locked up in optimizing our setup.
After our crash last year on race day, I knew there was alot of stuff that needed to be fixed:

I got all the dampers fixed and/or replaced last fall, so now to order up some parts to compliment the shocks. First up is some new springs:

Next up is a larger rear sway bar. Factory is a 22mm unit, and this one is about 25mm and its got 3 different positions to choose from. I also installed adjustable end links:

The front sway bar is a bit more of a chore. To do it the "easy" way, you drop the front subframe a few inches. Having a lift really makes this much simpler:

With the subframe out of the way and giving a little extra clearance, the OEM bar slides right out. Here it is next to the new Tanabe hollow sway bar:

Subframe brace added which ties the front and rear mounting points of the control arms together:

Next up was to install the Whiteline Steering Precision Kit. Fancy words for replace rubber bushings with urethane. A few of the OEM bushings needed to get pressed out, but rather than remove the whole steering rack from the car, we worked up a makeshift press:

One of the things I didn't like about the shocks is that they didn't allow for as much adjustment at the hub spindle as my Ohlins rally shocks, so after a trip to a buddies machine shop, the Ohlins eccentric washers fit in there perfect:

Camber plates + camber adjustment at the hub mounting points = this much maximum camber:

Hmmm, looks to me like we've got plenty of room to stuff more rubber under the front end since that's last year's setup with a 20mm spacer.
Thanks for reading!
Dave
After our crash last year on race day, I knew there was alot of stuff that needed to be fixed:
I got all the dampers fixed and/or replaced last fall, so now to order up some parts to compliment the shocks. First up is some new springs:
Next up is a larger rear sway bar. Factory is a 22mm unit, and this one is about 25mm and its got 3 different positions to choose from. I also installed adjustable end links:
The front sway bar is a bit more of a chore. To do it the "easy" way, you drop the front subframe a few inches. Having a lift really makes this much simpler:
With the subframe out of the way and giving a little extra clearance, the OEM bar slides right out. Here it is next to the new Tanabe hollow sway bar:
Subframe brace added which ties the front and rear mounting points of the control arms together:
Next up was to install the Whiteline Steering Precision Kit. Fancy words for replace rubber bushings with urethane. A few of the OEM bushings needed to get pressed out, but rather than remove the whole steering rack from the car, we worked up a makeshift press:
One of the things I didn't like about the shocks is that they didn't allow for as much adjustment at the hub spindle as my Ohlins rally shocks, so after a trip to a buddies machine shop, the Ohlins eccentric washers fit in there perfect:
Camber plates + camber adjustment at the hub mounting points = this much maximum camber:
Hmmm, looks to me like we've got plenty of room to stuff more rubber under the front end since that's last year's setup with a 20mm spacer.
Thanks for reading!
Dave