


2.3L GT3076Build


im running 27-28 psi on 93 oct, the turbo is still efficient at those boost levels. although your intercooler and other variables will come into play

Good luck with 35, you will hold that till about 5k RPM 
The 30R falls on its face on race gas, with your small housing you will drop 10lbs from peak boost to redline if you run as much boost as you can.
Scorke
The 30R falls on its face on race gas, with your small housing you will drop 10lbs from peak boost to redline if you run as much boost as you can.
Scorke

Thread Starter
Evolved Member
iTrader: (62)
Joined: Feb 2004
Posts: 3,336
Likes: 6
From: Redmond - Lake Tapps ,WA
Good to know. I just pulled those numbers out of my butt anyway. Maybe the boost levels will be similar and I'll just add some timing on the race gas map.

Thread Starter
Evolved Member
iTrader: (62)
Joined: Feb 2004
Posts: 3,336
Likes: 6
From: Redmond - Lake Tapps ,WA
Yeah my stock IC should line up just fine once I build a new lower IC pipe  I'll get the thing running on the stocker and then look for a deal on a lightly used AMS, Buschur or ETS. I was going to build a custom vertical flow IC with a trick radiator but I'm out of money for more custom parts right now.
I need to get the thing back together at this point, and I still have some outstanding small parts to pickup. I'd like to do a few things with the brakes and build some more aero stuff before next track season as well.
Buy brackets guys, so I can finish this!
I'll get the thing running on the stocker and then look for a deal on a lightly used AMS, Buschur or ETS. I was going to build a custom vertical flow IC with a trick radiator but I'm out of money for more custom parts right now.I need to get the thing back together at this point, and I still have some outstanding small parts to pickup. I'd like to do a few things with the brakes and build some more aero stuff before next track season as well.
Buy brackets guys, so I can finish this!
Thread Starter
Evolved Member
iTrader: (62)
Joined: Feb 2004
Posts: 3,336
Likes: 6
From: Redmond - Lake Tapps ,WA
A couple pics of the balanced components. The pistons were within .60 grams of each other from Wiseco. The machine shop made them within .10 grams by removing a little material on the underside of the three heavy ones. Now the set is matched.

They did the same thing to the rods by sanding the inside surfaces of the H-Beam's.

Next up is to test fit the crank and grind the clearance areas in the block. Then spin down the balance shafts on the lathe.
They did the same thing to the rods by sanding the inside surfaces of the H-Beam's.
Next up is to test fit the crank and grind the clearance areas in the block. Then spin down the balance shafts on the lathe.

I'm doing a 2.3. The Parts JUST came in. I look forward to reading the rest of the thread. (I'm on page 3)
One thing, My crank bolt wouldn't back off at all so I reversed the torque wrench and hit the bolt maybe 2 or 3 times. Then put it back on "loose" and it spun right out.
One thing, My crank bolt wouldn't back off at all so I reversed the torque wrench and hit the bolt maybe 2 or 3 times. Then put it back on "loose" and it spun right out.
Thread Starter
Evolved Member
iTrader: (62)
Joined: Feb 2004
Posts: 3,336
Likes: 6
From: Redmond - Lake Tapps ,WA
I'm doing a 2.3. The Parts JUST came in. I look forward to reading the rest of the thread. (I'm on page 3)
One thing, My crank bolt wouldn't back off at all so I reversed the torque wrench and hit the bolt maybe 2 or 3 times. Then put it back on "loose" and it spun right out.
One thing, My crank bolt wouldn't back off at all so I reversed the torque wrench and hit the bolt maybe 2 or 3 times. Then put it back on "loose" and it spun right out.
 .
.Funny enough I have been doing more painting the last week or so and not working on the motor. The number of rooms unpainted in my house is getting seriously low.
On another painting note I put a whole can of engine enamel on the block, and because it was down to bare casting after the cold tank it's still pretty rough. I mounted the block to the stand and then decided I'm going to put another can of paint on the block. I'll hit the valve cover and spark plug cover/cam cover while I'm painting. Should have some pics around the weekend.
That's a good trick. I did try that - but it didn't budge .
Funny enough I have been doing more painting the last week or so and not working on the motor. The number of rooms unpainted in my house is getting seriously low.
On another painting note I put a whole can of engine enamel on the block, and because it was down to bare casting after the cold tank it's still pretty rough. I mounted the block to the stand and then decided I'm going to put another can of paint on the block. I'll hit the valve cover and spark plug cover/cam cover while I'm painting. Should have some pics around the weekend.
.Funny enough I have been doing more painting the last week or so and not working on the motor. The number of rooms unpainted in my house is getting seriously low.
On another painting note I put a whole can of engine enamel on the block, and because it was down to bare casting after the cold tank it's still pretty rough. I mounted the block to the stand and then decided I'm going to put another can of paint on the block. I'll hit the valve cover and spark plug cover/cam cover while I'm painting. Should have some pics around the weekend.


Yeah my stock IC should line up just fine once I build a new lower IC pipe I'll get the thing running on the stocker and then look for a deal on a lightly used AMS, Buschur or ETS. I was going to build a custom vertical flow IC with a trick radiator but I'm out of money for more custom parts right now.
Buy brackets guys, so I can finish this!
I'll get the thing running on the stocker and then look for a deal on a lightly used AMS, Buschur or ETS. I was going to build a custom vertical flow IC with a trick radiator but I'm out of money for more custom parts right now.Buy brackets guys, so I can finish this!
Word! I will be buying some brackets this Christmas...
Thread Starter
Evolved Member
iTrader: (62)
Joined: Feb 2004
Posts: 3,336
Likes: 6
From: Redmond - Lake Tapps ,WA
Did some work today on the engine. First I checked my main clearances and did a little mock-up to see where I needed to grind the block for rod clearance due to the 100mm crank.
Here's the plastigage on the bearings - looking good .0020" everywhere.


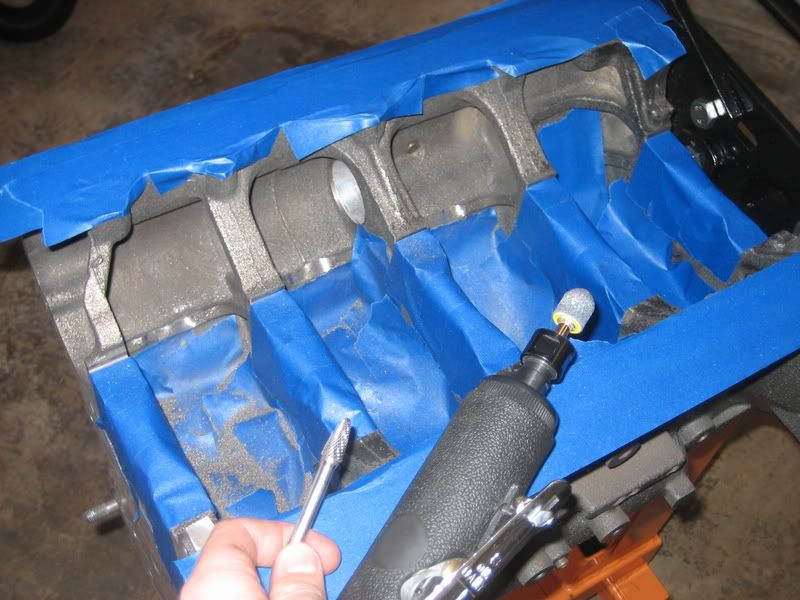
I didn't want to lube everything up and do a full rotating assembly mock-up just yet so I kinda roughed things together for figuring the rod grindage to the block. AMS has a good picture on their website about grinding the block. They say you need to clear out two areas. To me it looked like I needed to clear 3 areas, although I didn't do a full rotating mock-up to verify. So I decided I'd grind all three areas just to so I didn't have to go back later. I masked off the block to keep the chips from getting into everything, it worked really well. I used a teardrop shaped carbide burr to rough the cuts and then a stone to finish up. A ball end cutter would work well also.

After that I went over to a friends house and fired up the lathe to spin down my balance shaft. I lobed off the back section and then spun off the counter weights. This is pretty much the same as the AMS race balance shaft, they spin it down a little more but I was fine with this. It cost me roughly $4 which was the amount I paid for a cheese burger, fries and a coke because I was hungry on the drive to my friends house a savings of $296 over the AMS part.

Here's the plastigage on the bearings - looking good .0020" everywhere.
I didn't want to lube everything up and do a full rotating assembly mock-up just yet so I kinda roughed things together for figuring the rod grindage to the block. AMS has a good picture on their website about grinding the block. They say you need to clear out two areas. To me it looked like I needed to clear 3 areas, although I didn't do a full rotating mock-up to verify. So I decided I'd grind all three areas just to so I didn't have to go back later. I masked off the block to keep the chips from getting into everything, it worked really well. I used a teardrop shaped carbide burr to rough the cuts and then a stone to finish up. A ball end cutter would work well also.
After that I went over to a friends house and fired up the lathe to spin down my balance shaft. I lobed off the back section and then spun off the counter weights. This is pretty much the same as the AMS race balance shaft, they spin it down a little more but I was fine with this. It cost me roughly $4 which was the amount I paid for a cheese burger, fries and a coke because I was hungry on the drive to my friends house a savings of $296 over the AMS part.

