
DSLR Photography for beginner - How to shoot like a Pro.


Newbie
Joined: Feb 2009
Posts: 4
Likes: 0
From: somerset, pa
this is a very cool post. im amateur at screenwriting/filmmaking... even things like this help people like me. i'm always willing to learn a little bit more about any craft such as this. excellent post and good luck to everyone. anyone else that is into film in my pa area or any other area, feel free to pm or email me for something to do.


check this link if anyone needs to know how to do rigs
http://www.orlandoforums.com/forum/s...d.php?t=130834
http://www.orlandoforums.com/forum/s...d.php?t=130834


Evolving Member
Joined: Aug 2008
Posts: 104
Likes: 0
From: Crete
nice *** pics
This is a long read but please believe me that this will help you overcome the fear of the DSLR world and be right on your way to take better pictures!
---DISCLAIMER-
I'm writing this guide for members who have been asking me how to get started with photography. I am by no means a pro-photographer, I'm just an amateur whose really into photography and started doing my own research to get started on this. I was blessed with the help of Vince (n1nj4_m0d3), a close friend who is very knowledgeable and my uncle from Vietnam who is a pro photographer himself. However, everything you see and hear can be different and confusing to the novice eyes and ears so let me help you break things down so that you can easier understand the importance and ease of getting started
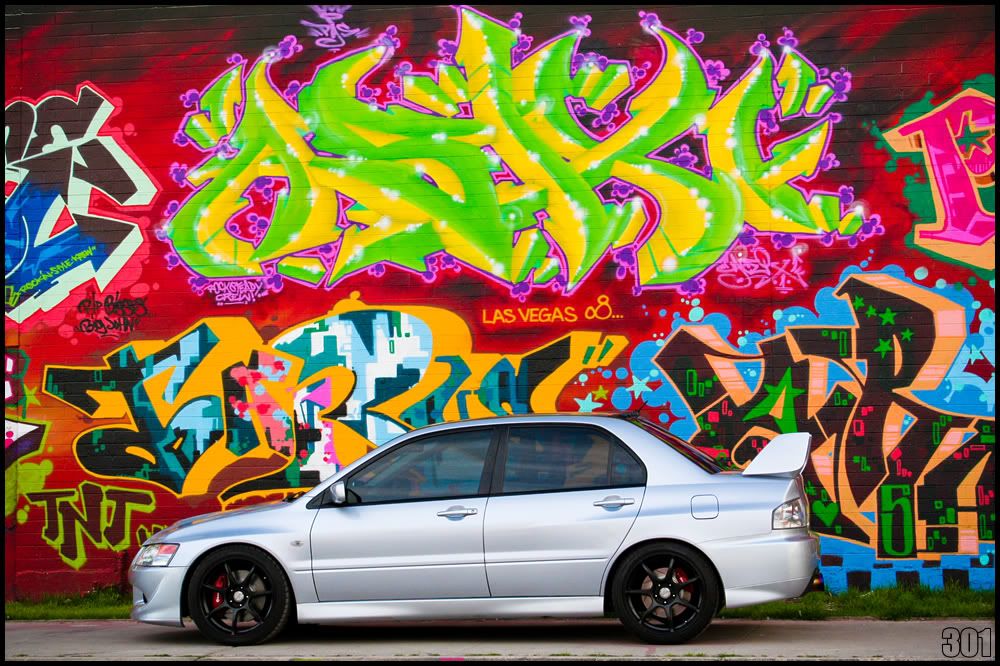
First: You are take pictures with a point-n-shoot camera currently and it�s doing fine for the nights out at the clubs or concerts. But take this into consideration, for your family events, outings, snowboarding trips, or maybe a daughter or son�s first steps � you want something that can be framed. For those once-in-a-lifetime candid shots, you need something that fires up quickly, takes the shot and even without any type of manual adjustments, it will come out half way decent. This is where the DSLR comes.
Example of just me picking up my camera, set it to automatic mode, and click.

Second: So you now understand why you need to invest in a DSLR. The big question is which one? There are literally thousands of new and old models out there, so how do you know? Well, the answer is easy. Most DSLR within the last 3 years of production will give you a nice image, what you need to know is how to use it. It�s like a car, you can have a ferrari and drive horribly, or you can have an Evo and beat an exotic on a road course. My suggestion is to stick with the big names such as Canon or Nikon. Sony is also a good choice as they are newer on the market and is generally a little less expensive.
Canon Rebel Series: Great camera with many semi-pro and pro-level features for your money. If you are considering $400-$500 budget I would suggest picking up an XT or Xti with a kit lens. If you have $700-$800 I would choose an Xsi (this is what I shoot with).
Nikon D-series: I would highly recommend the D70, D80 for the same budget of $600-$700 but I am against the D40, the reason is because the D40 has no built-in autofocus which means you need to buy a lens with AT built in making your lens selection less and more expensive as well. The D40X and D50 does not have this issue.
Sony Alpha series: great price for your money. The Alpha is new and though some people are hard core Canon and Nikon fans, I think Sony is doing really well to keep up with the big boys.
Picture taken with Canon Rebel XSi 12.0 Megapixel with 18-55mm IS kit lens.

The basics:
A DSLR has many features, but for a beginner, there only a few that really matters and these are the ones you should pay attention to...for now:
ISO: This is how sensitive the image sensor is to light in the area you�re taking the picture. The higher the ISO, the easier it is to take pictures in low-light conditions. HOWEVER � you should never take a good photograph in anything higher than 200 or a maximum of 400 with an entry-level DSLR. This will create a lot of noise � or dots � in your picture making it look �grainy�. I normally keep this at 100 or 200 and never changing it.
Keeping the ISO at 100 is the best way to keep your picture noise-free.

Aperture, exspressed as F-Stop: Without going into a lot of details, this is arguably one of the most important thing when chosing a lens. The aperture range is expressed in f-stop and can be found on the lens (example F2.8-F8.0) The lower the aperture, the larger the lens opening - or aperture � is. Expensive lens differs from cheaper lens in a sense that their aperture range is larger. Further info on this should be left for a more in-depth expert article, however, what you should know is simply that if you set your F-Stop to the lowest posible it will make for a good portrait style shot � keeping the subject in focus � but the background blurry. Similarly, if you max out the F-Stop, you�ll get a picture that�s clear all around, perfect for landscape type photography.
Example of low F-Stop setting, you can see how my dog Snowie is sharp in this picture but the background is blurry.

Shutter speed: For a novice, setting the shutter speed simply means how long the shutter is open to allow light into the picture, a lower shutter speed means a darker picture and vice versa. Keeping the shutter speed longer, say, 20 to maybe even 30 seconds will allow a dark location to appear much brighter.
Example of a 30 second shutter speed on a dark light with minimal surrounding light.

Post-processing and File Type: RAW RAW RAW - Only shoot in RAW. It's the only way to take full advantage of photoshop. Raw is a file type that allows you to control every aspect of your image and readjust them as needed after you transfer them into Photoshop. If you take an image in raw that's too dark, the exposure can be digitally changed on PS. You should also familiarize yourself with photoshop. Here's a nice article that's easy to follow and fun for a beginner: http://www.mahalo.com/How_to_Use_Pho...tos_Look_Great
No post-processing versus processed picture


Expanding on your style - RIG SHOTS
So ever since Vince (n1nj4_m0d3) did a photoshoot for my Evo with his rig, I have been getting PMs almost every week asking how someone can do this, and with what type of gears to construct the rig.
I have not attempt to do my own rig shot but I know how Vince went about it and obviously any questions beyond how the rig was constructed will have to be directed to him and you can PM him @ n1nj4_m0d3
I took these pictures while he was preparing for the rig so that you can clearly see how it's set up on the vehicle.
The rig:
-2 pro-grade suction cups
-expandable aluminum pole
-tripod head modified to be mounted fixed onto one end
-zip ties
-a wideangle lens, for these Vince used a fairly expensive Canon 10-22mm wideangle.
-a remote for your DSLR
The rig


Results of Vince's work:

So there you have it - a small guide that's not too long to read and you can get started right away. I'm sure I might have missed some details and such and so any experts who would like to add to this thread please do! Let's help get more DSLR photographers out there and take better, nicer, and beautiful photos of our cars, families, and hobbies
---DISCLAIMER-
I'm writing this guide for members who have been asking me how to get started with photography. I am by no means a pro-photographer, I'm just an amateur whose really into photography and started doing my own research to get started on this. I was blessed with the help of Vince (n1nj4_m0d3), a close friend who is very knowledgeable and my uncle from Vietnam who is a pro photographer himself. However, everything you see and hear can be different and confusing to the novice eyes and ears so let me help you break things down so that you can easier understand the importance and ease of getting started
First: You are take pictures with a point-n-shoot camera currently and it�s doing fine for the nights out at the clubs or concerts. But take this into consideration, for your family events, outings, snowboarding trips, or maybe a daughter or son�s first steps � you want something that can be framed. For those once-in-a-lifetime candid shots, you need something that fires up quickly, takes the shot and even without any type of manual adjustments, it will come out half way decent. This is where the DSLR comes.
Example of just me picking up my camera, set it to automatic mode, and click.
Second: So you now understand why you need to invest in a DSLR. The big question is which one? There are literally thousands of new and old models out there, so how do you know? Well, the answer is easy. Most DSLR within the last 3 years of production will give you a nice image, what you need to know is how to use it. It�s like a car, you can have a ferrari and drive horribly, or you can have an Evo and beat an exotic on a road course. My suggestion is to stick with the big names such as Canon or Nikon. Sony is also a good choice as they are newer on the market and is generally a little less expensive.
Canon Rebel Series: Great camera with many semi-pro and pro-level features for your money. If you are considering $400-$500 budget I would suggest picking up an XT or Xti with a kit lens. If you have $700-$800 I would choose an Xsi (this is what I shoot with).
Nikon D-series: I would highly recommend the D70, D80 for the same budget of $600-$700 but I am against the D40, the reason is because the D40 has no built-in autofocus which means you need to buy a lens with AT built in making your lens selection less and more expensive as well. The D40X and D50 does not have this issue.
Sony Alpha series: great price for your money. The Alpha is new and though some people are hard core Canon and Nikon fans, I think Sony is doing really well to keep up with the big boys.
Picture taken with Canon Rebel XSi 12.0 Megapixel with 18-55mm IS kit lens.
The basics:
A DSLR has many features, but for a beginner, there only a few that really matters and these are the ones you should pay attention to...for now:
ISO: This is how sensitive the image sensor is to light in the area you�re taking the picture. The higher the ISO, the easier it is to take pictures in low-light conditions. HOWEVER � you should never take a good photograph in anything higher than 200 or a maximum of 400 with an entry-level DSLR. This will create a lot of noise � or dots � in your picture making it look �grainy�. I normally keep this at 100 or 200 and never changing it.
Keeping the ISO at 100 is the best way to keep your picture noise-free.
Aperture, exspressed as F-Stop: Without going into a lot of details, this is arguably one of the most important thing when chosing a lens. The aperture range is expressed in f-stop and can be found on the lens (example F2.8-F8.0) The lower the aperture, the larger the lens opening - or aperture � is. Expensive lens differs from cheaper lens in a sense that their aperture range is larger. Further info on this should be left for a more in-depth expert article, however, what you should know is simply that if you set your F-Stop to the lowest posible it will make for a good portrait style shot � keeping the subject in focus � but the background blurry. Similarly, if you max out the F-Stop, you�ll get a picture that�s clear all around, perfect for landscape type photography.
Example of low F-Stop setting, you can see how my dog Snowie is sharp in this picture but the background is blurry.
Shutter speed: For a novice, setting the shutter speed simply means how long the shutter is open to allow light into the picture, a lower shutter speed means a darker picture and vice versa. Keeping the shutter speed longer, say, 20 to maybe even 30 seconds will allow a dark location to appear much brighter.
Example of a 30 second shutter speed on a dark light with minimal surrounding light.
Post-processing and File Type: RAW RAW RAW - Only shoot in RAW. It's the only way to take full advantage of photoshop. Raw is a file type that allows you to control every aspect of your image and readjust them as needed after you transfer them into Photoshop. If you take an image in raw that's too dark, the exposure can be digitally changed on PS. You should also familiarize yourself with photoshop. Here's a nice article that's easy to follow and fun for a beginner: http://www.mahalo.com/How_to_Use_Pho...tos_Look_Great
No post-processing versus processed picture
Expanding on your style - RIG SHOTS
So ever since Vince (n1nj4_m0d3) did a photoshoot for my Evo with his rig, I have been getting PMs almost every week asking how someone can do this, and with what type of gears to construct the rig.
I have not attempt to do my own rig shot but I know how Vince went about it and obviously any questions beyond how the rig was constructed will have to be directed to him and you can PM him @ n1nj4_m0d3
I took these pictures while he was preparing for the rig so that you can clearly see how it's set up on the vehicle.
The rig:
-2 pro-grade suction cups
-expandable aluminum pole
-tripod head modified to be mounted fixed onto one end
-zip ties
-a wideangle lens, for these Vince used a fairly expensive Canon 10-22mm wideangle.
-a remote for your DSLR
The rig
Results of Vince's work:
So there you have it - a small guide that's not too long to read and you can get started right away. I'm sure I might have missed some details and such and so any experts who would like to add to this thread please do! Let's help get more DSLR photographers out there and take better, nicer, and beautiful photos of our cars, families, and hobbies

Posting this up for a friend. Some of his work.  I thought I'd post here.
My name is Orlando I go by Orlandoech Photography. Ive been shooting for about 1.5yrs now. I currently do freelance work for;
Performance Auto & Sound
Import Tuner
SuperStreet
TunerZine
ScoobyWorld
There are PLENTY of photogs out there that are better than me thats for sure. I myself enjoy looking at others work and also learning from others as well.
Anyway, here is a before, after and simple setup of an Evo rig shot I took for Performance Auto & Sound, its being fully featured in their August/Sept 2009 issue, so check it out when it comes out. I'm actually not suppose to share this picture till the feature prints, but oh well
If anyone wants to ask me ?s feel free to hit me up on PMs, MSN or AIM. My info is in my profile.
The headlight was shot seperately, so it wouldnt wash out during a long exposure. The sky was added in from a seperate picture as well, which I shot on a completely different day.


I thought I'd post here.My name is Orlando I go by Orlandoech Photography. Ive been shooting for about 1.5yrs now. I currently do freelance work for;
Performance Auto & Sound
Import Tuner
SuperStreet
TunerZine
ScoobyWorld
There are PLENTY of photogs out there that are better than me thats for sure. I myself enjoy looking at others work and also learning from others as well.
Anyway, here is a before, after and simple setup of an Evo rig shot I took for Performance Auto & Sound, its being fully featured in their August/Sept 2009 issue, so check it out when it comes out. I'm actually not suppose to share this picture till the feature prints, but oh well
If anyone wants to ask me ?s feel free to hit me up on PMs, MSN or AIM. My info is in my profile.
The headlight was shot seperately, so it wouldnt wash out during a long exposure. The sky was added in from a seperate picture as well, which I shot on a completely different day.