
WARNING / HOW TO: Fuel Line Return (High Pressure)

Insane fuel pressure is fixed! drilled the hole out with a 9/64 drill bit, All though I think the main issue was within the crap that was clogging the tiny hole to begin with. Now hopefully the hole I made wont effect anything negatively..

Have a customers car here with 80 psi at idle, pulled the filter out and it also had a black piece stuck in it. Some kind of rubber.
Last edited by tobz; Apr 6, 2011 at 04:48 PM.
I had this black rubber piece on my 2011 X... Had the holes drilled put by APM and then ran out of gas at 1/3 tank.... Bought new oem pump assembly. All is good now..... I hope!

i had this exact same clog in filter in the return line. before i removed the clog i was getting 60+ psi fuel pressure and my AFPR could not lower it at all. it was, as you would expect, seriously affecting my tune. i had way too much fuel down low and not enough at the top end. on the dyno, the fuel pressure would shoot up (to about 100psi+) down low and then it would drop off to about 20 psi and raise up to about 35 by 7000rpms. i THINK this was due to the a pressure relieve valve opening to relieve the the high pressure. anyway, i removed the clog and reinstalled everything and it has fixed my fuel pressure issues. the AFPR can now change the pressure and the car is running much better. interesting there aren't more people with this issue.

Newbie
Joined: Feb 2010
Posts: 40
Likes: 0
From: South Dakota
So.... like an idiot, I snipped the corrugated hose that was covering the return filter because I didn't want to put too much pressure on the assembly by yanking it off. I was assuming I could just replace it with some fuel injection hose....
... then I remembered that the corrugation was to allow the main assembly to compress on the guide pins and springs, the fuel injection hose would surely kink.
Any ideas?
As of right now I'm probably going to just use whatever corrugated hose I can find and attach it using gates heatshrink hose clamps... not ideal... but the only other option I have right now is to use silicone lines, which I know is retarded....
.... although I could possibly use some flexible rubber line made for nitro methane r/c cars from the hobby shop....
Newbie
Joined: Feb 2010
Posts: 40
Likes: 0
From: South Dakota
Managed to rig something with vinyl hose from my brake bleeding setup... Hopefully it holds up.
My return line filter was extremely clogged, the mesh seemed to be caked with what appeared to be rtv silicone.
I'm an 08 gsr with 80k miles, running gasoline although my state likes to sneak up to 10% ethanol in the premium at some gas stations.
My return line filter was extremely clogged, the mesh seemed to be caked with what appeared to be rtv silicone.
I'm an 08 gsr with 80k miles, running gasoline although my state likes to sneak up to 10% ethanol in the premium at some gas stations.

Evolving Member
Joined: Sep 2010
Posts: 126
Likes: 0
From: Finland
Did any of you guys just remove the filter and reinstall everything? I took my filter out by snipping the line (only way to get it off). Also for those that did clean the filter, how did you do it? You guys used carb cleaner?

So I recently had the fuel pump discharge hose burst in tank causing a very tense drive home. I have a Walbro 450 fuel pump. I switched out the hose for the radium engineering corrugated PTFE hose and installed. My fuel pressure was way too high, like 80psig. I read this thread and opened up the orifice hole to 1/8" and removed the screen (which had a bit of debris in it but I wouldn't say it was clogged). This allowed me to get back down to normal fuel pressure levels with the AFPR. It seems my car (injectors?) like about 50psig idle pressure now. If I set base pressure below 50 (therefore idle pressure being even lower due to vacuum) I end up maxing out my IDC to get enough fuel to run 12.5:1 on my ID 1100s (E85) at ~28psig boost on stock turbo (I have a 2.4L 10:1 SCR motor). Seems odd and I'm playing with that but at any rate I'm posting here to say that with the Wally 450, 1/8" orifice hole, and 6% fuel level (gas light blinking) I don't experience fuel starvation.
Pictures:
https://goo.gl/photos/cWuYzCQ6u4fPTUEx8
Pictures:
https://goo.gl/photos/cWuYzCQ6u4fPTUEx8

Newbie
Joined: Dec 2018
Posts: 18
Likes: 0
From: Z�rich, Switzerland
Raising this from the dead - I want to upgrade my pump, and drill out return line at same time. I removed everything a while back to check it, but couldn't work out how to fit my Walbro pump kit (now have instructions and know what to do), nor how to remove this piece that needs drilling out to around 2mm;
Attachment 293105
How do I get this assembly out of the tank sump assembly? I tried prizing down the sides with a flat blade, but was concerned about break the holder. No way I want to drill it out without first removing it, so I can remove the swarf from drilling.
Can anyone advise please?
Many thanks, Richard
Newbie
Joined: Dec 2018
Posts: 18
Likes: 0
From: Z�rich, Switzerland
To answer my own question - keep it as one assembly (I separated top part while bottom part was still locked in place on my first try), then you can use a big flat blade to prize it out of it's retaining lugs;
After prizing out entire assembly;
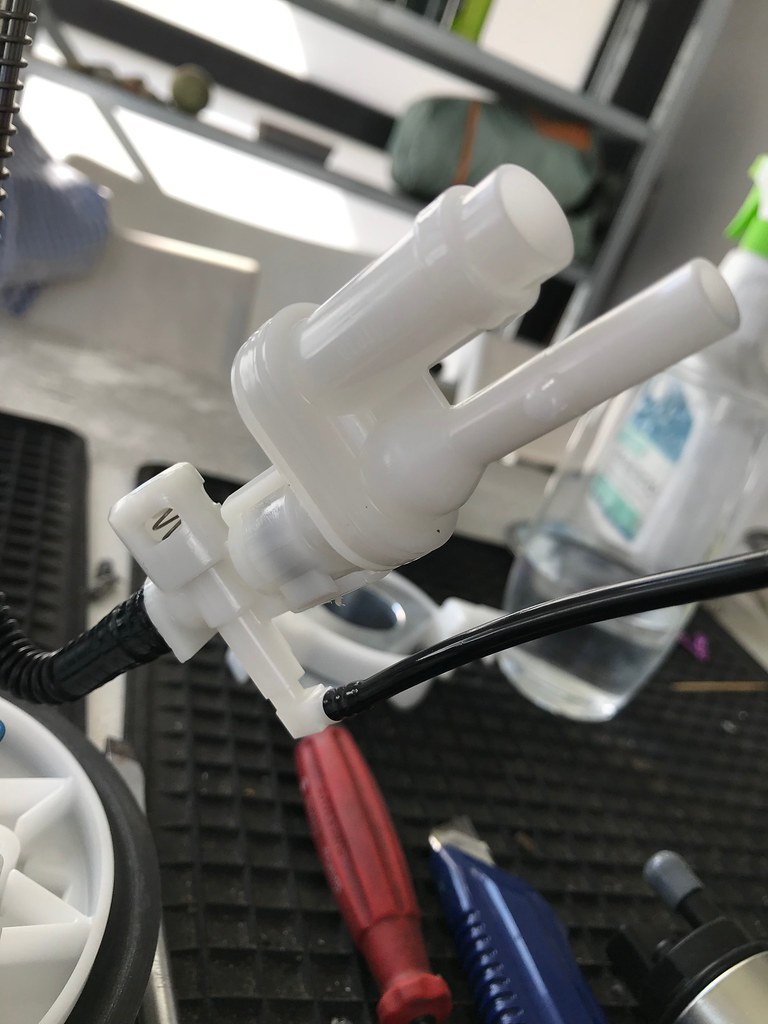
The round pegs here...
Click into these - it's a tight fit;

When refitting, remove rubber o-ring and mount at other end - it can be pretty tricky to get it to line up properly while supplying sufficient force to re-engage the clips.
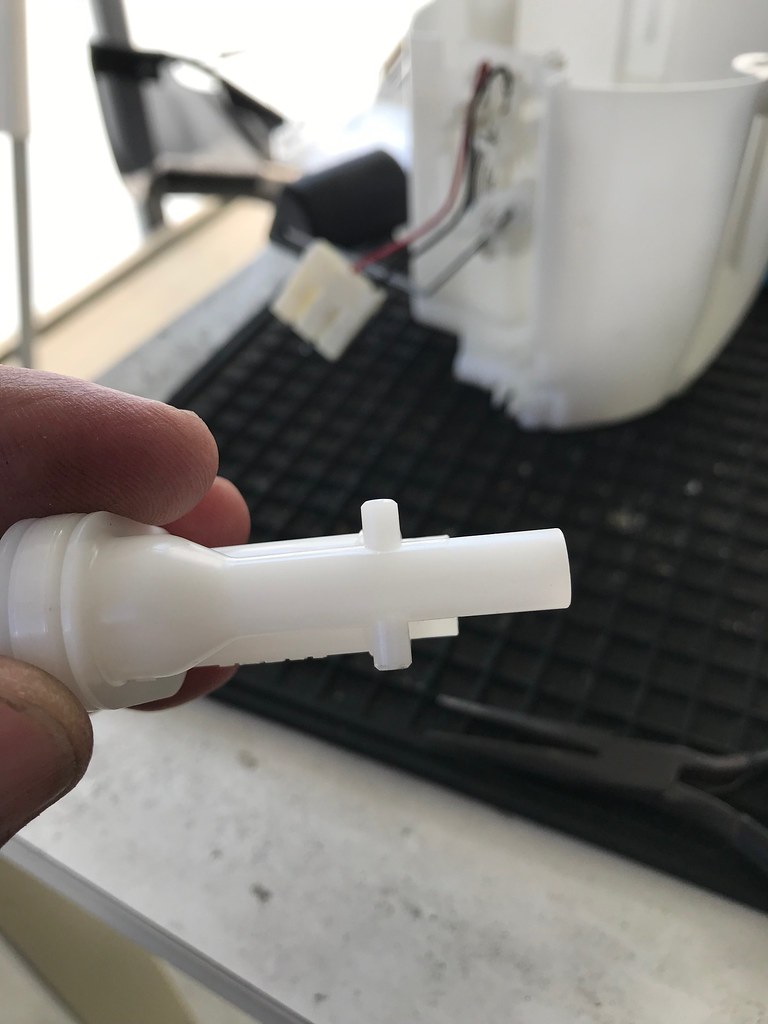
After then separating the 2 pieces, before and after drilling (2mm);

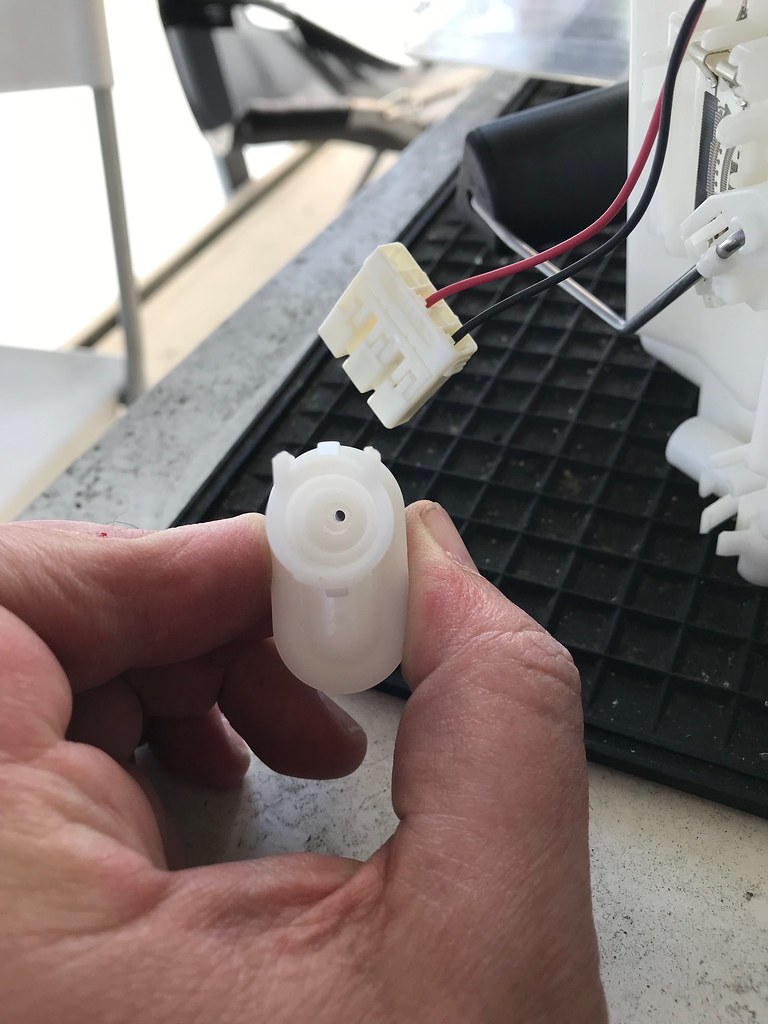
Completed assembly witha Walbro pump;
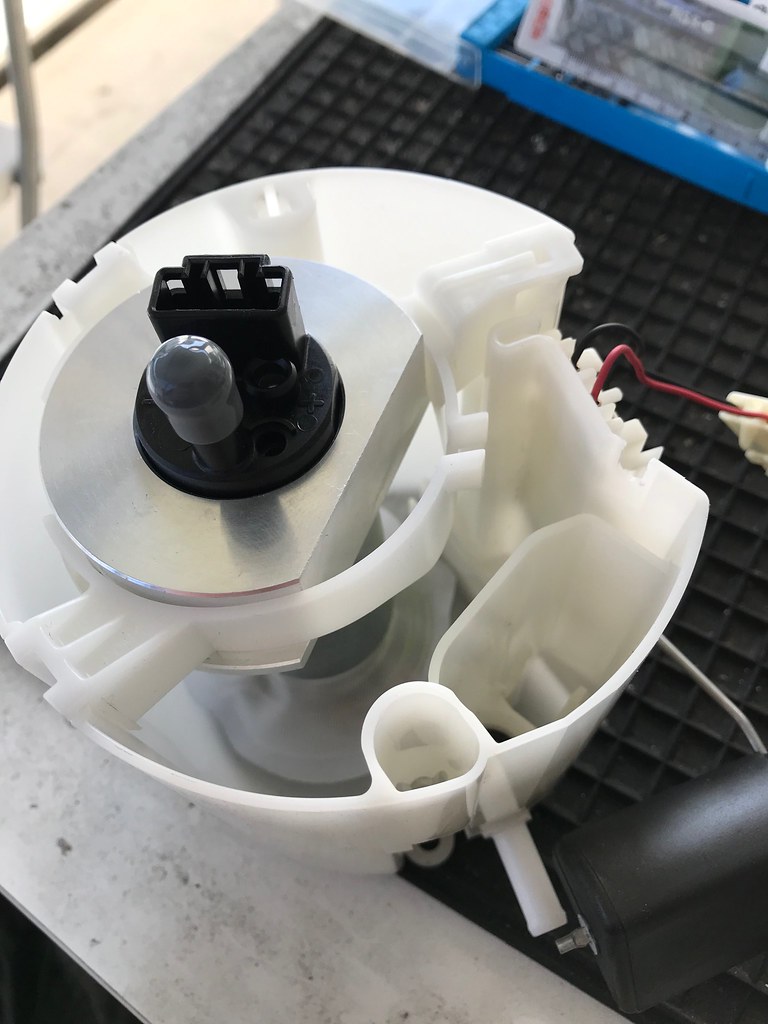
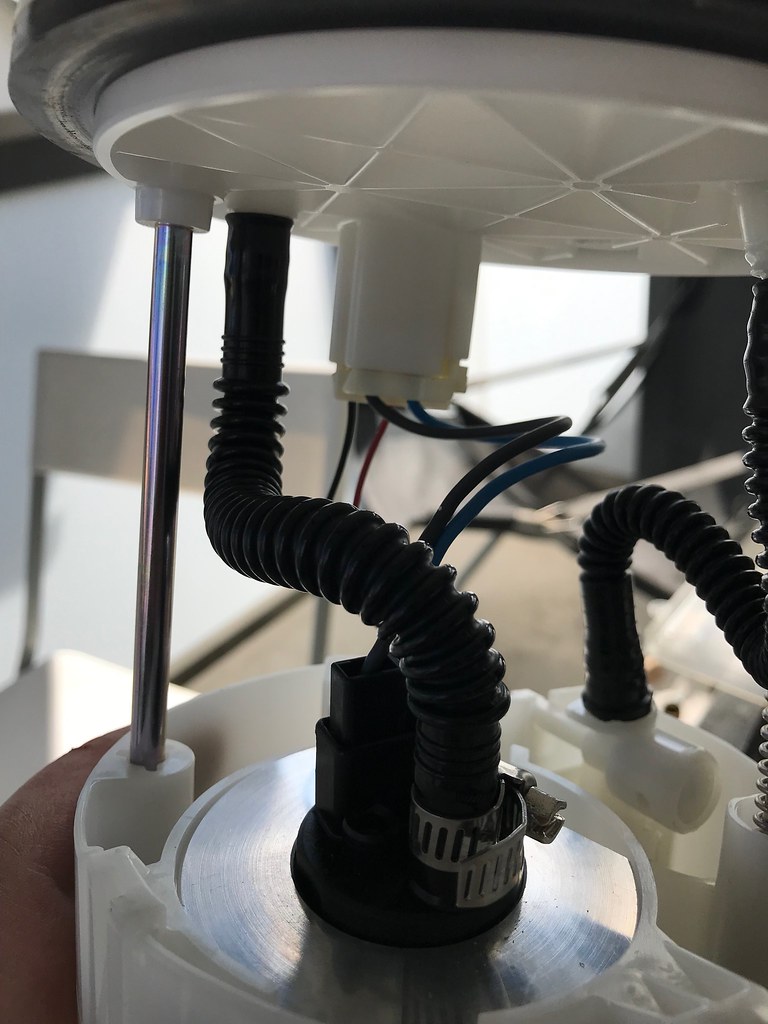
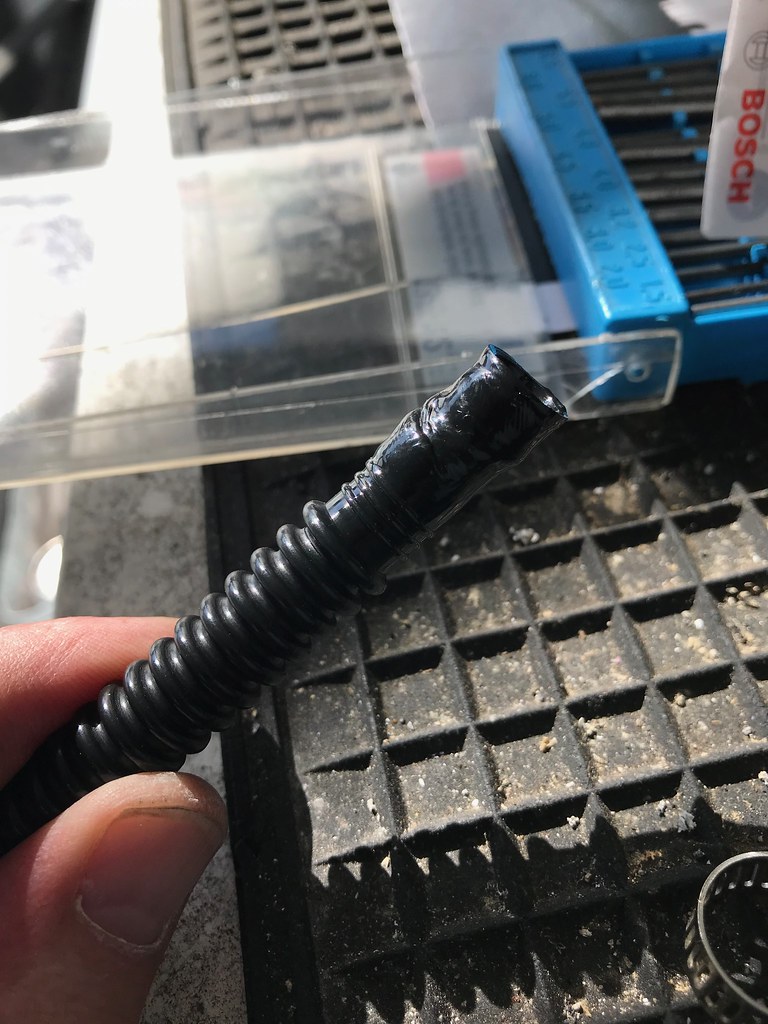
My kit originally came with rubber fuel host for the pump hi pressure outlet - given the whole assembly gets compressed when mounted in tank I was concerned about this kinking. So I order some proper corrugated host via Aliexpress. This needs heating with a heat gun before pushing the fittings on - be careful with the heat, see below for what happened with my first attempt
Thanks, Richard
After prizing out entire assembly;
The round pegs here...
Click into these - it's a tight fit;
When refitting, remove rubber o-ring and mount at other end - it can be pretty tricky to get it to line up properly while supplying sufficient force to re-engage the clips.
After then separating the 2 pieces, before and after drilling (2mm);
Completed assembly witha Walbro pump;
My kit originally came with rubber fuel host for the pump hi pressure outlet - given the whole assembly gets compressed when mounted in tank I was concerned about this kinking. So I order some proper corrugated host via Aliexpress. This needs heating with a heat gun before pushing the fittings on - be careful with the heat, see below for what happened with my first attempt
Thanks, Richard

Newbie
Joined: Jun 2015
Posts: 52
Likes: 0
From: sd
To answer my own question - keep it as one assembly (I separated top part while bottom part was still locked in place on my first try), then you can use a big flat blade to prize it out of it's retaining lugs;
After prizing out entire assembly;
The round pegs here...
Click into these - it's a tight fit;
When refitting, remove rubber o-ring and mount at other end - it can be pretty tricky to get it to line up properly while supplying sufficient force to re-engage the clips.
After then separating the 2 pieces, before and after drilling (2mm);
Completed assembly witha Walbro pump;
My kit originally came with rubber fuel host for the pump hi pressure outlet - given the whole assembly gets compressed when mounted in tank I was concerned about this kinking. So I order some proper corrugated host via Aliexpress. This needs heating with a heat gun before pushing the fittings on - be careful with the heat, see below for what happened with my first attempt
Thanks, Richard
But what size "length" are those corrugated hoses? Inner diameter?

Thread
Thread Starter
Forum
Replies
Last Post
fostytou
Evo How To Requests / Questions / Tips
359
Oct 23, 2025 09:54 AM
Clipse3GT
Evo X Engine / Turbo / Drivetrain
5
Jun 24, 2018 09:47 PM
Clipse3GT
For Sale - Engine / Drivetrain / Power
8
Sep 21, 2017 02:48 PM
Clipse3GT
Evo X Engine / Turbo / Drivetrain
24
Jul 28, 2017 01:44 PM
Clipse3GT
Evo X How Tos / Installations
118
Dec 27, 2016 06:59 PM