
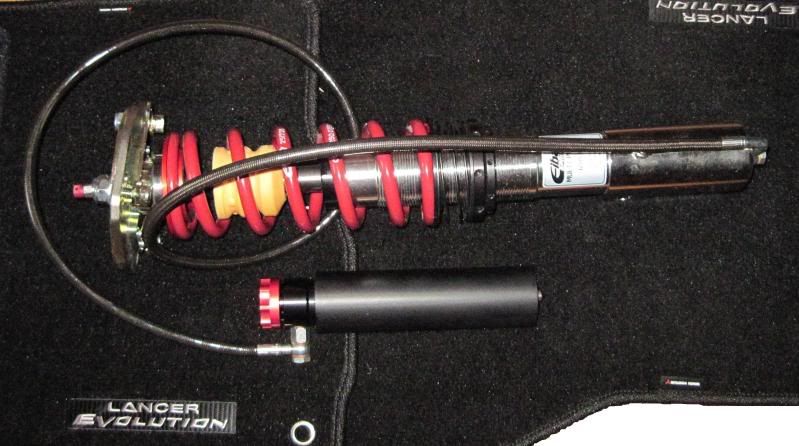
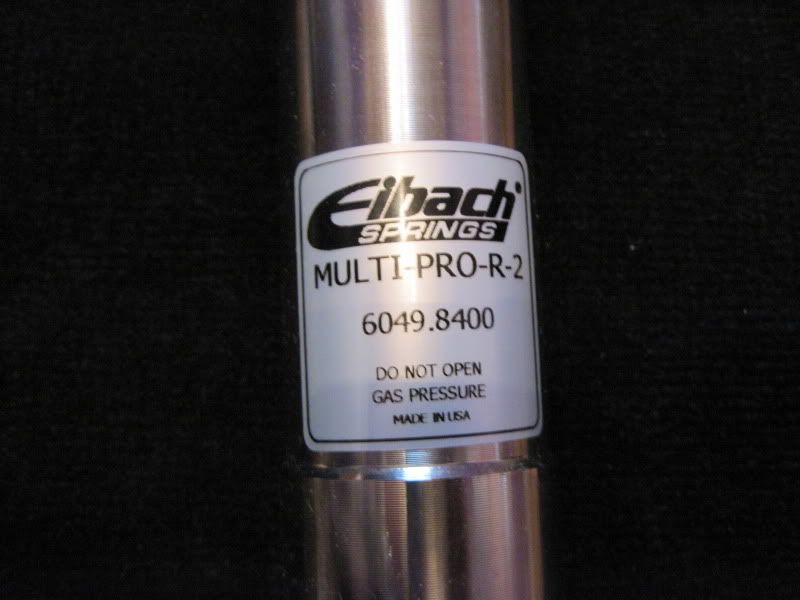
Eibach Multi-Pro R2 w/ Vorshlag Plates

Eibach Multi-Pro R2 w/ Vorshlag Plates
i recently ordered this from GTWORX.com (awesome guys and very helpful). The Coilovers were a Christmas present to myself. Haven't had a chance to put them on yet but will be doing a full right up with install pics etc once I get a chance to get them on. it prob wont be until after the holidays though.
I would like to take this chance to give GTWORX and Vorshlag props. GTWORX were very helpful from the very beginning. gave me lots of advice and even made some suggestions for settings for the coilovers. they were very prompt about replying to emails and it was very easy to get them on the phone as well. once the Coilovers arrived there was an issue with the Vorshlag plates, the upper spool piece didnt fit properly. i contacted GTWORX and they worked with me and even got Vorshlag involved to help get the situation resolved very quickly and to get the correct fitment. Vorshlag even shipped new spool pieces to me overnight free of charge. i have dealt with many companies over the years modding cars and have had issues with several of them, it goes with the territory. it is good to see two companies that puts customer service so high up on their agenda. I would recommend GTWORX and Vorshlag to any one.
PICS:

a full write up and installation with pics is in the works.
I would like to take this chance to give GTWORX and Vorshlag props. GTWORX were very helpful from the very beginning. gave me lots of advice and even made some suggestions for settings for the coilovers. they were very prompt about replying to emails and it was very easy to get them on the phone as well. once the Coilovers arrived there was an issue with the Vorshlag plates, the upper spool piece didnt fit properly. i contacted GTWORX and they worked with me and even got Vorshlag involved to help get the situation resolved very quickly and to get the correct fitment. Vorshlag even shipped new spool pieces to me overnight free of charge. i have dealt with many companies over the years modding cars and have had issues with several of them, it goes with the territory. it is good to see two companies that puts customer service so high up on their agenda. I would recommend GTWORX and Vorshlag to any one.
PICS:
a full write up and installation with pics is in the works.
Last edited by gotrnet; Dec 19, 2009 at 04:02 PM.


Trending Topics
I'm really glad everything's coming together for you Justin! The guys at Vorshlag are great to work with (one of the reasons we like using their stuff). Can't get that kind of service from the fly by night "shops" or the huge dealers that don't know anything about suspension.
Please give us a call if you need a little more help setting up the dampers.
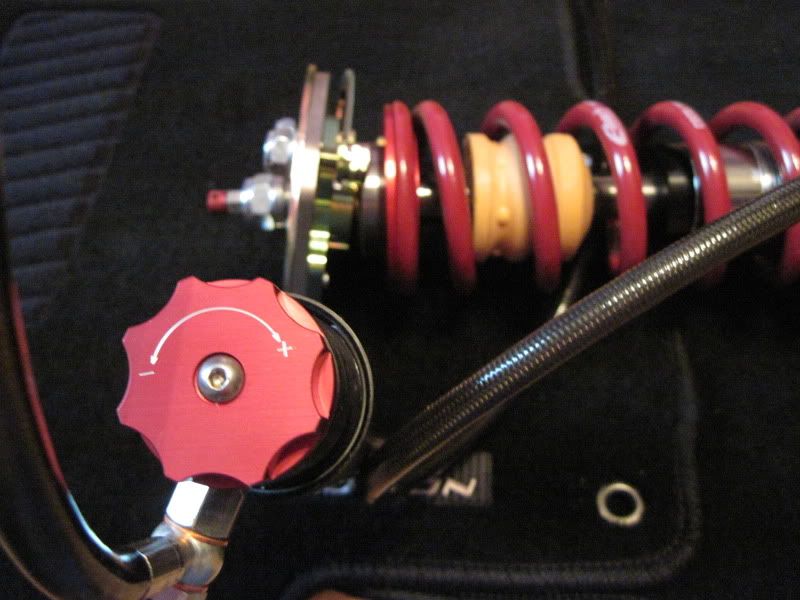
I gotta say I was really impressed with the quality of the hardware on these things. Great quality springs, spring perches, etc. Really looking forward to hearing what you think when you put them on.
The shock dyno plots were great so i'm sure they'll ride and perform very well.
- Andrew
Please give us a call if you need a little more help setting up the dampers.
I gotta say I was really impressed with the quality of the hardware on these things. Great quality springs, spring perches, etc. Really looking forward to hearing what you think when you put them on.
The shock dyno plots were great so i'm sure they'll ride and perform very well.
- Andrew
Last edited by GTWORX.com; Feb 1, 2011 at 08:59 AM.


Evolving Member
Joined: May 2009
Posts: 230
Likes: 0
From: NC
I'm really glad everything's coming together for you Justin! The guys at Vorshlag are great to work with (one of the reasons we like using their stuff). Can't get that kind of service from the fly by night "shops" or the huge dealers that don't know anything about suspension.
Please give us a call if you need a little more help setting up the dampers.
I gotta say I was really impressed with the quality of the hardware on these things. Great quality springs, spring perches, etc. Really looking forward to hearing what you think when you put them on.
The shock dyno plots were AWESOME so i'm sure they'll ride and perform very well.
- Andrew
 Thanks guys
Looking forward to hearing the numbers and also seeing how the plots compare between the different Eibach models. If they're dynoing that well and improve on travel, I'm going to have to pick up a set from you.
I know its way too early for this, but how long do you feel these could go before needing a rebuild and also where could they be serviced at?
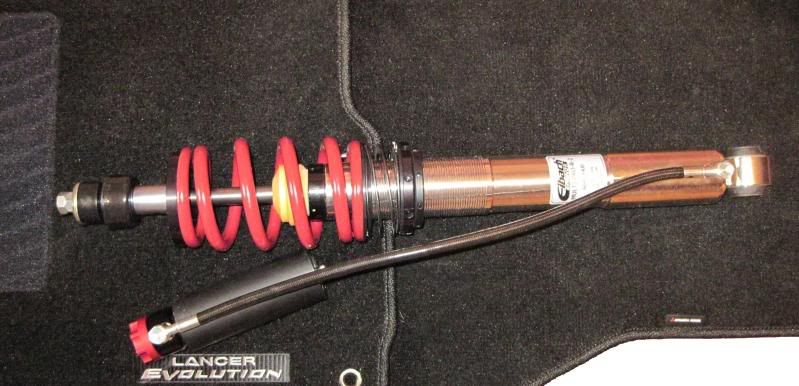
so i had a chance to get the coilovers installed today. only ran into a few issues. the coilovers themselves go on very straight forward with no issues. the only real issues i had were with mounting the reservoirs. first lets start in the rears.
once you have the stock top mounts on the coilovers you will need to remove most of the trunk components, the trunk carpet and backing board, the two pieces of foam on either side, the spare, and the plastic piece covering the battery/ washer fluid area. then i put my car on a lift and took the tires off. then remove the two bolts at the top of the struts, the ones on the rear side are hard to get to and removing the back seat didn't really help me get to them.
Drivers side
Passenger side
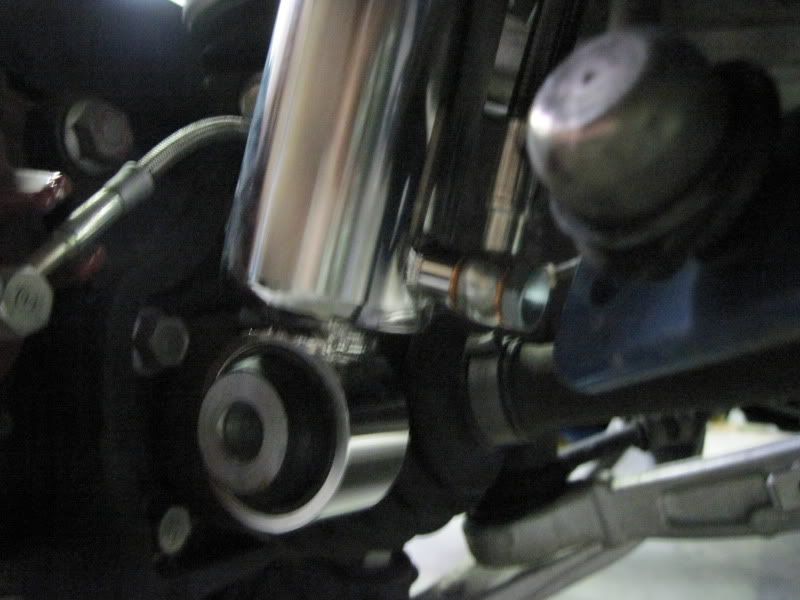
then remove the large bolt at the bottom of the strut, below is a pic of the bolt with the strut already removed.
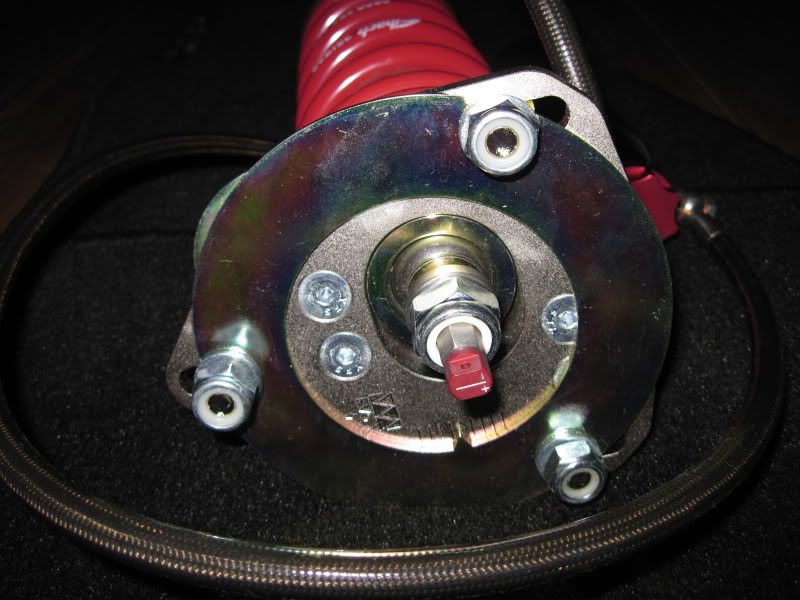
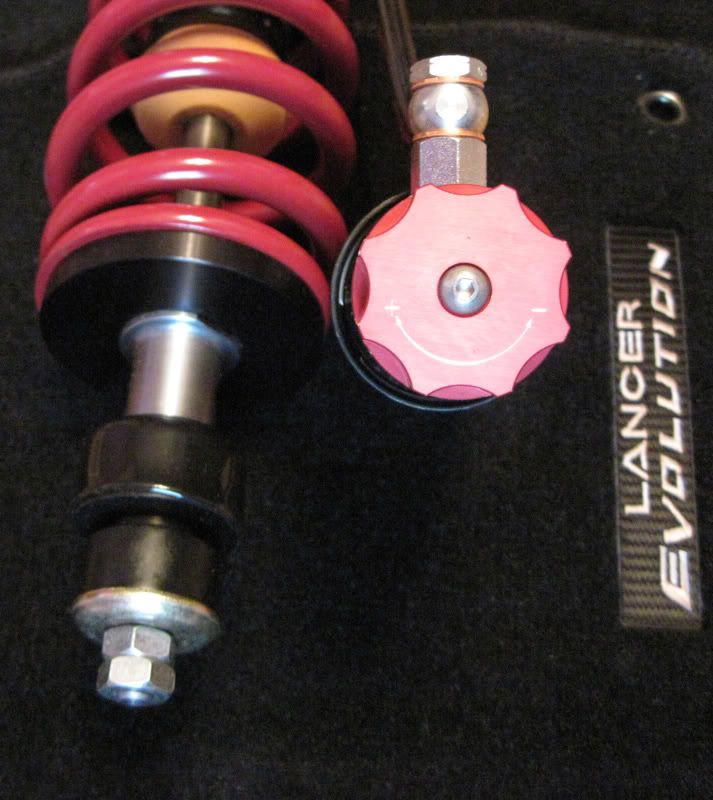
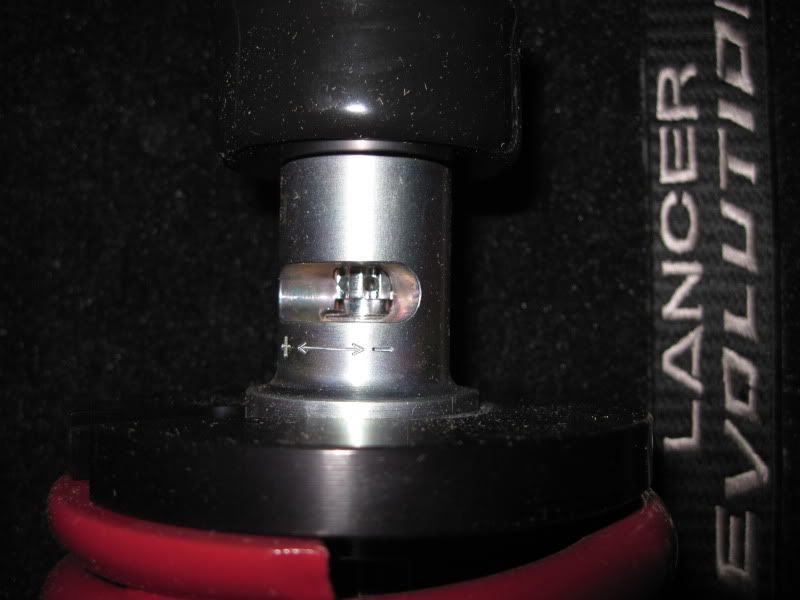
insert the coilover in place, and secure the top first, be sure that you can see the adjustment window at the top of the shock.
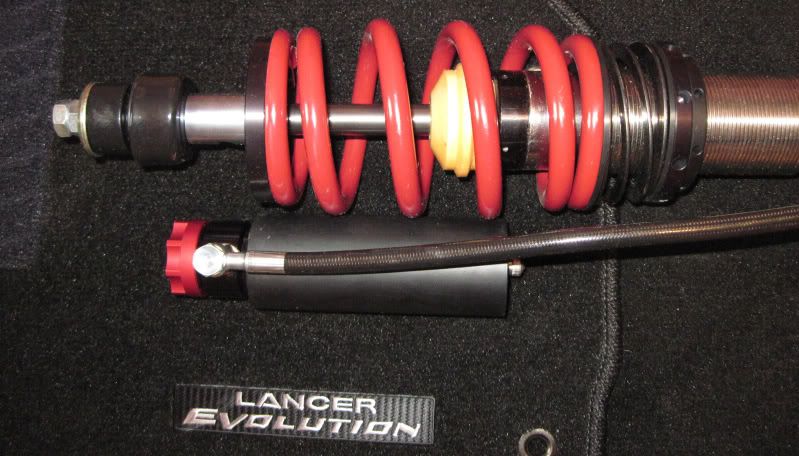
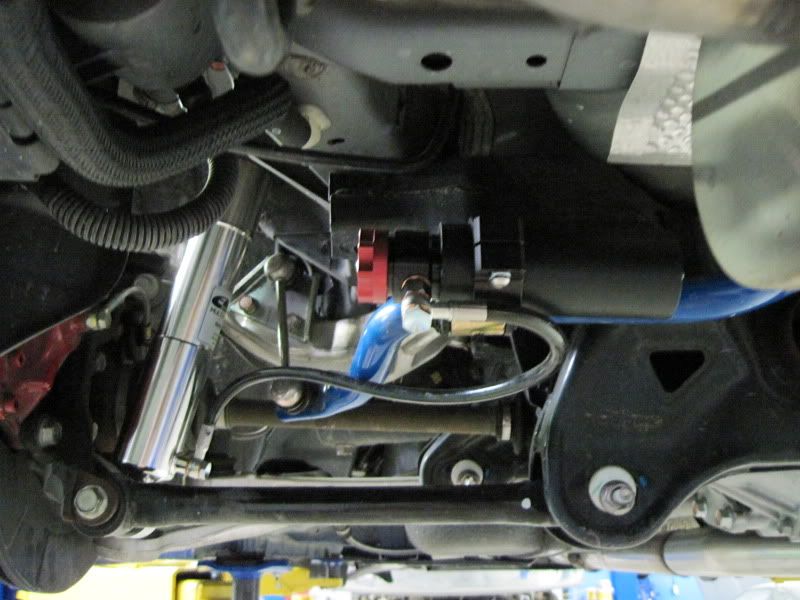
supposedly the attachment place for the reservoir should face the back of the car per instructions from Eibach. this is physically impossible if you want the bottom of the strut to bolt up properly so i just had it face the only way it can towards the car. then replace the large bolt at the bottom of the strut.
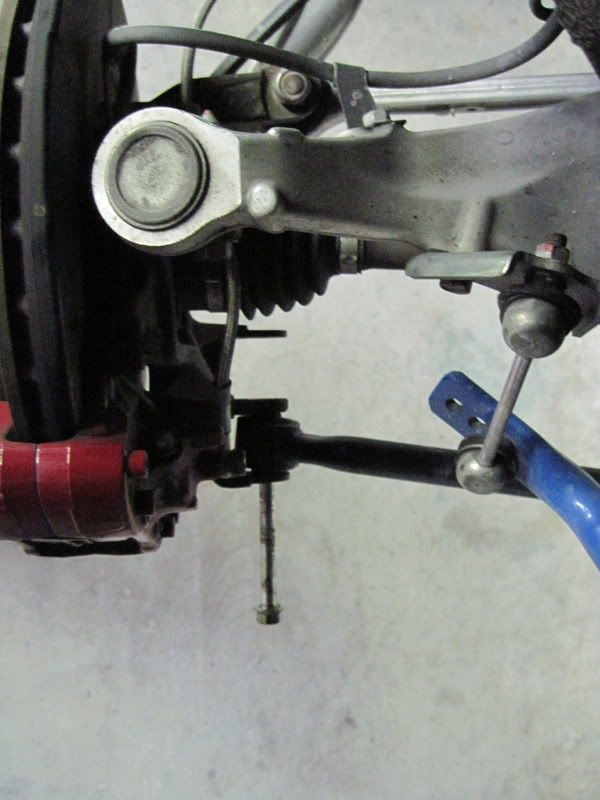
now with the reservoir issue for the rear struts. the bolt that Eibach says you are to use is right next to the sway bar attachment point. if you remove this bolt you can see it is way too large to fit through the hole in the bracket. so i removed one of the bolts that holds the brackets to my sway bars and mounted it right there. it turns out it is a much better place since you can get to it without having to jack up the car.

you can see the hole where the bolt should go directly above the bend in the sway bar, this is the mounting point per the directions supplied by Eibach.
Now on to the front,
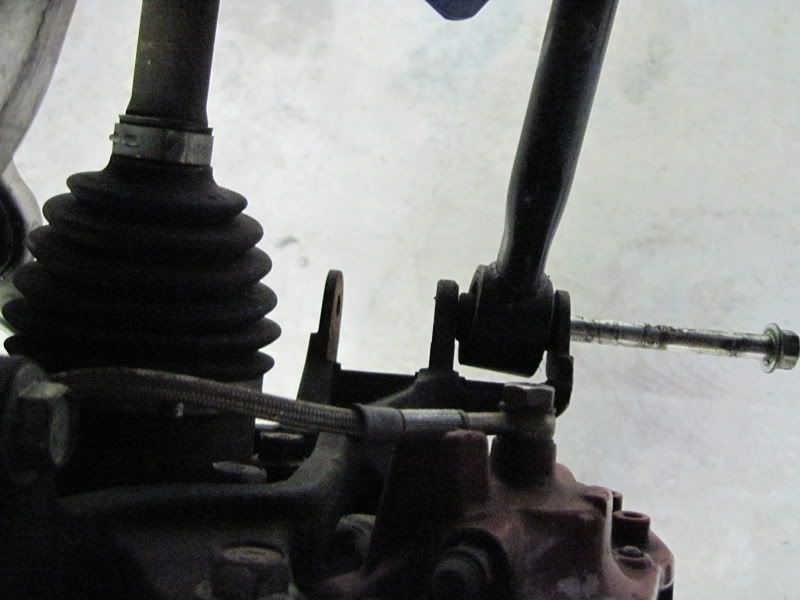
once the front tires are removed, remove the three bolts at the top of the strut. now remove the brake lines from the back of the strut held on by one nut. i recommend you remove the sensor on the inside of the wheel to give yourself a little working room. also remove the white plastic bracket that holds the wire running to this sensor.
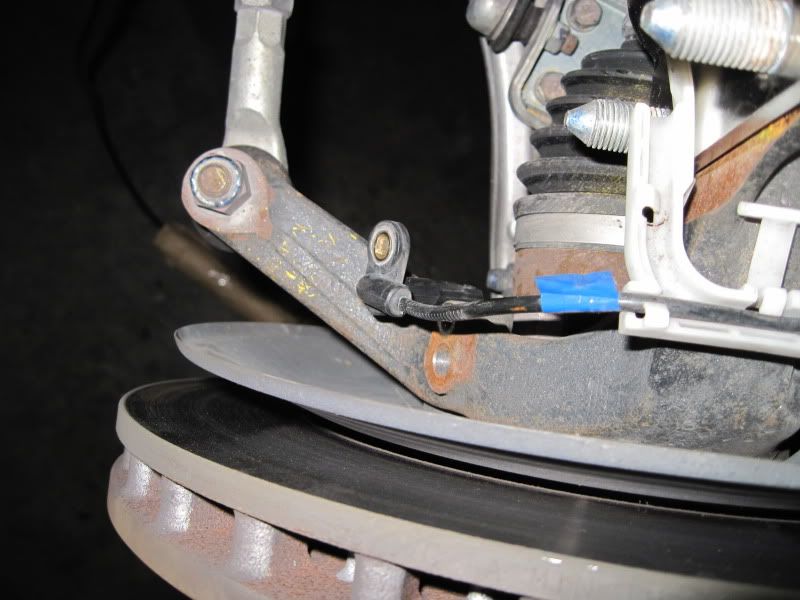

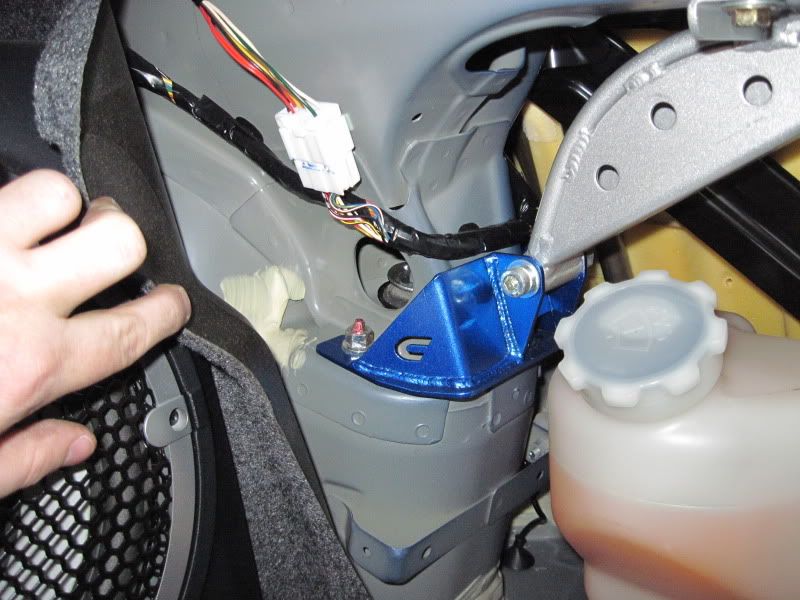
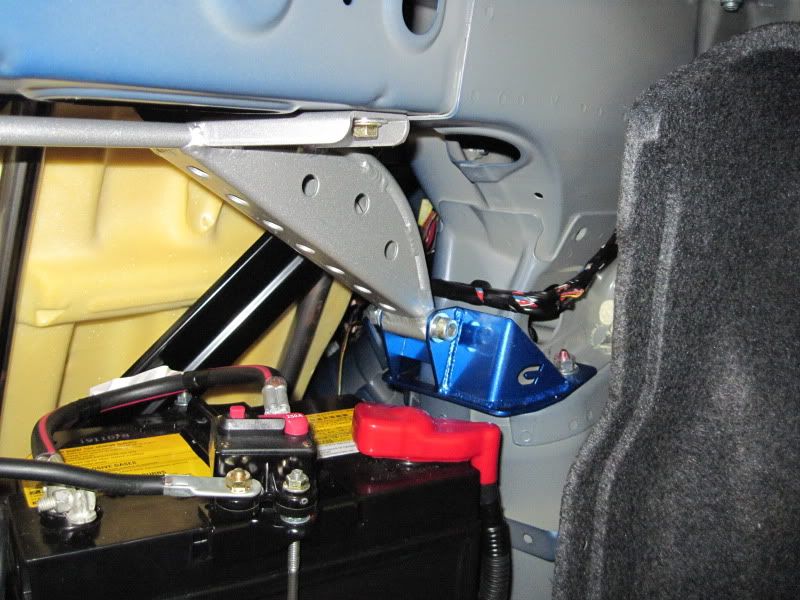
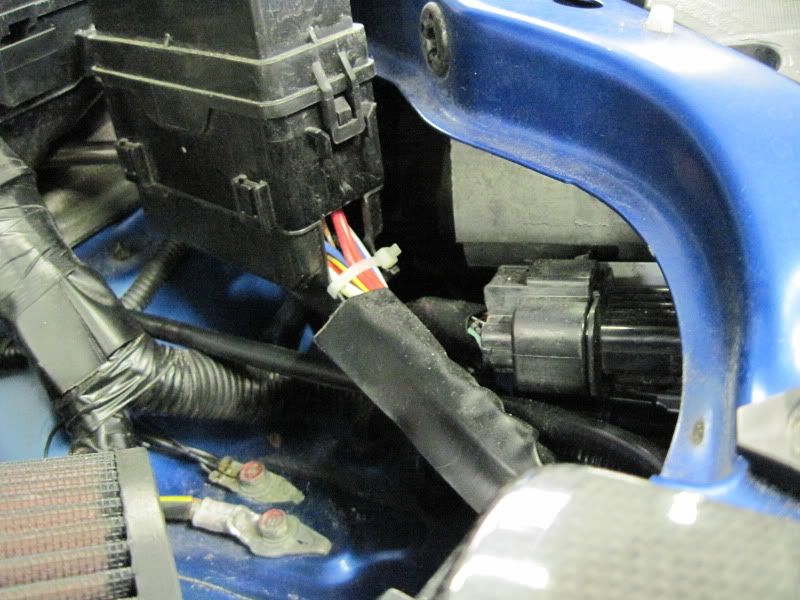
then remove the two large bolts directly behind the rotor holding the strut to the wheel hub. remove the strut. after bolting your camber plates, or stock tops to the coilovers, replace by reversing the procedure. it is a fairly straight forward process. now to mount the front reservoirs. you have to pull back the plastic wheel liner just the portion on the front of the wheel well. up to the only metal bolt holding it in and the front bumper to the fenders. no run the reservoirs behind this plastic and up through a hole in the inner fender wells. on the drivers side you need to loosen the fuse box and run the hose under this. on the passengers side you need to remove the coolant reservoir and the power steering reservoir need to be unbolted as well.
Drivers Side

Passenger Side
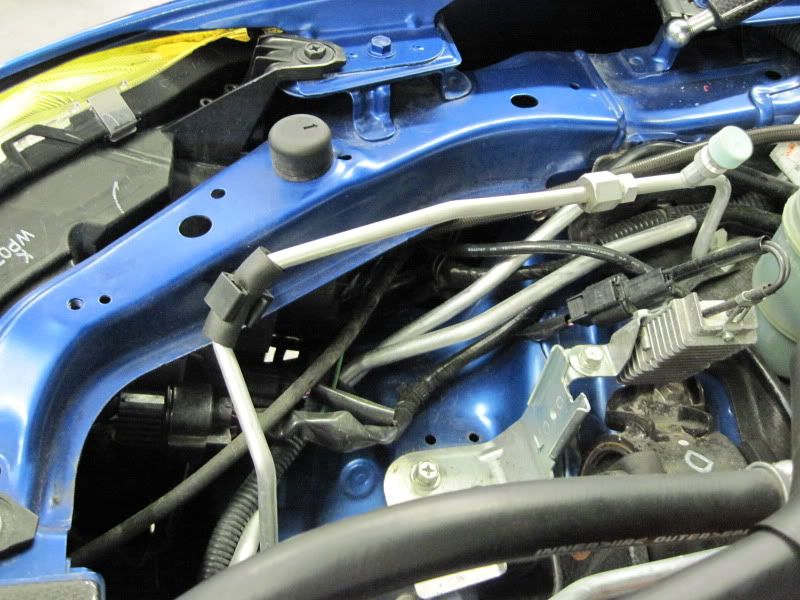
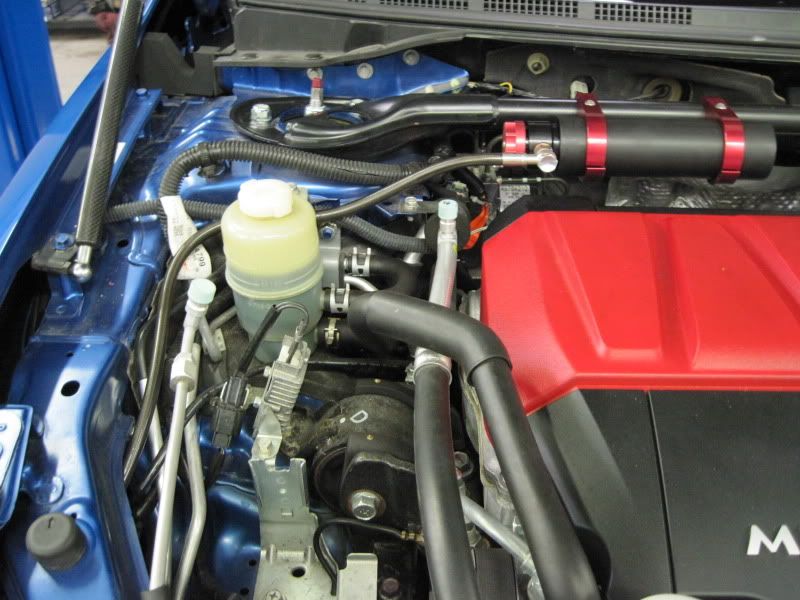
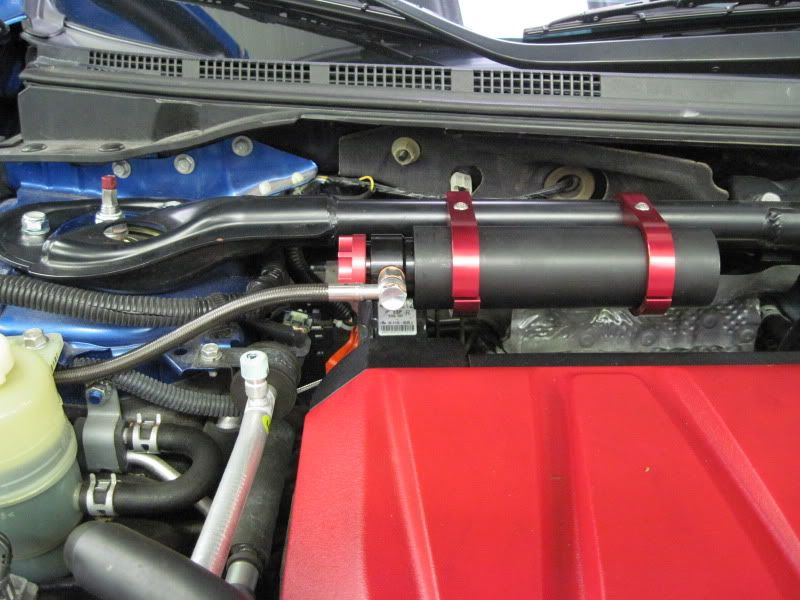
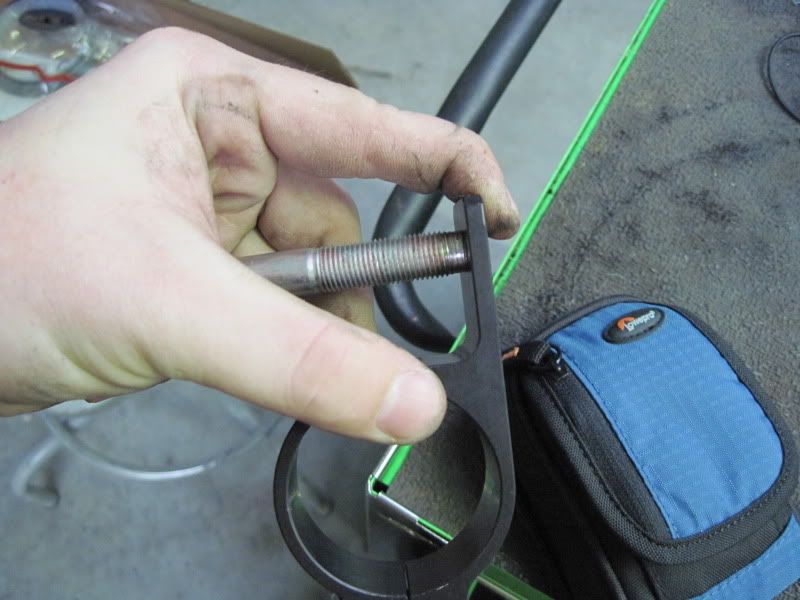
the red reservoir brackets you see in the pics are nice and fit very well. they are a two piece design connected by a bolt. the issues is these are aluminum, the top pieces has no threads and is just a hole that goes all the way through the piece, the bottom has a hole that is threaded but does not go through the entire piece. there for the bolts and bottom out. the bolts supplied were too long and would not allow the pieces to tighten up on the strut brace or on the reservoir so i had to use a few small washers to shim down the length so that they would tighten up. no big deal but shouldn't have happened in the first place. if the bolt was shorter or if the threaded hole had gone all the way through the bottom piece of the bracket this would not have been an issue.
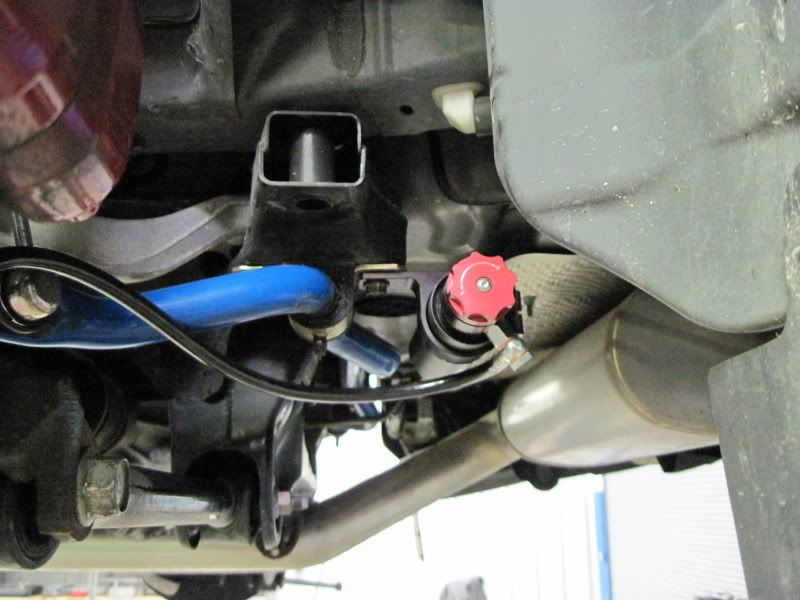
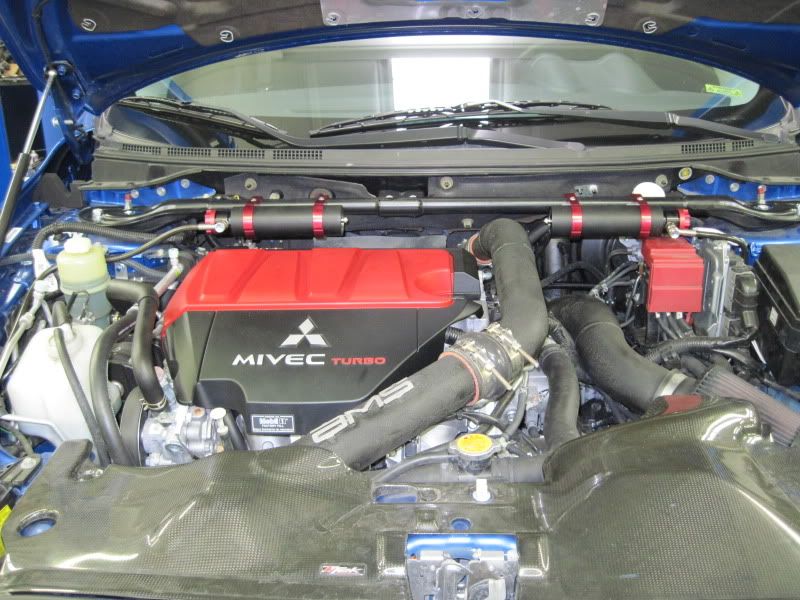
and here is the finished product under the hood.
I will try to get some pictures of the stance of the car tomorrow in the sunlight.
first impressions, it was a 30 mile ride home and the car handles great for street driving and the ride is just what i was looking for. i have it set on the soft side for street driving and it a much stiffer ride than my old setup, MR Bilsteins with Tanabe gf210 springs, but not too stiff. you can feel the road but it is not shaking the fillings out of your teeth. i can't wait to get these things on the autox course, but our first event of 2010 isn't until February.
while i can tell a lot of engineering and thought went into these coilovers, it is the details that trip up this set of Eibachs. i am sure that the coilovers are very capable and they give a great ride. it just bothers me that they seem to put all this engineering and thought into the coilovers but can't supply the correct size bolt for the front brackets and the correct size hole for the rear brackets. i know that this may seem trivial but when your car is in pieces or even worse almost back together and then you run into a problem with a design flaw it leaves the consumer to try to correct or work around a very simple mistake on the manufactures part. i have sent eibach an email noting the issues i ran into, so i hope they fix the very small mistake with an overall great product in my eyes.
I would once again like to thank GTWORX and Vorshlag for all their help in getting this great product on my evo X. they are two great companies that have made this experience well worth my time and money. thanks again guys!!
once you have the stock top mounts on the coilovers you will need to remove most of the trunk components, the trunk carpet and backing board, the two pieces of foam on either side, the spare, and the plastic piece covering the battery/ washer fluid area. then i put my car on a lift and took the tires off. then remove the two bolts at the top of the struts, the ones on the rear side are hard to get to and removing the back seat didn't really help me get to them.
Drivers side
Passenger side
then remove the large bolt at the bottom of the strut, below is a pic of the bolt with the strut already removed.
insert the coilover in place, and secure the top first, be sure that you can see the adjustment window at the top of the shock.
supposedly the attachment place for the reservoir should face the back of the car per instructions from Eibach. this is physically impossible if you want the bottom of the strut to bolt up properly so i just had it face the only way it can towards the car. then replace the large bolt at the bottom of the strut.
now with the reservoir issue for the rear struts. the bolt that Eibach says you are to use is right next to the sway bar attachment point. if you remove this bolt you can see it is way too large to fit through the hole in the bracket. so i removed one of the bolts that holds the brackets to my sway bars and mounted it right there. it turns out it is a much better place since you can get to it without having to jack up the car.
you can see the hole where the bolt should go directly above the bend in the sway bar, this is the mounting point per the directions supplied by Eibach.
Now on to the front,
once the front tires are removed, remove the three bolts at the top of the strut. now remove the brake lines from the back of the strut held on by one nut. i recommend you remove the sensor on the inside of the wheel to give yourself a little working room. also remove the white plastic bracket that holds the wire running to this sensor.
then remove the two large bolts directly behind the rotor holding the strut to the wheel hub. remove the strut. after bolting your camber plates, or stock tops to the coilovers, replace by reversing the procedure. it is a fairly straight forward process. now to mount the front reservoirs. you have to pull back the plastic wheel liner just the portion on the front of the wheel well. up to the only metal bolt holding it in and the front bumper to the fenders. no run the reservoirs behind this plastic and up through a hole in the inner fender wells. on the drivers side you need to loosen the fuse box and run the hose under this. on the passengers side you need to remove the coolant reservoir and the power steering reservoir need to be unbolted as well.
Drivers Side
Passenger Side
the red reservoir brackets you see in the pics are nice and fit very well. they are a two piece design connected by a bolt. the issues is these are aluminum, the top pieces has no threads and is just a hole that goes all the way through the piece, the bottom has a hole that is threaded but does not go through the entire piece. there for the bolts and bottom out. the bolts supplied were too long and would not allow the pieces to tighten up on the strut brace or on the reservoir so i had to use a few small washers to shim down the length so that they would tighten up. no big deal but shouldn't have happened in the first place. if the bolt was shorter or if the threaded hole had gone all the way through the bottom piece of the bracket this would not have been an issue.
and here is the finished product under the hood.
I will try to get some pictures of the stance of the car tomorrow in the sunlight.
first impressions, it was a 30 mile ride home and the car handles great for street driving and the ride is just what i was looking for. i have it set on the soft side for street driving and it a much stiffer ride than my old setup, MR Bilsteins with Tanabe gf210 springs, but not too stiff. you can feel the road but it is not shaking the fillings out of your teeth. i can't wait to get these things on the autox course, but our first event of 2010 isn't until February.
while i can tell a lot of engineering and thought went into these coilovers, it is the details that trip up this set of Eibachs. i am sure that the coilovers are very capable and they give a great ride. it just bothers me that they seem to put all this engineering and thought into the coilovers but can't supply the correct size bolt for the front brackets and the correct size hole for the rear brackets. i know that this may seem trivial but when your car is in pieces or even worse almost back together and then you run into a problem with a design flaw it leaves the consumer to try to correct or work around a very simple mistake on the manufactures part. i have sent eibach an email noting the issues i ran into, so i hope they fix the very small mistake with an overall great product in my eyes.
I would once again like to thank GTWORX and Vorshlag for all their help in getting this great product on my evo X. they are two great companies that have made this experience well worth my time and money. thanks again guys!!
Last edited by gotrnet; Dec 26, 2009 at 06:11 PM.
Is there any concern about excessive heat cooking the oil in the reservoirs? I'm thinking people with tubular exhaust manifolds are going to want to fab up a heat shield of some sort to deflect some of the radiant heat.
Looks like a capable setup!
Looks like a capable setup!
