When you click on links to various merchants on this site and make a purchase, this can result in this site earning a commission. Affiliate programs and affiliations include, but are not limited to, the eBay Partner Network.
For anyone who has a slight rattle while shifting between 2k and 3k rpm. And/or rattle or knock while driving under light acceleration or coasting between 2000-3000rpm.. Here is my experience..hope it helps someone..sorry for such long thread
It all started when i bought the 2008 lancer gts used with 260000kms and it was a millimeter under the bottom of crosshatch for oil level (sign that i probably should have stayed away but hey..was an awesome car otherwise and price was right)
We topped up oil and drove it home an hour drive or so and during the drive , every shift we heard a slight rattle noise . like a fluttering or knock kinda
When we got home we checked over everything a little more and while revving to 2-3k rpm the noise seamed to come from exhaust mani heat shield. Which was loose..So we removed it and it seamed like noise went away.
Next day drove the car and walla..noise again ..checked over everything and noise now seamed to come from the valve cover near timing chain so we assumed timing chain slack/bad guides or something possibly related to that. So we ordered new chain /tensioners/guides etc and prepared for a timing job for as soon as the parts came in. Definately wouldnt hurt to replace anyway...We continued to drive it and it slightly got worse over a few weeks. To the point where after a hiway drive (and only after a long hiway drive)the motor now had a slight knock at idle now until the motor cooled way down. I put a screwdriver to my ear and other end to the valve cover and head in various areas and noise seamed to come from the third cylinder area away from timing chain. Definately not timing chain..now assuming piston slap or rod knock or ?
So i dropped oil pan so i could take a quick look at the bottom end to diagnose further .sure enough completely loose connecting rod on third cylinder and tiny amount of play on the second connecting rod.NOTE!!THESE TWO MIDDLE RODS ARE THE ONLY CONNECTING RODS THAT U HAVE ACCESS TO WITHOUT OIL PUMP AND/OR LADDER FRAME REMOVAL WHICH IS MUCH BIGGER JOB-HOPE U GET LUCKY LIKE ME Immediately called around for connecting rod bearings and found only one parts store that could order them.other than dealer which was way too expensive.. So back on goes the oil pan and fresh oil etc....$50 for the 8 piece bearing kit and a week later they came in. Had to wait another week (motor still knocking so driving it very light/ya i know..shouldnt have driven it but hey..had to work)
Now for the actual job this is what i needed and how i did it
(1500 grit sandpaper,10mm,12mm,17mm 6 point sockets,10mm 12 point socket, small ice pick,ratchet and small extension,razorblade,flathead screwdriver,brakeclean,rod bearings and hitemp rtv sealant,penetrating oil,rags/blue paper towel)(drill with 3/8 socket adapter or air ratchet optional)torque wrench that goes 20 ftlbs or so
Ebrake on..wood in front and behind the rear wheel
Jacked it up..put on jackstands..drain oil into drain pan
Put drain plug back in..spray a/c bracket bolt with penetrating oil..remove the 10mm pan bolts and few 12mm pan bolts near the a/c compressor on pan..(drill or air ratchet makes this much quicker cuz theres lots i think 14 bolts or so)remove the a/c compressor bolt(hope it comes out without breaking-its long and kinda brittle, i twisted mine slightly) pry off oil pan gently as not to bend it..working way around it a few times helps it come off easy..now inspect pan for shavings and clean thoroughly..then dab the bottom of block(actually ladder frame)to soak up oil drips before they drip on your face during next steps
Use ice pick to clear shavings from the oil pump pickup screen
Now if neccessary turn crankshaft clockwise until the two middle rods come down closest to bottom so u can work on them
With fingers grabbing the two bolts of the rod cap..try to wiggle the rod and if there is slack or clack going on the bearing needs replaced..
Remove the two 10mm 12 point bolts on the rod cap and remove the cap..take note if the rod bearing spun or not (one of mine did and had major play..other didnt spin and had very minimal play)
Now rethread one bolt into the rod partially without cap in place and use it to push the rod/piston up an inch or two
Most likely the half bearing will fall out of rod and if not just poke it with screwdriver and it will fall out
Now inspect the journal of the crankshaft and pray u dont have major scratches/scoring (if u do u may need some resurfacing or a new crankshaft-- i beleive i was lucky or maybe the synthetic oil did wonders and coated it good enough? that there was very minimal scoring)
Remove the half bearing from the cap and use the bearing to cut a same width piece of 1500grit sandpaper..use the sandpaper to smooth out the cap..then the crankshaft journal (i looped it around the crankshaft and see-saw 'd it around shaft for a minute or two..then halfass sanded the bottom of rod/which u can barely get to due to the ladder frame in the way)
Now use clean oil and blue paper towel to 'clean' all the surfaces u just sanded and leave a fresh oily residue on the crankshaft surface..make sure no detritus is anywhere..must be clean as can be with just some oil on the surfaces
Now take note of the tab positions of the bearing and the seats so the tabs line up and kinda snap in place like they should
Dip your new bearing halves in fresh oil and press first half to the bottom of crank and slide it around to top position and pull the threaded rod bolt down so the rod sets onto the bearing and crank...now gently use screwdriver and some patience to line up and press the bearing securely into place..its a bit tuff cuz of the ladder frame in way but u will get it...making sure bearing sits exactly flush on both sides...now press the other bearing half into the cap making sure tabs click into tab slot
If u get any detritus anywhere during any of this just reclean with fresh oil and start over..u dont want a spec of dirt in this area
Now remove the semi threaded bolt from the rod and push loaded cap up to crankshaft and tighten the bolts lightly..
Now use a torque wrench and tighten to spec( i used 20 ftlbs and then 90 degrees further, and then checked actual torque which was about 38 ftlbs)i recommend u check with the manual or online for your exact specs as i did this without actual specs..just experience that may or may not be actual but it worked how i did it
After rotating crank one full spin and double checking work..cleaned all mating surfaces of pan/ladder frame with razorblade and brake clean..applied thin bead of hitemp rtv gasket maker to pan and let sit to get tacky...i rechecked the oil pickup screen to make sure it was shaving free
Now stick pan back on and lightly tighten all bolts..
Now torque bolts to spec(i tightened them as tight as they would go easily without putting much effort into cranking them super tight..id guess 10 ftlbs or less but again u should check with a manual for actual torque specs and procedure
Now i removed and replaced oil filter with a new mobil m1-110
Wait a few hours or til next day and refill oil and drop car down off stands etc...start car and hope for best and drive gently for next few days..all seams good
Car has way more power now..sounds smooth..better on fuel
This fixed my problem and cost $50 for bearings which i only used four pieces of the 8...and $50 for new oil and filter and rtv gasket maker..very cheap fix considering what could have happened if left untreated..also note i was lucky and only the two middle cylinders rod bearings needed replaced..not sure why the hidden two were still solid....possibly getting more of a splash of oil constantly because they are covered by ladder frame and oil pump but im unsure
These bad bearing were most likely caused by previous owner not checking oil enough and also living in underground parking going up and down hard inclines constantly with low oil
This car burned quarter a litre of oil a week
Since this fix it still burned oil like crazy...changed pcv valve and now burns less than quarter a litre in two months !!! Cant beleive it..if u burn oil like crazy it COULD be your pcv valve stuck open like mine which kinda started this whole issue in a sense
Thanks for listening..
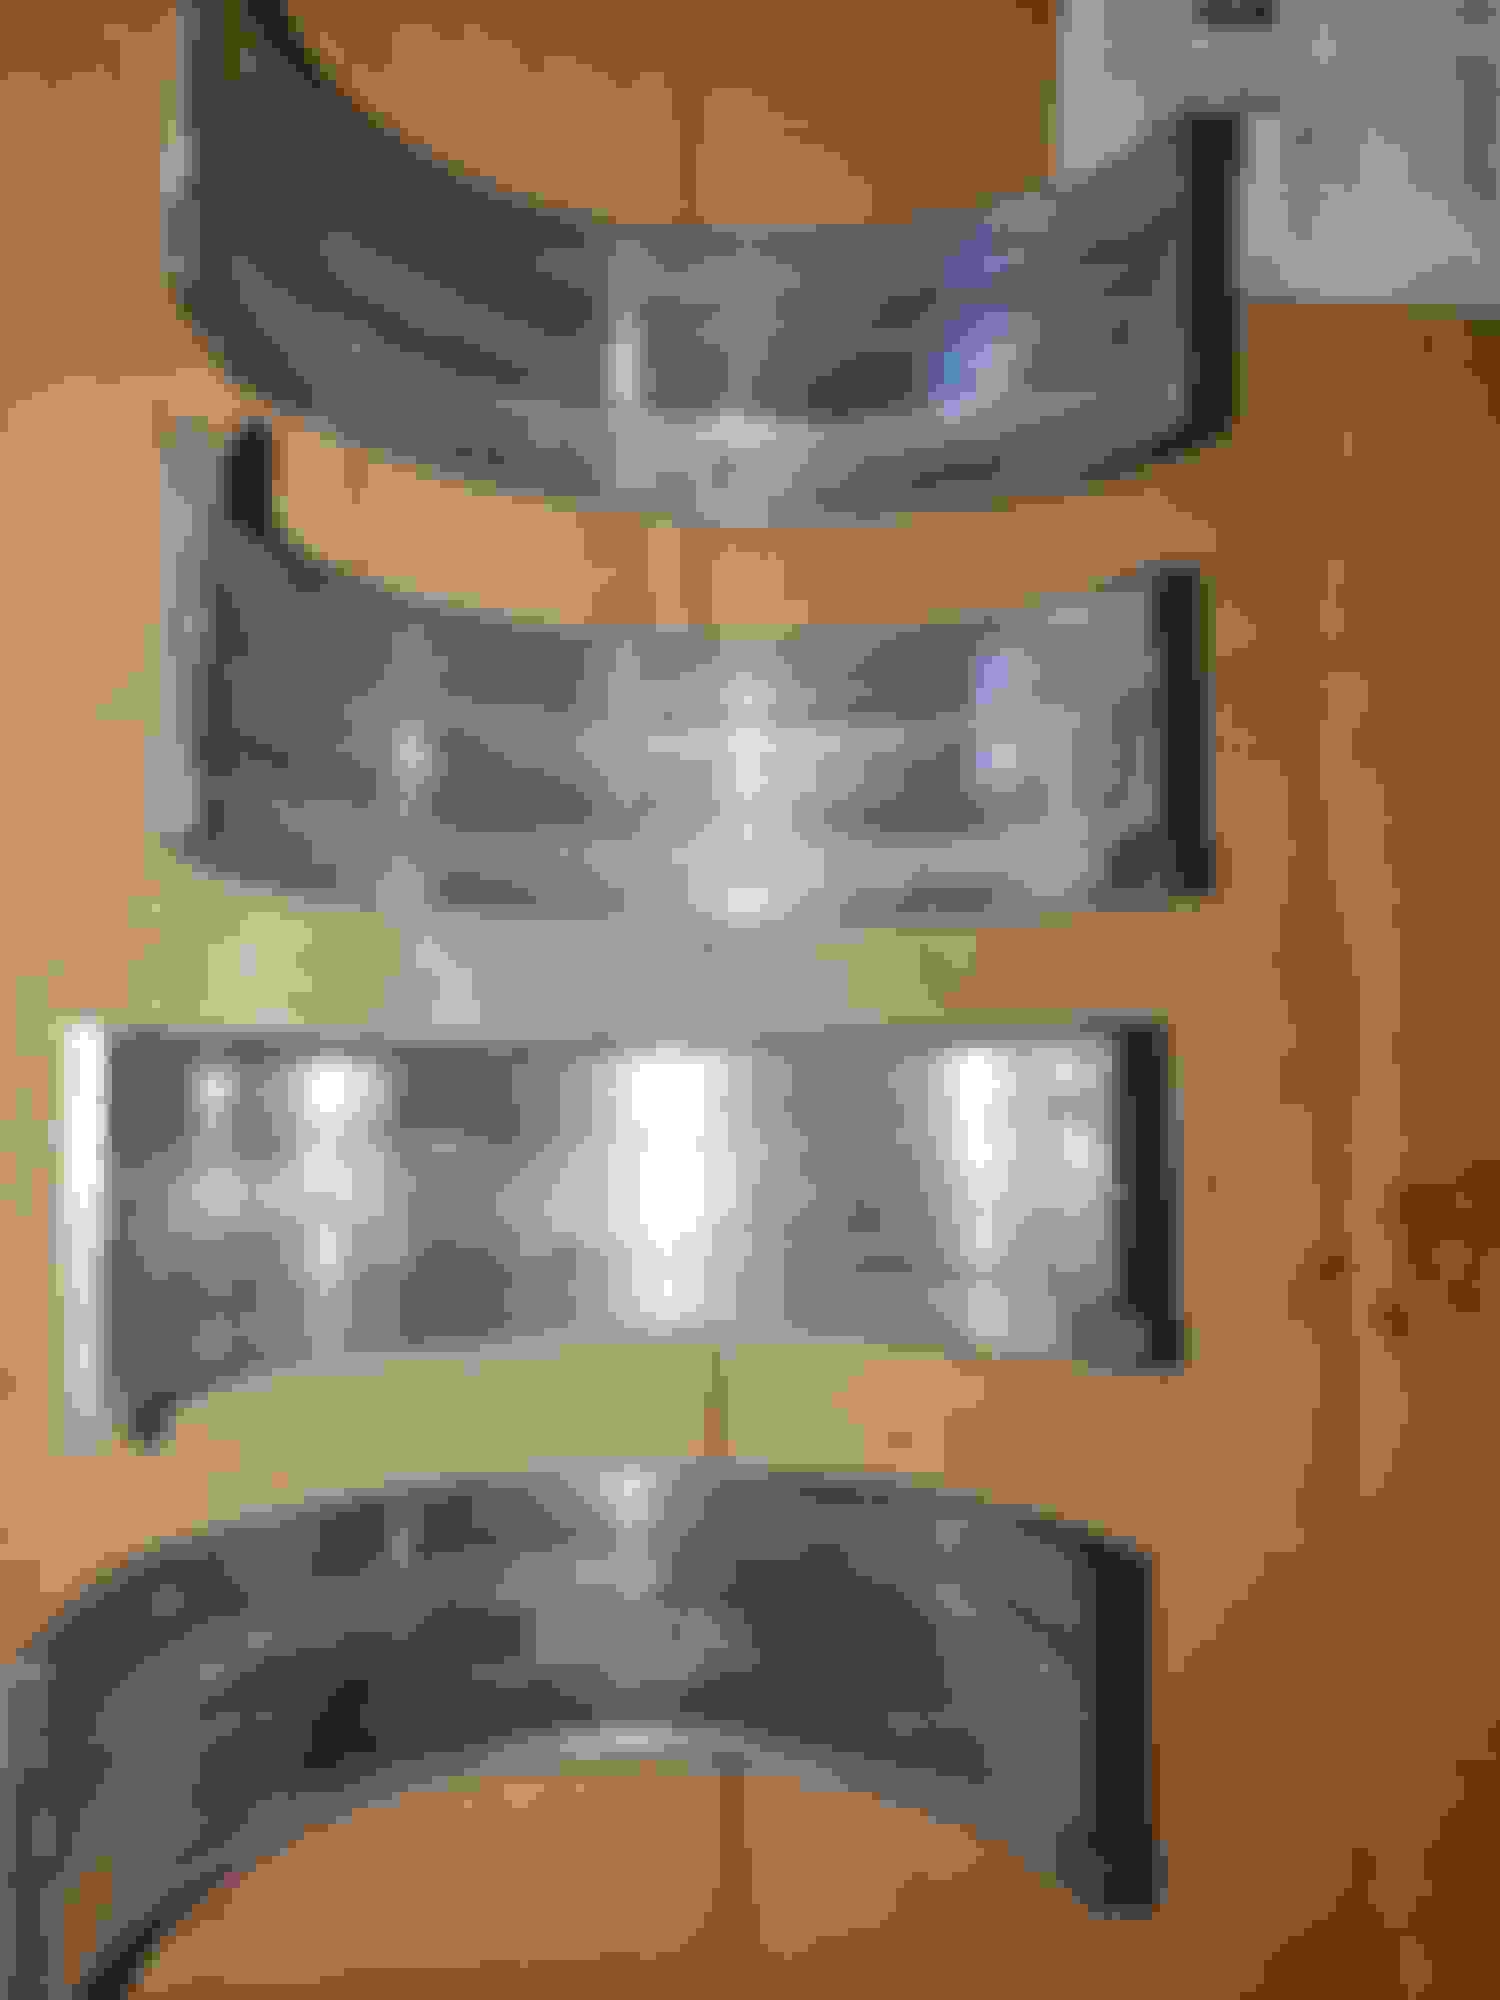
On the very left is a new bearing half and the right four are the bad ones that caused my issues...the bad two on left are from third cylinder which the bearings spun....note the tab missing on one half and the tab bent straight on the other half beside it..this allowed the bearing to spin out if place
I wish I would've seen this a few weeks back....mine was doing the same thing but I didn't have time to do anything about it and now my engine took a dump��
But I want to thank the OP. I bought a used Lancer from a guy locally and anytime I hit 2700RPM the connecting rods started rattling. I took it to a mechanic and they agreed with the diagnosis.
Dropped the pan(s), pulled the bearings and they were mangled like in the pic, but the journals were somehow unscathed.
I should have the car back by Monday and I'll finally get to enjoy it after owning it for three weeks weeks and having to baby it. It's the car I spent the last year looking for and you saved me from having to drop a new engine in it.
Bumping this old thread because this helped save my engine,
I had the same issue as described in this post, pulled the 2 accessible connecting rod caps off and bearings were damaged just like in the images (picture of my bearings attached), replaced bearings with STD (non-colored) bearings and engine noise went away,
Was going to replace my timing chain at first, glad this write up was here,
I owe you for this write-up, thanks again!!
EDIT: 2011 Outlander Sport with 4B11 engine - Car had 195K miles when noise started, did repair at 200K miles, car now has 205K runs better and no further noise at the moment
Last edited by Illestoutlander; Aug 2, 2019 at 12:36 PM.
Hi everyone, I have a 2009 Lancer ES 2.0 Manual transmission
I�m currently running to this exact same problem, rod bearings need replacement
Is it possible to remove the ladder frame and oil pump from the bottom of the car while the motor is intact? If I�m going to replace the broken ones, I might as well replace all of them.