
HVAC Repair - MEGA Guide


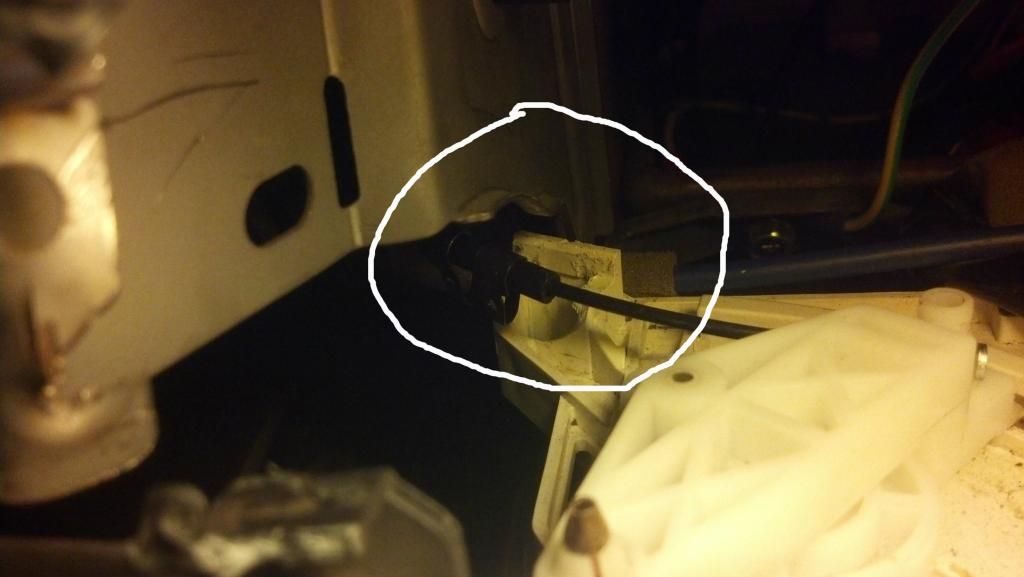
Try to dremel out the bent piece of white plastic and see if you can reseat the black clip into the control unit. If you can and the cable has full range of motion you are fine and you don't need to purchase another control unit!
Hey guys, I have a 2006 Lancer ES. Will this procedure work for my 06 (seems like most of you are fixing 03s)?
Also need a temp control shaft. The ebay listing says it's compatible with a 2003 lancer - wondering if that same shaft is compatible with my 2006 control unit. Anyone know?
Thanks!
Also need a temp control shaft. The ebay listing says it's compatible with a 2003 lancer - wondering if that same shaft is compatible with my 2006 control unit. Anyone know?
Thanks!
Ok, so yes I hulked it and I broke the knob off the shaft, then i decided to try and hulk the shaft with pliers... bad idea,  didnt learn my lesson with the first hulking.
  Something further inside (down the shaft) broke/ stripped, any idea what it was? Im pretty sure Im gunna have to replace the entire HVAC control unit. Or, is it repairable? Also, is there any way to get my heat back till I get the parts? Its getting too cold to drive without heat now.
didnt learn my lesson with the first hulking. Something further inside (down the shaft) broke/ stripped, any idea what it was? Im pretty sure Im gunna have to replace the entire HVAC control unit. Or, is it repairable? Also, is there any way to get my heat back till I get the parts? Its getting too cold to drive without heat now.
Last edited by SleepySamurai13; Nov 24, 2012 at 06:43 PM.
Well I just ordered my replacement gears and cable and I already have the broken shaft piece replaced (bought off eBay for $22.50 http://www.ebay.com/itm/2002-06-LANCER-Heater-Control-Panel-Switch-Knob-Shaft-EVOLUTION-OUTLANDER-/251236688659?pt=Motors_Car_Truck_Parts_Accessories&fits=Model%3ALancer&hash=item3a7edfa313&vxp=mtr) and the actual knob to turn the shaft...had two teeth break off on the back and couldn't buy one on this forum used....so dealership price it was.
I know others have already posted the part numbers needed but here they are again. This is what I just picked up and what I was charged.
1 MR500925 Heater Control Knob - $5.47 - Trying to Confirm Part Number as I lost original plastic with part #. Price is based on MitsubishiParts.Net
1 MR979515 WIRE $5.44
1 7801A110 HEATER CONTR $16.00
These last two I purchased from MitsubishiParts.net....charged me $10.95 shipping! Oh well...Russell couldn't do anything about it.
I'll post back my results when I install all the replacements!
Last edited by SilverShadow03; Jun 5, 2013 at 10:54 AM.

Newbie
Joined: Oct 2012
Posts: 15
Likes: 0
From: l.o.
There was more to it.. Take out the heater control unit, clean and lube the gears so they are moving smooth. Its easier to take out the cables also with the control unit out. There are clips holding the cables stable in the unit, but if you dont want to damage anything, you have to get to them from the bottom of the unit. Just detatch the cables from the gears further under the dash ( oposite from the control unit) and pull out the cables with the unit itself. Before you do any of this, I would set the heater to full heat, and the control to window defrost, and make note of it, so when it all goes back together, it will be a smooth process. There is a little "nipple" on the smallest of the three gears by the gas peddle that is suppost to go in the "C" shape of the gear closest to the fire wall.

Newbie
Joined: Feb 2013
Posts: 36
Likes: 0
From: California
There was more to it.. Take out the heater control unit, clean and lube the gears so they are moving smooth. Its easier to take out the cables also with the control unit out. There are clips holding the cables stable in the unit, but if you dont want to damage anything, you have to get to them from the bottom of the unit. Just detatch the cables from the gears further under the dash ( oposite from the control unit) and pull out the cables with the unit itself. Before you do any of this, I would set the heater to full heat, and the control to window defrost, and make note of it, so when it all goes back together, it will be a smooth process. There is a little "nipple" on the smallest of the three gears by the gas peddle that is suppost to go in the "C" shape of the gear closest to the fire wall.
Hey i just did the new gears and cable but my knob is tougher to turn than before

my problem is that the nipple on the smallest of the three gears keeps falling out of the "C" shape on the closest gear to the firewall. That smallest gear is difficult for me to turn as well. Any suggestions?
Newbie
Joined: Oct 2012
Posts: 15
Likes: 0
From: l.o.
Hey i just did the new gears and cable but my knob is tougher to turn than before
my problem is that the nipple on the smallest of the three gears keeps falling out of the "C" shape on the closest gear to the firewall. That smallest gear is difficult for me to turn as well. Any suggestions?
my problem is that the nipple on the smallest of the three gears keeps falling out of the "C" shape on the closest gear to the firewall. That smallest gear is difficult for me to turn as well. Any suggestions?
Last edited by 000; Mar 23, 2013 at 09:39 PM.
Newbie
Joined: Feb 2013
Posts: 36
Likes: 0
From: California
The small gear is the one controlling everything in the box. I just moved that small gear with the nipple back and forth like a thousand times as hard as i could and hoped it would knock anything loose in the air box itself. I guess the boxes get all jammed up with dust and pollin because there is no cabin filter. Did you take the black clips off of the old cables that snapped into the control unit and put them on the new cables? The cables also had a smaller snap in plastic peice down by the gears to keep the cable from wobbling out of place, maybe check that. Also make sure the screws in the gears arent too tight. Other than that IDK. I had to play around with it, but mine is working great now. Try turning the unit to full blast through the vent with the car running and get under there, and move the hell out of the hot/cold gear, so if anything breaks loose, it might come flying out of the vent. Maybe attach a shop vac at the same time. McGyver isht..
Newbie
Joined: Oct 2012
Posts: 15
Likes: 0
From: l.o.
this is exactly what im going to do. i clipped the wire in properly, but i might have routed it wrong. Im gonna reroute the cable and also do what you said. what did you fiddle the nipple gear with? just your fingers back and forth? or did you clamp a vice grip on it or something?
Last edited by 000; Mar 24, 2013 at 09:09 PM.
Newbie
Joined: Oct 2012
Posts: 15
Likes: 0
From: l.o.
this is exactly what im going to do. i clipped the wire in properly, but i might have routed it wrong. Im gonna reroute the cable and also do what you said. what did you fiddle the nipple gear with? just your fingers back and forth? or did you clamp a vice grip on it or something?

I know this has been posted before but for some of you coming into this thread now and have yet to read through the previous pages, here is a video I followed to replace my upgraded HVAC gears.
I know this has been posted before but for some of you coming into this thread now and have yet to read through the previous pages, here is a video I followed to replace my upgraded HVAC gears.
How To Video
How To Video
