
HVAC Repair - MEGA Guide

Newbie
Joined: Nov 2010
Posts: 21
Likes: 0
From: Lancaster Co, Pennsylvania
Hey rayman0690, thanks for this DIY! I am doing the link and lever gears on my Ralliart and considering the blend door as well.
I saw on another thread that you had a discussion with a guy (while you were doing this) who said that he replaced the blend door without evacuating AC.
Do you think there is any possibility of this? When the HVAC unit is unbolted, will it move around enough to separate it and access the blend door?
I would be willing to crawl around like a bug under the (remaining) dash if I could avoid messing with the AC refrigerant.
For reference, this is what alexisrc originally said in that thread:
Originally Posted by alexisrc
I actually drop the dash and removed it all.
There is no need to discharge the A/C lines.
Remove the blender assy but not the heater core. You can dismantle the whole thing and put if back together using small screws. Clean the blender door and use grease . I recommend you to blend or fold the door it self using a heat gun, to make it sit better. You'll notice that the problem comes because the different shapes of the door and the rails. Test the blender door before you instal it back together. Round all sharp edges of the rails using a fine san paper. Grease and clean all gears.
Last edited by samdog; Sep 3, 2012 at 11:46 PM.


Hey rayman0690, thanks for this DIY! I am doing the link and lever gears on my Ralliart and considering the blend door as well.
I saw on another thread that you had a discussion with a guy (while you were doing this) who said that he replaced the blend door without evacuating AC.
Do you think there is any possibility of this? When the HVAC unit is unbolted, will it move around enough to separate it and access the blend door?
I would be willing to crawl around like a bug under the (remaining) dash if I could avoid messing with the AC refrigerant.
For reference, this is what alexisrc originally said in that thread:
I saw on another thread that you had a discussion with a guy (while you were doing this) who said that he replaced the blend door without evacuating AC.
Do you think there is any possibility of this? When the HVAC unit is unbolted, will it move around enough to separate it and access the blend door?
I would be willing to crawl around like a bug under the (remaining) dash if I could avoid messing with the AC refrigerant.
For reference, this is what alexisrc originally said in that thread:
I honestly cannot see a way to repair the blend door without evacuating the A/C system. There just is not enough "wiggle" room to get to the rear clips on the air mix box that you have to break open.
I tried to do the same but in the end having it evacuated and removing it completely was way easier and probably saved a lot of time and hassle.

Newbie
Joined: Mar 2007
Posts: 2
Likes: 0
From: VA
I actually was just working on this very project tonight for my '03 Lancer OZ Rally. I was able to get the new blender door in without removing the air mixer box or evacuating the A/C system. I broke enough of the clips on the front and one on the top of the back that I was able to make it work. But it was quite a hassle, and I worked on it for a long time trying to get out the old blender door without breaking anything. On top of that, there is a piece inside the air mix box that is hard to get realigned when reassembling the box since I had such a small opening to work with.
I'm not sure I would recommend this method though since it took so much effort . I almost gave up on it many times. The only thing that kept me trying was that I had spent so much time disassembling my car, and I didn't want to have to tow it somewhere to get the A/C system evacuated (or worse yet, bring it to the Mitsu dealer and have them finish the repair for me ).
).
I haven't put everything back together yet, but I have reassembled the air mixer box and bolted it back in place. I'll post more info once I make some more progress and find some more time to post.
I'm not sure I would recommend this method though since it took so much effort . I almost gave up on it many times. The only thing that kept me trying was that I had spent so much time disassembling my car, and I didn't want to have to tow it somewhere to get the A/C system evacuated (or worse yet, bring it to the Mitsu dealer and have them finish the repair for me
).I haven't put everything back together yet, but I have reassembled the air mixer box and bolted it back in place. I'll post more info once I make some more progress and find some more time to post.
That's awesome. I was so far along in the project that it just made sense to go ahead and make it a little easier for myself to remove the air mix box.
Definitely post up how you managed or any tips and tricks that helped you along the way!
Definitely post up how you managed or any tips and tricks that helped you along the way!

my knobs all worked perfectly their whole lives. I took my dash out recently and now have issues. I'm pissed that I did it to myself!
This thread will hopefully have my answers when I get to read through it all...
This thread will hopefully have my answers when I get to read through it all...

Also, specifically what you mentioned, the routing of the wires. Dunno what I coulda done wrong, but the way it acts that makes sense. Knob will go far, but then pop back like it's being pulled by tension.
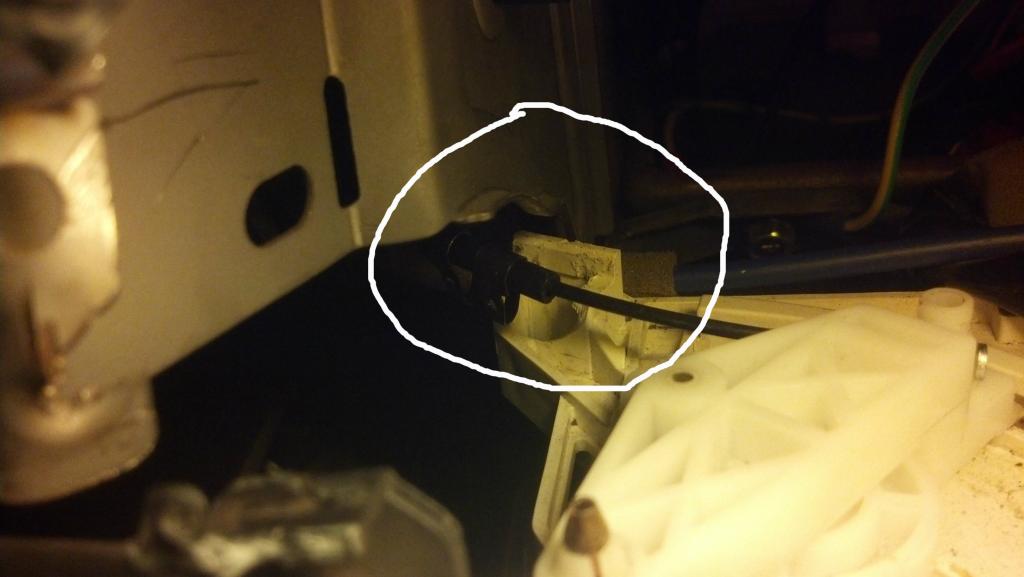
This error occurred in my attempt to replace the cable and gears. Whoops.
So I think I just screwed myself into replacing the whole control unit, right? Unless you more knowledgeable folks have a better idea, I don't know what else to do.

Newbie
Joined: Feb 2012
Posts: 5
Likes: 0
From: phoenix
Hey guys, I have a 2006 Lancer ES. Will this procedure work for my 06 (seems like most of you are fixing 03s)?
Also need a temp control shaft. The ebay listing says it's compatible with a 2003 lancer - wondering if that same shaft is compatible with my 2006 control unit. Anyone know?
Thanks!
Also need a temp control shaft. The ebay listing says it's compatible with a 2003 lancer - wondering if that same shaft is compatible with my 2006 control unit. Anyone know?
Thanks!