
ACD Relocation

ACD Relocation
so the other day i was browsing the forums and came across this thread.
https://www.evolutionm.net/forums/ev...os-photos.html
the car is sick and he has some great ideas... i personally liked the idea of moving the ACD to open up the room for a cold air intake in the bumper.
its a enormous PITA to start. i under estimated the amount of work that i would have to put into this.
to start you will need:
12+ ft of 5/16s brake line
2ft of 5/16 rubber hose
3ft of 5/8 rubber hose
3ft of 3/8 rubber hose
4 5/16th, 2 5/8s and 2 3/8s hose clamps.
100ft of 18 gauge wire in one or various colors
20ft of 12 gauge red
20ft of 12 gauge black wire
various sizes of zipties
soldering iron/ solder
shrink wrap and electrical tape
and a hanger bracket
i custom made a bracket to old the acd pump unit out of 16gauge steel from home depot... 18x6
if you dont have a lift or access to a lift dont bother. this is way to complicated for jack stands
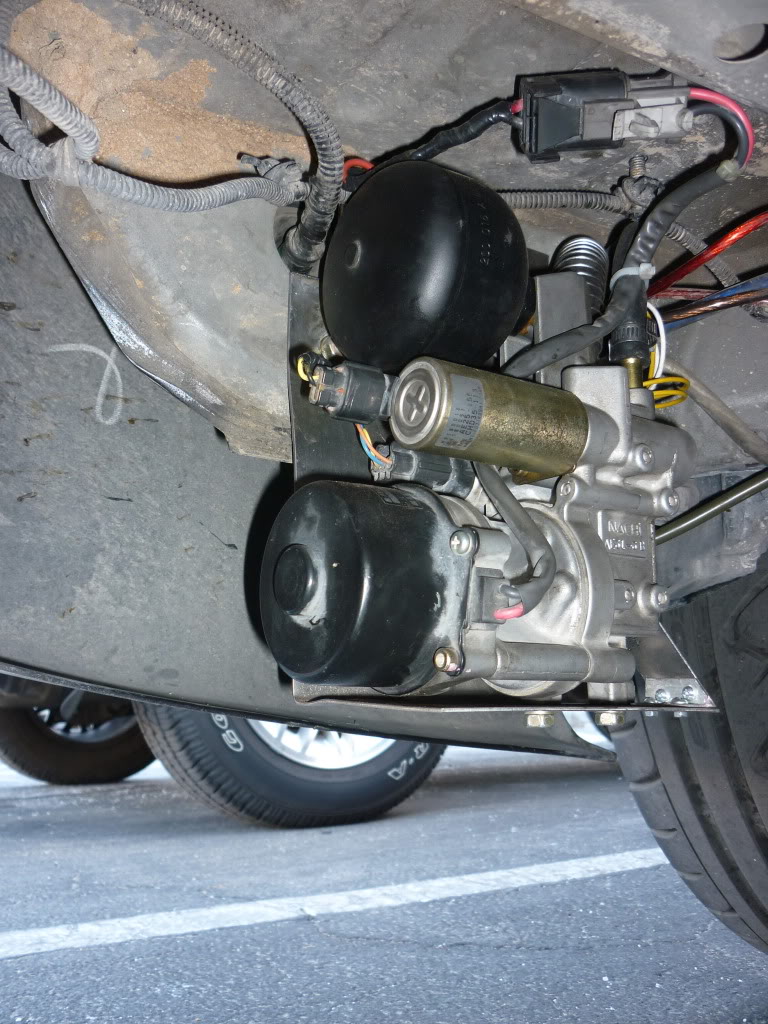
start by removing the front driver side tire and fender liner. if you have a under panel you'll need to remove that as well. then disconnect the wiring connectors. then using a 14 mm line wrench and 17mm box end wrench disconnect the hydraulic line coming out of the acd pump just below the radiator. allow a few minutes for the fluid to drain to minimize spillage. there are 4 or 5 bolts holding acd unit to the frame all 12mm unbolt them. you may have to remove your UICP from your intercooler to clear the fluid line. now you should be able to remove the ACD unit from the car.
Now is when i build my bracket. using a 18x6 inch piece of 16 gauge steel i measured 4inches from one side and bent it at 90*. then i cut a 1'' strip from the opposite end and tack welded it to the side at an angle to brace the bracket... using a cut off wheel die grinder i notched the bracket to fit the ACD hydrualic line and drilled the 3 holes 3/8s diameter to bolt the unit to the bracket.
once you have your bracket fabricated test fit it to the location you've chosen to mount the unit. i have removed my charcoal canister from behind the driver side rear tire and with my 6inch wide bracket the ACD unit fits perfectly in its place. using the factory bolt holes of the canister
NOTE: you may have to cut into the undercarriage to clear the ACD line.
with the bracket and unit seperate mock up the location and drill the mounting bolt holes once everything is ready mount the ACD unit to the bracket and bolt it into the car. the original bracket has plenty of bolts that wont be used anymore so you can use these to secure everything.
Next you can either mount the reservoir or extended the wiring harness. i mounted the reservoir last... in order to extended the harness i cut the connectors off of the factory wiring harness 3-4''s back from the connector. i stripped about 1/4-3/8s inch of shielding from each wire. then i took 5 lengths of 20ft of white/yellow(couldnt find enough white) wire and did the same to the ends. i soldered and heat shrunk each connection and for extra protection from the elements i wrapped each wire with electrical tape 2inches on either side of the connection. then i soldered the red and black 12 gauge wires to the appropriate wires using the same method. now is the best time to run the wiring... BEFORE soldering on the end connectors. make sure that you mark each wire so you know what goes where when you get to the other end of the car.
once the wiring is routed, cut away the extra wiring, and solder on the end connectors. ensure you heat shrink and wrap everything.then connect the connectors to the pump.
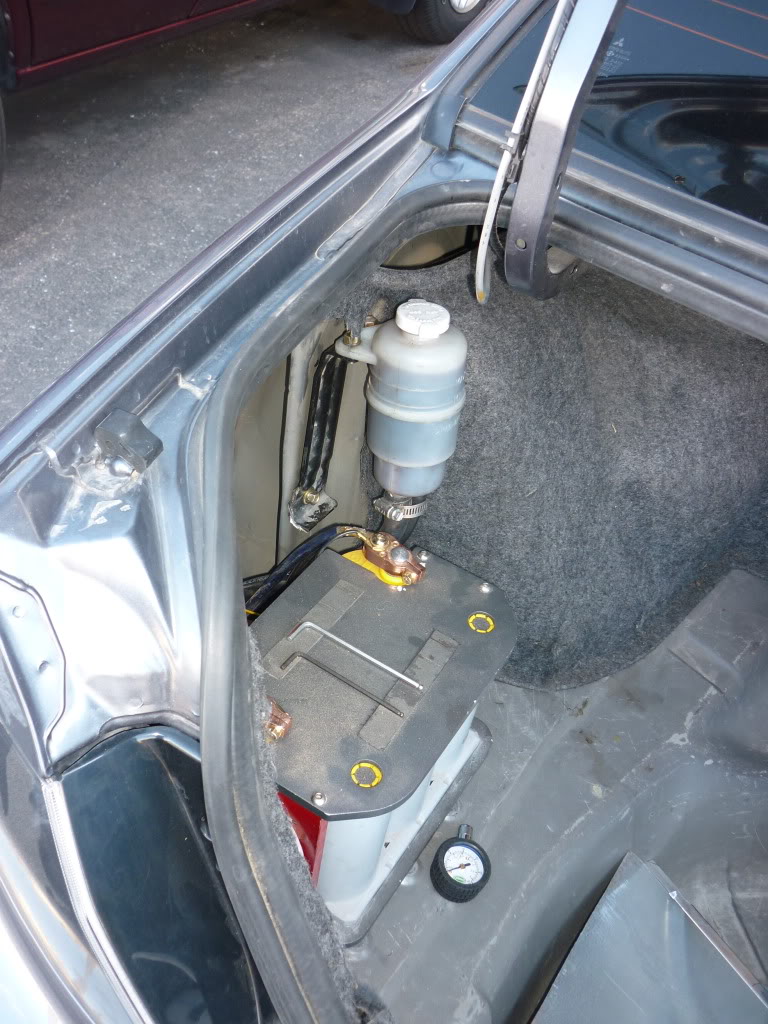
i mounted my reservoir just behind the rear wheel well inside the trunk. if you remove the trunk liner you can see two unused bolt holes that make a great mounting point. also I cut the stock reservoir bracket off of the ACD bracket and used that to mount the reservoir.
once you find where you plan to mount the reservoir and its in route the 5/8 and 3/8s hoses from the ACD unit to the reservoir. In the location i chose i ran them threw a grommet hole underneath the trunk behind the charcoal canister. the immediate 90* angle of the 5/8s hose is to much and the hose tries to collapse. use a 5/8s hose flew hose elbow to support it. the 3/8s is sturdy enough to not need one. once routed cut the hoses to length and tighten hose clamps to them.
When routing the metal hydraulic line it must go above the rear axle or keep it from being damaged or binding. there are 8 17mm bolts holding the rear suspension subframe to the chassis. if you have the stock mustache bar the suspension has plenty of travel to make routing the line easy. I have the buschur diff brace which doesnt. route the line how you see fit up to the tail of the transfer case... just on the driver side of the drive shaft tunnel at the tail of the transfer case is where the main ACD line routed around the engine bay meets the section on the transfer case. unbolt the hydraulic line using the 14mm line wrench.
remove the factory hydraulic line from the car. unless you have the patients of a monk use the die grinder... with it out of the car you can cut the ends off of it about 6inches back from the end and reuse the fittings... sliding them onto the new hose and flaring them blah blah blah... or i chose to take a short cut here and using the 5/16s rubber hose as a joiner i slid the new hydraulic line into the hose and clamped it down using 2 hose clamps then slid that onto the 6inch fitting and again tightened down 2 hose clamps. the ACD pump can reach pressures of about 120psi so i wouldnt recommend replacing the entire line with rubber hose unless you use stainless steel braided hose. however such a small section wont effect performance. do the same at the opposite end of the new hydraulic line. tighten the new line into the old fittings. once that is finished remount the rear suspension crossmember... torque all 8 bolts to 65lbs +or-3lbs or 88+-5NM
fill the ACD fluid reservoir to the very top. not to the full line. TO THE TOP. place the cap on the tank. using a second person for help bleed the ACD system several methods work. evoscan actuator, gas pedal, or hard wire....
FOLLOW AT YOUR OWN RISK FOLLOW AT YOUR OWN RISK
i tried the evoscan actuator to bleed the system but it wouldnt work. to the point i was afraid i messed something up. then i tried the gas pedal method but my pump didnt stay on long enough to really bleed the system properly. so i finally hard wired the pump since my battery was only 2 feet away anyway. disconnect the large connnector with the 12 gauge wires. using a piece of speaker wire. connect two wires to the terminals of the battery. and the other end to the terminal of the ACD pump. DO NOT CONNECT THE PUMP FOR MORE THE 5-7 SECONDS at a time. have someone open the bleeder valve located on the underrside of the transfer case. connect the pump. close the bleeder... disconnect the pump. repeat 5-6 times as needed. the ACD pump flows fluid really fast so check the level after every 2-3 connections.
EDIT: i worked with Hamish from evoscan on my ACD issue. turns out i was running a version that was to old. 2.6b i have version 2.8 now and works great... so if i had to re due the bleed portion i would use evoscan.
replace your fender liner and front tire... THEN test drive... please dont get these steps backward... lol.
It has been 2 days since i finshed this installation and still no leaks. I have done several launches followed by hard turn/slides to force the ACD to quickly lock and unlock the clutch pack and still no errors.
https://www.evolutionm.net/forums/ev...os-photos.html
the car is sick and he has some great ideas... i personally liked the idea of moving the ACD to open up the room for a cold air intake in the bumper.
its a enormous PITA to start. i under estimated the amount of work that i would have to put into this.
to start you will need:
12+ ft of 5/16s brake line
2ft of 5/16 rubber hose
3ft of 5/8 rubber hose
3ft of 3/8 rubber hose
4 5/16th, 2 5/8s and 2 3/8s hose clamps.
100ft of 18 gauge wire in one or various colors
20ft of 12 gauge red
20ft of 12 gauge black wire
various sizes of zipties
soldering iron/ solder
shrink wrap and electrical tape
and a hanger bracket
i custom made a bracket to old the acd pump unit out of 16gauge steel from home depot... 18x6
if you dont have a lift or access to a lift dont bother. this is way to complicated for jack stands
start by removing the front driver side tire and fender liner. if you have a under panel you'll need to remove that as well. then disconnect the wiring connectors. then using a 14 mm line wrench and 17mm box end wrench disconnect the hydraulic line coming out of the acd pump just below the radiator. allow a few minutes for the fluid to drain to minimize spillage. there are 4 or 5 bolts holding acd unit to the frame all 12mm unbolt them. you may have to remove your UICP from your intercooler to clear the fluid line. now you should be able to remove the ACD unit from the car.
Now is when i build my bracket. using a 18x6 inch piece of 16 gauge steel i measured 4inches from one side and bent it at 90*. then i cut a 1'' strip from the opposite end and tack welded it to the side at an angle to brace the bracket... using a cut off wheel die grinder i notched the bracket to fit the ACD hydrualic line and drilled the 3 holes 3/8s diameter to bolt the unit to the bracket.
once you have your bracket fabricated test fit it to the location you've chosen to mount the unit. i have removed my charcoal canister from behind the driver side rear tire and with my 6inch wide bracket the ACD unit fits perfectly in its place. using the factory bolt holes of the canister
NOTE: you may have to cut into the undercarriage to clear the ACD line.
with the bracket and unit seperate mock up the location and drill the mounting bolt holes once everything is ready mount the ACD unit to the bracket and bolt it into the car. the original bracket has plenty of bolts that wont be used anymore so you can use these to secure everything.
Next you can either mount the reservoir or extended the wiring harness. i mounted the reservoir last... in order to extended the harness i cut the connectors off of the factory wiring harness 3-4''s back from the connector. i stripped about 1/4-3/8s inch of shielding from each wire. then i took 5 lengths of 20ft of white/yellow(couldnt find enough white) wire and did the same to the ends. i soldered and heat shrunk each connection and for extra protection from the elements i wrapped each wire with electrical tape 2inches on either side of the connection. then i soldered the red and black 12 gauge wires to the appropriate wires using the same method. now is the best time to run the wiring... BEFORE soldering on the end connectors. make sure that you mark each wire so you know what goes where when you get to the other end of the car.
once the wiring is routed, cut away the extra wiring, and solder on the end connectors. ensure you heat shrink and wrap everything.then connect the connectors to the pump.
i mounted my reservoir just behind the rear wheel well inside the trunk. if you remove the trunk liner you can see two unused bolt holes that make a great mounting point. also I cut the stock reservoir bracket off of the ACD bracket and used that to mount the reservoir.
once you find where you plan to mount the reservoir and its in route the 5/8 and 3/8s hoses from the ACD unit to the reservoir. In the location i chose i ran them threw a grommet hole underneath the trunk behind the charcoal canister. the immediate 90* angle of the 5/8s hose is to much and the hose tries to collapse. use a 5/8s hose flew hose elbow to support it. the 3/8s is sturdy enough to not need one. once routed cut the hoses to length and tighten hose clamps to them.
When routing the metal hydraulic line it must go above the rear axle or keep it from being damaged or binding. there are 8 17mm bolts holding the rear suspension subframe to the chassis. if you have the stock mustache bar the suspension has plenty of travel to make routing the line easy. I have the buschur diff brace which doesnt.
route the line how you see fit up to the tail of the transfer case... just on the driver side of the drive shaft tunnel at the tail of the transfer case is where the main ACD line routed around the engine bay meets the section on the transfer case. unbolt the hydraulic line using the 14mm line wrench. remove the factory hydraulic line from the car. unless you have the patients of a monk use the die grinder... with it out of the car you can cut the ends off of it about 6inches back from the end and reuse the fittings... sliding them onto the new hose and flaring them blah blah blah... or i chose to take a short cut here and using the 5/16s rubber hose as a joiner i slid the new hydraulic line into the hose and clamped it down using 2 hose clamps then slid that onto the 6inch fitting and again tightened down 2 hose clamps. the ACD pump can reach pressures of about 120psi so i wouldnt recommend replacing the entire line with rubber hose unless you use stainless steel braided hose. however such a small section wont effect performance. do the same at the opposite end of the new hydraulic line. tighten the new line into the old fittings. once that is finished remount the rear suspension crossmember... torque all 8 bolts to 65lbs +or-3lbs or 88+-5NM
fill the ACD fluid reservoir to the very top. not to the full line. TO THE TOP. place the cap on the tank. using a second person for help bleed the ACD system several methods work. evoscan actuator, gas pedal, or hard wire....
FOLLOW AT YOUR OWN RISK FOLLOW AT YOUR OWN RISK
i tried the evoscan actuator to bleed the system but it wouldnt work. to the point i was afraid i messed something up. then i tried the gas pedal method but my pump didnt stay on long enough to really bleed the system properly. so i finally hard wired the pump since my battery was only 2 feet away anyway. disconnect the large connnector with the 12 gauge wires. using a piece of speaker wire. connect two wires to the terminals of the battery. and the other end to the terminal of the ACD pump. DO NOT CONNECT THE PUMP FOR MORE THE 5-7 SECONDS at a time. have someone open the bleeder valve located on the underrside of the transfer case. connect the pump. close the bleeder... disconnect the pump. repeat 5-6 times as needed. the ACD pump flows fluid really fast so check the level after every 2-3 connections.
EDIT: i worked with Hamish from evoscan on my ACD issue. turns out i was running a version that was to old. 2.6b i have version 2.8 now and works great... so if i had to re due the bleed portion i would use evoscan.
replace your fender liner and front tire... THEN test drive... please dont get these steps backward... lol.
It has been 2 days since i finshed this installation and still no leaks. I have done several launches followed by hard turn/slides to force the ACD to quickly lock and unlock the clutch pack and still no errors.
Last edited by joseph143; Feb 18, 2011 at 05:40 PM.

the pump assembly weighs about 10 pounds. the brackets 3 pounds... fuild idk but its 1/2 quart of atf stpiii. all sitting in the farthest position from the springs so its amplified by the fulcrum effect. not truly a noticeable weight savings.
other then the ability to run a 3 inch intake pipe down into the front bumper the only real benefit it taking the expensive **** pump out of a high risk area. any small animal or large rock oeven a curb could wipe this pump out and cost you a lot of money.
other then the ability to run a 3 inch intake pipe down into the front bumper the only real benefit it taking the expensive **** pump out of a high risk area. any small animal or large rock oeven a curb could wipe this pump out and cost you a lot of money.

just an update... i had the car on the lift this weekend for and oil change and turbo oil line install.... i double checked all seals and connections on my ACD... its all perfect... no leaks... i guessed cause my fluid level is still to high... refer to the first pic...
i do need to buy some wire loom and loom the harness extension still but i rarely use my trunk so i'm in no hurry... other then that i'm completely happy/ satisfied with this modification...
also i'm working on a formed funnel/CAI for the front bumper to the air filter... wish me luck...
i do need to buy some wire loom and loom the harness extension still but i rarely use my trunk so i'm in no hurry... other then that i'm completely happy/ satisfied with this modification...
also i'm working on a formed funnel/CAI for the front bumper to the air filter... wish me luck...

Trending Topics
it wasnt that much work... fitting cutting fitting cutting and fitting again was the hardest part. people do a lot harder and a lot more expensive work to balance the weight of the car... like paying 5k for the arc titanium cat back... WTF! personally its pretty cheap and worth the time to take that much weight out of the heaviest corner of our cars and place it in the lightest...


Nice! I'm actually doing the exact same thing right now. Tonight I'm fabbing up the brackets to mount the pump and also to mount my fuse boxes in the trunk.
Just one quick question though, and please dont take this as me picking apart what you did, because it is not at all and I applaud your efforts. But for the ACD line itself that has to run up to the center diff, why not find a hydraulic shop and have them make up a nice line maybe using some braided line? It would make life much easier to run up front and also to secure and install.
Either way nice work!
I like the idea of moving the ACD stuff to the rear to move weight where it needs to be and make room for a cold air setup BUT like Ernie said you put it on the wrong side! If you corner weight the car the left side is heavier. Since your battery is back there too, you should move that over to the right, hopefully even it out. From what I understand the whole ACD setup weighs around 30 lbs, I would just rather get rid of the 30 lbs all together and go with a non-ACD t- case with an upgraded diff. I know I would just get pissed trying to reloate everything, haha.
Well here's the start of my setup. This is far from done but you get the idea. The head of the bolts under the pump are 3/4" above the truck floor and the reservoir will be moved to almost above the wheel well with extended hoses. Should have it finished up by the weekend, have to make a couple of brackets to connect the bottom mounting plate and the main side plate then weld everything up. Last but not least have to add some sex appeal with some shaping too on the brackets. 

Last edited by EvoooB; Mar 16, 2011 at 04:06 AM.
Well here's the start of my setup. This is far from done but you get the idea. The head of the bolts under the pump are 3/4" above the truck floor and the reservoir will be moved to almost above the wheel well with extended hoses. Should have it finished up by the weekend, have to make a couple of brackets to connect the bottom mounting plate and the main side plate then weld everything up. Last but not least have to add some sex appeal with some shaping too on the brackets.
I had actually thought about that, but could not come up with any info on it. That was the only deciding factor left when making a decision on whether to mount it inside or out. At this point I just said the hell with it and I'll try it inside and see what happens. If it becomes a problem, I'll just move it underneath... Only time will tell.
Last edited by EvoooB; Mar 16, 2011 at 07:34 AM.