
How to: 3M Headlight Restoration


How to: 3M Headlight Restoration
When I bought my car, the previous owner decided to spray gallons of spray detailer all over the car. I'm sure this would have been okay had they not neglected to wipe it off! Instead, they let it dry which left a horrible residue all over the paint, and headlights.
I sent countless hours revitalizing the paint, I just needed to do something to the headlights.
Enter the 3M product:
I've seen this product used a few times, and it basically includes everything I put together when I did this to an old pair or DSM headlights back in the day.
Okay, so enough about that, here's some pictures of the process and the results.
Tools Required:
(1) 3M Headlight Restoration Kit
(1) Battery operated drill
(1) Spray bottle (w/ water)
(1) Large blanket, towel, drop cloth
** I suggest using an old blanket, towel or drop cloth to cover the motor because the polish WILL get everywhere!
(1) Bag of rags, or several terry towels
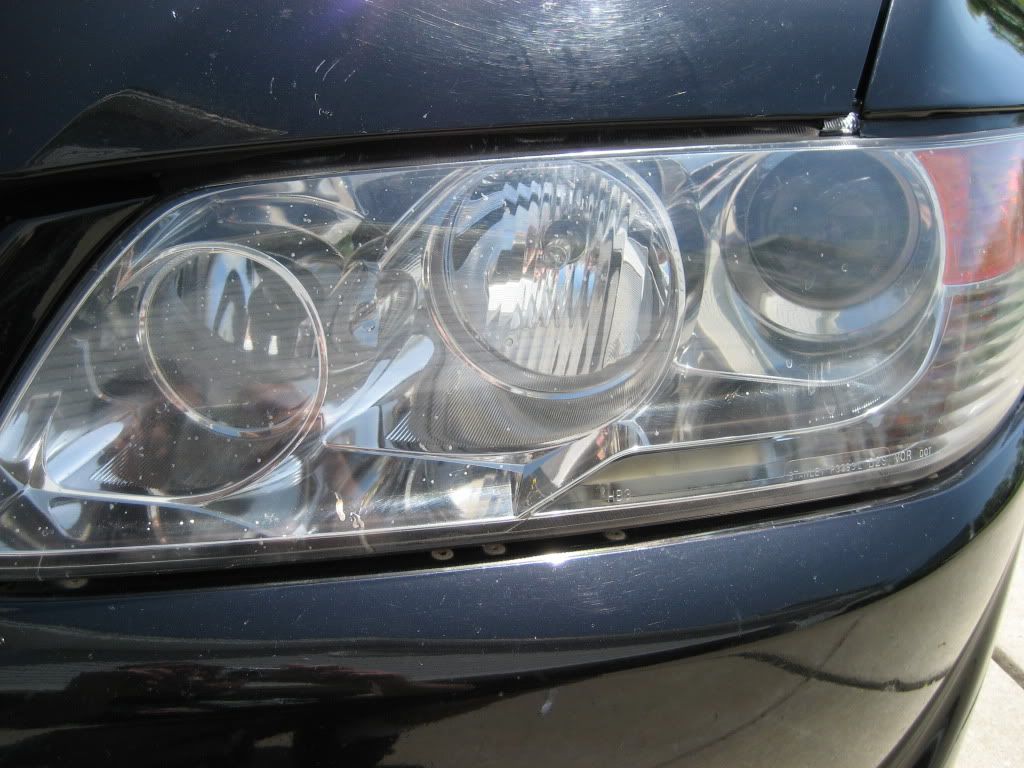
This is what my headlights looked like before; notice all the crap caked on the lens, this isn't pitting, it's mostly dried up spray detailer.


Step 1: Tape off the surrounding areas using the tape provided. *Apply two layers of tape


Step 2: Open up the kit and make sure everything is there. This is also a good time to go gather up your tools (drill and spray bottle with water)


Step 3: Attach the supplied holder to your drill and begin wet sanding the headlight with brown sanding disc (500 grit). ** Make sure not to press to hard on the headlight surface because you can "burn" the headlight. I used a low setting on the drill as not to overwork the lens.
Spray the surface with water:

Sand the lens in a uniform manner:

Wipe of the lens, you'll notice the lens is now cloudy, don't be alarmed!

Step 4: Repeat Step 3 for other headlight
Step 5: Begin sanding the headlight lens with the white sanding disc (800 grit). This will help smooth out the lens and reduce the marks left by the 500 grit discs.

** Notice the clarity of the lens compared to the 500 grit.
Step 6: Repeat step 5 for other headlight
Step 7: Using the "Trizact" disc (3000 girt) begin wet sanding the headlight. Again, this process will reduce the visibility of scratches, and help blend everything together.

Step 8: Repeat Step 7 for other headlight
Step 9: Using the supplied polishing pad, apply polish to the headlight and buff it. Don't let the pad get dry, keep it "lubricated" with the polishing compound.
** If you have your hood open, I would suggest putting a towel or drop cloth over the motor because the polishing compound gets EVERYWHERE!
Step 10: Now that you have polished both headlights, apply the lens sealer compound and buff the lens in the same fashion.
Results:


Before/After:
I'm extremely happy with the results.
If you have headlights that could use a restoration, this kit is perfect! It took me about an hour to complete both headlights and I think they look great.
Hope this helps!
I sent countless hours revitalizing the paint, I just needed to do something to the headlights.
Enter the 3M product:
I've seen this product used a few times, and it basically includes everything I put together when I did this to an old pair or DSM headlights back in the day.
Okay, so enough about that, here's some pictures of the process and the results.
Tools Required:
(1) 3M Headlight Restoration Kit
(1) Battery operated drill
(1) Spray bottle (w/ water)
(1) Large blanket, towel, drop cloth
** I suggest using an old blanket, towel or drop cloth to cover the motor because the polish WILL get everywhere!
(1) Bag of rags, or several terry towels
This is what my headlights looked like before; notice all the crap caked on the lens, this isn't pitting, it's mostly dried up spray detailer.
Step 1: Tape off the surrounding areas using the tape provided. *Apply two layers of tape
Step 2: Open up the kit and make sure everything is there. This is also a good time to go gather up your tools (drill and spray bottle with water)
Step 3: Attach the supplied holder to your drill and begin wet sanding the headlight with brown sanding disc (500 grit). ** Make sure not to press to hard on the headlight surface because you can "burn" the headlight. I used a low setting on the drill as not to overwork the lens.
Spray the surface with water:
Sand the lens in a uniform manner:
Wipe of the lens, you'll notice the lens is now cloudy, don't be alarmed!
Step 4: Repeat Step 3 for other headlight
Step 5: Begin sanding the headlight lens with the white sanding disc (800 grit). This will help smooth out the lens and reduce the marks left by the 500 grit discs.
** Notice the clarity of the lens compared to the 500 grit.
Step 6: Repeat step 5 for other headlight
Step 7: Using the "Trizact" disc (3000 girt) begin wet sanding the headlight. Again, this process will reduce the visibility of scratches, and help blend everything together.
Step 8: Repeat Step 7 for other headlight
Step 9: Using the supplied polishing pad, apply polish to the headlight and buff it. Don't let the pad get dry, keep it "lubricated" with the polishing compound.
** If you have your hood open, I would suggest putting a towel or drop cloth over the motor because the polishing compound gets EVERYWHERE!
Step 10: Now that you have polished both headlights, apply the lens sealer compound and buff the lens in the same fashion.
Results:
Before/After:
I'm extremely happy with the results. If you have headlights that could use a restoration, this kit is perfect! It took me about an hour to complete both headlights and I think they look great.
Hope this helps!
Good luck. I did this to mine and they looked great for about a week, then small cracks started coming out and the pitting began. And NO I didn't press too hard, I was gentle thruout the whole process. You used aggressive surfaces, I used 1500 and 2000 grit with soap and water, still cracked with time.
Hmm, not too sure what to say about that.
The kit comes with 500 grit, 800 grit and 3000 grit. I did this a couple weekends ago and it's still fine.
Prior to doing the headlights on my EVO, I did the headlights on my old DSM using a similar method:
-800 grit, 1000 grit, 1500 grit, 2000 grit. Wet sanding of course.
-I then polished the headlights using mothers mag/aluminum polish
-I then sealed the lenses with Mothers Plast-X.
Using the above method yielded similar results to the 3M kit, and lasted for the whole time I had the car (3-4 years). The car was daily driven and saw blistering sunshine and extreme cold temperatures and everything in between and never "cracked or pitted"
Like I said, it's been about 2 weeks now, and I have no complaints about them. I'm not really sure what may have happened when doing yours, but thanks for the input.
Yea I'm not sure, not to sound like oh poor pitiful me but it's my luck. I "restored" my tail lights, then a week later did my heads, then about a month later they all cracked and pitted  again I was gentle as hell and really took my time. I even removed my lights I didn't even leave them on the car. Like you I did my GS-T's headlights and they lasted for years I have no explanation as to why my evo's went bad. Needless to say that's well over $1000 to replace. I don't recommend anyone messing with their evo lights, way too expensive to replace. Good luck to you bro, they look good.
again I was gentle as hell and really took my time. I even removed my lights I didn't even leave them on the car. Like you I did my GS-T's headlights and they lasted for years I have no explanation as to why my evo's went bad. Needless to say that's well over $1000 to replace. I don't recommend anyone messing with their evo lights, way too expensive to replace. Good luck to you bro, they look good.
I guess only time will tell.
If yours really turned out that bad, why not contact 3M and see what they have to say?
Sorry you had a bad experience, I made sure to seal up the lenses with the compound they supplied in order to help protect it from the elements.
To my understanding, the headlight sealer is a new addition to the kit, so maybe that was the issue with yours?
Regardless, I think the headlights look great, 100 times better then they did before.
As with every product out there, use at your own risk I guess.

Trending Topics
I used the same 3m kit. Except I felt mine were so bad I wetsanded them down to 200 grit. This was a month or so ago, they look new.
Before

200 on pass side, finished on driver side.

After

Before
200 on pass side, finished on driver side.
After
Last edited by charlie.tunah; Jul 19, 2012 at 03:53 AM.


Evolving Member
Joined: Dec 2009
Posts: 181
Likes: 0
From: pensacola
I've been reading about doing this and i've heard that basically your taking the top layer off the headlight.. What happens is, your clearcoat fades and gets hazy on the lens.. So the BEST method is to have another coat of clearcoat applied to the headlights after your polish them out.. my local bodyshop restores headlights for 50$ a piece
I've used all the brand name headlight restoration kits, and 3M is the only one I stand by now. I just recently freshened mine up (just used the compound and the orange foam pad). It takes longer to tape around the headlight than it does to do the actual polishing 
I just used this kit on my wife's civic. Boy does it work well, I had used Mother's (or was it meguiars i forget) kit before, and those were ok, but the 3M kit takes the cake. Her lenses were completely yellowed and nasty and now they are super clear. I was very happy with the result. Going to do my evo next.
I suggest people to use UV clear coat after the polishing. Restoration kits usually last only a week to few months.
First, buy uv sealer-helmsman spar urethane and Odorless Mineral spirits from walmart or home depot any hardware stores... mix these 1:1 , and apply on headlights with a piece of shop towel, or a brush. and let it dry for a day.
This will give headlights to look brand new, gloss, and won't get yellowed or hazed at least a year or so.

Thread
Thread Starter
Forum
Replies
Last Post
05ah8james
Evo How Tos / Installations
50
Jan 17, 2017 07:35 PM
ILuvJDM
Project Cars / Build Threads
125
Mar 20, 2014 08:00 AM
jay777
Vendor Service / Parts / Tuning Review
23
May 15, 2013 06:53 PM