
Notices
Evo X How Tos / Installations Post or link to your detailed how to / installation articles in here. If you have any questions regarding the how tos, feel free to post them in the Request sub-forum.

HOW TO: ETS Intake and ETS UICP Detailed Install Guide

Thread Tools
 
Search this Thread
 
Old Oct 3, 2013 | 05:21 AM
  #61  
tkromer's Avatar
Evolved Member
iTrader: (6)
 
Joined: Jun 2011
Posts: 705
Likes: 1
From: Morgantown, WV
Gettin ready to do this either tonight or Saturday. Is this as easy as it looks? Like 30 minutes? I can budget an hour and a half tonight, but I don't want to get the job halfway done.
Reply
Old Oct 3, 2013 | 09:15 AM
  #62  
ETS Michael's Avatar
Former Sponsor
iTrader: (91)
 
Joined: Mar 2007
Posts: 8,685
Likes: 54
From: Vancouver, WA
I would say if your a novice an hour to hour and a half should be enough time to pull the upper pipe and intake and install an upper pipe and intake. It's pretty straight forward. Honestly it will prob take you around 30-45 mins.

Michael
Reply
Old Oct 3, 2013 | 09:28 AM
  #63  
tkromer's Avatar
Evolved Member
iTrader: (6)
 
Joined: Jun 2011
Posts: 705
Likes: 1
From: Morgantown, WV
Thanks! Not even doing the UICP today, just ordered that.
Reply
Old Oct 4, 2013 | 04:03 AM
  #64  
tkromer's Avatar
Evolved Member
iTrader: (6)
 
Joined: Jun 2011
Posts: 705
Likes: 1
From: Morgantown, WV
Just for anyone curious, it took me about 55 minutes, which included about 10 minutes to jack up the car and pop the undertray when I dropped my 10mm wrench. Intake only, UICP would have certainly added another 15-20 minutes IMO. Install was super easy though. Thanks again to the OP for the great directions and ETS for the great product.
Reply
Old Oct 8, 2013 | 11:04 AM
  #65  
newevoxguy's Avatar
Evolving Member
 
Joined: Jul 2013
Posts: 130
Likes: 0
From: New Hampshire
Thank you. I did mine today took about an hr. Now it sounds awesome and perfect fit
Reply
Old Nov 23, 2013 | 05:22 PM
  #66  
frenchfry675's Avatar
Newbie
 
Joined: Aug 2013
Posts: 3
Likes: 0
From: wyomissing,pa
Originally Posted by CRooKeDCoP
I am having problems finding the second bolt to install the heat shield anyone else have a problem with it ? 2012 GSR. I will take pics tomorrow when it's not raining. Intake install went well other then the heat shield. Car sounds great now even sounds quieter at hwy speeds. No drone from stock anymore.
I'm sure you already figured this out but I had this issue to. The bolt that's used for the stock box can't be used for the heat sheild cause it's to long and not threaded all the way. I used one of the oem mass air flow bolts for the heat sheild since you don't use them for anything. Other then that one issue it was a awesome write up and saved me a ton of time. Thank you op. I was also very happy with the quality of the parts really top notch. And 15% off right now

Last edited by frenchfry675; Dec 6, 2013 at 04:03 AM.
Reply
Old Dec 2, 2013 | 11:04 PM
  #67  
Psycho719's Avatar
Newbie
 
Joined: Dec 2011
Posts: 73
Likes: 0
From: Orange County
Originally Posted by tkromer
Just for anyone curious, it took me about 55 minutes, which included about 10 minutes to jack up the car and pop the undertray when I dropped my 10mm wrench. Intake only, UICP would have certainly added another 15-20 minutes IMO. Install was super easy though. Thanks again to the OP for the great directions and ETS for the great product.
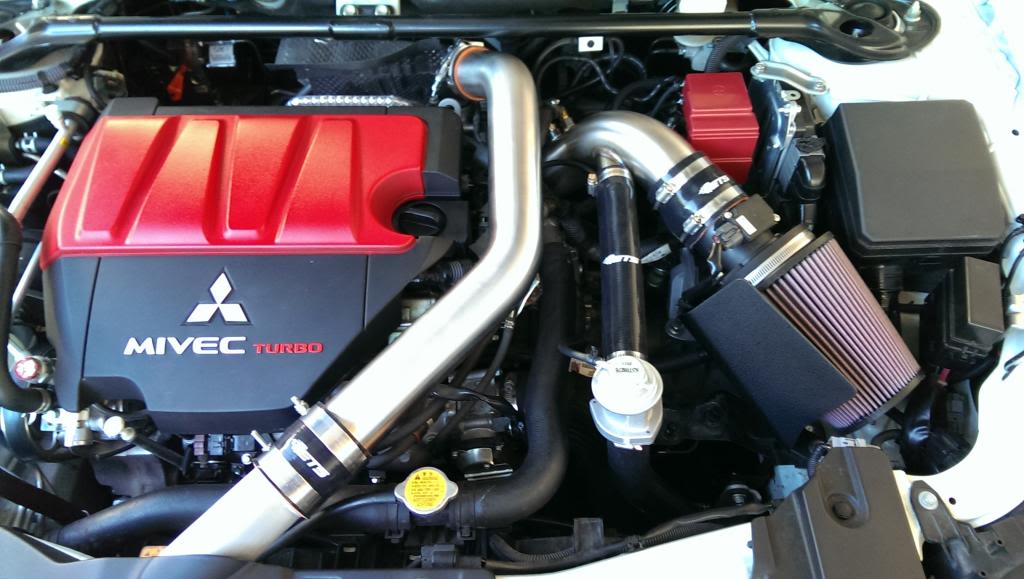
Just installed my intake today and dropped my short flat head lol. Didn't bother removing undertray as it probably fell somewhere on my test drive lol. Install was straight forward. However, I did have trouble using the supplied BOV hose. It was tough getting it in all the way on the nipples (sounds dirty lol). It's on there but not super flush to the bottom. I used zip ties and went out for a drive and everything sounded great and no weird boost leaks or idling issues. One other thing to note is make sure you use the right clamps on the couplings. I thought they were all the same size and when it came down to putting a clamp on the MAF the clamp was too small. I had them switched around and had to mess around with it. Also those of you having trouble installing the heat shield make sure you use the provided studs. And tweak the MAF housing to align with the shield.

Oddly enough the hardest part was removing the stupid screw type clips. It wouldn't pop the screw up and I was getting frustrated. Removing the hoses wasn't much of a challenge after heating it up with a blow dryer.

I will be installing the UICP next when it arrives Wednesday. I'll get some pics tomorrow when there is day light.
Reply
Old Dec 5, 2013 | 05:49 PM
  #68  
Psycho719's Avatar
Newbie
 
Joined: Dec 2011
Posts: 73
Likes: 0
From: Orange County
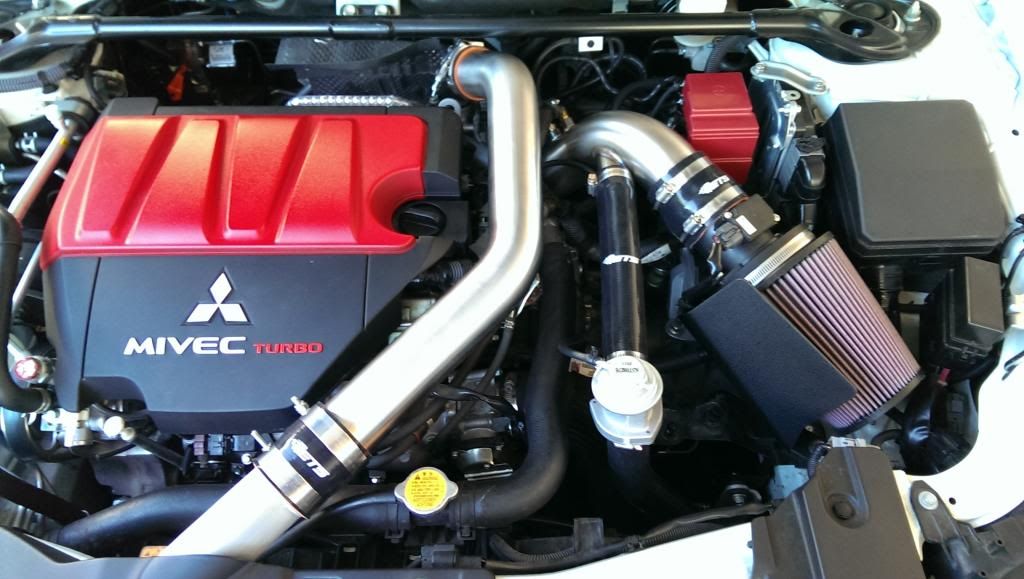
Mine installed, intake slightly touching red battery terminal. Can't really angle it away.

Name:  intake_zps88d81e13.jpg
Views: 0
Size:  86.6 KB
Reply
Old Dec 6, 2013 | 04:02 AM
  #69  
frenchfry675's Avatar
Newbie
 
Joined: Aug 2013
Posts: 3
Likes: 0
From: wyomissing,pa
Originally Posted by Psycho719
Mine installed, intake slightly touching red battery terminal. Can't really angle it away.

Mine was close to at first. Loosen the all the hose clamps and keep adjusting until it doesn't touch. Mine is only like a 1/4 inch from touching the red terminal cover.
Reply
Old Jan 3, 2014 | 02:14 PM
  #70  
Evo82's Avatar
Evolving Member
 
Joined: Oct 2013
Posts: 127
Likes: 2
From: MI
great help...thanks
Reply
Old Jan 3, 2014 | 02:16 PM
  #71  
Evo82's Avatar
Evolving Member
 
Joined: Oct 2013
Posts: 127
Likes: 2
From: MI
did you have to do a tune up after? i just ordered mine should be here next week
Reply
Old Jan 5, 2014 | 10:43 AM
  #72  
Tommy2jz's Avatar
Newbie
 
Joined: Nov 2013
Posts: 31
Likes: 0
From: Central NJ
Very detailed guide. Thanks!
Reply
Old Feb 9, 2014 | 07:58 PM
  #73  
William Naing's Avatar
Newbie
 
Joined: Jan 2013
Posts: 6
Likes: 0
http://i1196.photobucket.com/albums/...ake-UICP11.jpg

Need help on the boost control solenoid lines. Anyone have picture where these go? ~thank
Reply
Old Feb 19, 2014 | 03:17 PM
  #74  
powerman00's Avatar
Newbie
iTrader: (3)
 
Joined: Jan 2014
Posts: 50
Likes: 0
From: NJ
great write up, im going to be using this as soon as my ets intake and uicp arrive next week.
Reply
Old Apr 6, 2014 | 08:17 AM
  #75  
2x4's Avatar
2x4
Newbie
10 Year Member
 
Joined: Feb 2012
Posts: 56
Likes: 1
From: Houston
Great thread thanks! I hade a boost leak. Problem was I was clamping on the outlet pipe against the large bead at the end where the air comes out. After reading this, I pushed the hose down a little and slightly over the smaller bead. Then I clamped against the smaller bead. Seems backwards compared to all the other couplers but it works.
Reply


All times are GMT -7. The time now is 06:25 AM.