


2.3L GT3076Build



Thread Starter
Evolved Member
iTrader: (62)
Joined: Feb 2004
Posts: 3,336
Likes: 6
From: Redmond - Lake Tapps ,WA

Evolving Member
Joined: Nov 2005
Posts: 108
Likes: 0
From: Sweden





Thread Starter
Evolved Member
iTrader: (62)
Joined: Feb 2004
Posts: 3,336
Likes: 6
From: Redmond - Lake Tapps ,WA
Thanks guys. Piggy has been taken care of... Tamiflu FTW!
So I tried my hand today at laying up my sample piece. Couple things I learned.
- If you tape the edge of the carbon fiber fabric to stop it from fraying during handling and storage you can't remove the tape without ruining the fabric. So you need to plan to cut it off or leave it there for trimming after it cures.
- It's cold in my garage. The resin I'm using has a 45 min "gel" time. After 45 mins in my garage it was maybe gel - but it took over 3 hours and coming into the house to actually harden. This will give my working time to wet out the big panels of material for sure. But I'll need to bring the parts inside once bagged to cure.
- My little vacuum bag leaked like crazy. I needed the pump on full-time to hold the vacuum. But I didn't want to do that. So I just pulled a vaccum every couple mins to make sure the resin matrix stayed tight as it cured. I went up to 1/2 vacuum without crushing the foam.
- To me the material seemed to dry out during cure. I used 110% resin by mass, compared to the mass of the fiber. It was wet enough to have excess on the material when I bagged it. After curing there was resin that had made it into the catch fabric - but visually there is no excess post cure on the parts. I'm not sure if there is enough resin left on in the matrix or not? I'm sure the foam sucked up a bunch as well.
- I'm considering taping off the foam to seal the surface so it can't steal resin away from the fabric. But at the same point the catch fabric and linen peel play seemed to soak up excess resin - so maybe this is just the amount you end up with?
Some pics.
The setup.

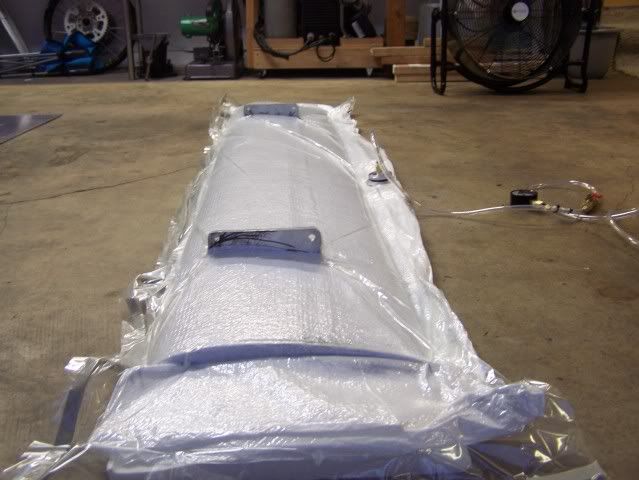
Bagged. Layering goes: parts, linen peel ply, catch fabric, bag.

Out of the bag, catch fabric off, ready to remove the linen peel ply.

Raw.

Trimmed a little.


Close up. The linen peel ply leaves a textured satin surface.

So I tried my hand today at laying up my sample piece. Couple things I learned.
- If you tape the edge of the carbon fiber fabric to stop it from fraying during handling and storage you can't remove the tape without ruining the fabric. So you need to plan to cut it off or leave it there for trimming after it cures.
- It's cold in my garage. The resin I'm using has a 45 min "gel" time. After 45 mins in my garage it was maybe gel - but it took over 3 hours and coming into the house to actually harden. This will give my working time to wet out the big panels of material for sure. But I'll need to bring the parts inside once bagged to cure.
- My little vacuum bag leaked like crazy. I needed the pump on full-time to hold the vacuum. But I didn't want to do that. So I just pulled a vaccum every couple mins to make sure the resin matrix stayed tight as it cured. I went up to 1/2 vacuum without crushing the foam.
- To me the material seemed to dry out during cure. I used 110% resin by mass, compared to the mass of the fiber. It was wet enough to have excess on the material when I bagged it. After curing there was resin that had made it into the catch fabric - but visually there is no excess post cure on the parts. I'm not sure if there is enough resin left on in the matrix or not? I'm sure the foam sucked up a bunch as well.
- I'm considering taping off the foam to seal the surface so it can't steal resin away from the fabric. But at the same point the catch fabric and linen peel play seemed to soak up excess resin - so maybe this is just the amount you end up with?
Some pics.
The setup.
Bagged. Layering goes: parts, linen peel ply, catch fabric, bag.
Out of the bag, catch fabric off, ready to remove the linen peel ply.
Raw.
Trimmed a little.
Close up. The linen peel ply leaves a textured satin surface.

Click here please jid2
Lookin good!
Lookin good!
Thread Starter
Evolved Member
iTrader: (62)
Joined: Feb 2004
Posts: 3,336
Likes: 6
From: Redmond - Lake Tapps ,WA
I braved the big lay-up today. Holy crap it was REALLY hard. If I was smart and patient I would have worked my way up slowly in terms of project size and difficultly. I made a couple mistakes (didn't know they were mistakes until I was well past the point of no return.
- First mistake was at the concept level. My Aluminum frame needs to poke through the carbon skin. So I needed to cut holes in the carbon fabric before the layup. This is a really bad idea. With the holes cut it just turns into an unraveling mess around them.
- Next mistake was wetting out the first layer of fabric on my solid sheet. I got it nice and tacky.... and then it was pretty much impossible to handle and then try and drape over the wing. It stuck in the wrong places and turned into a wrinkly nightmare. Lots of cursing. I had seen a lot of guys in videos wet out material like that and in that process. But it doesn't work on such large complex parts. I should have laid it over the wing dry and wet it out in place - which is what I did on the 2nd layer.
- Had to mix a 2nd batch of resin because I took forever. Luckily the cold temps help keep the work life really long.
- Getting out all the wrinkles and working the material over the leading edge of the wing was really difficult.
- Let it sit in the vacuum bag most of the afternoon/evening.
- Peel ply was pretty hard to pull off. Grunting involved. I found some scattered dry areas, I'll go back and add some resin to them next week.
It's nowhere near perfect, but it looks like it came out usable for sure. When I was struggling with the first layer drapping over the wing I was pretty sure I had just wasted a couple hundred bucks and was going to make carbon fiber tumble weeds. So I'm glad I was able to salvage it. I learned a lot. I had notions of wanting to do some parts like doors etc. But clearly that's past my experience level at this point. There are so many steps involved in working with this stuff - it's no picnic.
My work area, getting ready to start.

Mistake. Trying to wet out the material and then drape it. Shoulod have drapped it dry and then wet it in-place.

Hours and many curse words later.


Peeling away the peel ply and breather fabric. Hello Moto.

Now I need to trim off the excess and wet out a couple dry spots.


- First mistake was at the concept level. My Aluminum frame needs to poke through the carbon skin. So I needed to cut holes in the carbon fabric before the layup. This is a really bad idea. With the holes cut it just turns into an unraveling mess around them.
- Next mistake was wetting out the first layer of fabric on my solid sheet. I got it nice and tacky.... and then it was pretty much impossible to handle and then try and drape over the wing. It stuck in the wrong places and turned into a wrinkly nightmare. Lots of cursing. I had seen a lot of guys in videos wet out material like that and in that process. But it doesn't work on such large complex parts. I should have laid it over the wing dry and wet it out in place - which is what I did on the 2nd layer.
- Had to mix a 2nd batch of resin because I took forever. Luckily the cold temps help keep the work life really long.
- Getting out all the wrinkles and working the material over the leading edge of the wing was really difficult.
- Let it sit in the vacuum bag most of the afternoon/evening.
- Peel ply was pretty hard to pull off. Grunting involved. I found some scattered dry areas, I'll go back and add some resin to them next week.
It's nowhere near perfect, but it looks like it came out usable for sure. When I was struggling with the first layer drapping over the wing I was pretty sure I had just wasted a couple hundred bucks and was going to make carbon fiber tumble weeds. So I'm glad I was able to salvage it. I learned a lot. I had notions of wanting to do some parts like doors etc. But clearly that's past my experience level at this point. There are so many steps involved in working with this stuff - it's no picnic.
My work area, getting ready to start.
Mistake. Trying to wet out the material and then drape it. Shoulod have drapped it dry and then wet it in-place.
Hours and many curse words later.
Peeling away the peel ply and breather fabric. Hello Moto.
Now I need to trim off the excess and wet out a couple dry spots.
Last edited by jid2; Nov 29, 2009 at 08:54 PM.

Well done man. I learned a lot a few weeks ago with messing around with Fiberglass for the first time and man it is not as easy as it may seem or as I thought  I am learning tho too. I would love to get into some Carbon Fiber like you are sometime down the road when I learn a bet more about its process. Thanks for your awesome build and work you do and how you explain everything
  I learn a lot and watching what you do makes me want to do more of my own stuff myself
  Looking forward to more of your Winter projects...
I am learning tho too. I would love to get into some Carbon Fiber like you are sometime down the road when I learn a bet more about its process. Thanks for your awesome build and work you do and how you explain everything I learn a lot and watching what you do makes me want to do more of my own stuff myself Looking forward to more of your Winter projects...


It's been an incredible build so far, hat's off to you for not buying every single thing off-the-shelf just because there is an aftermarket option.
Most things I do is also custom, especially since I have a JDM Evo5 and everything doesn't always bolt up, you surely take it to a whole different level though.
Again, very nice build, can't wait to see more.
Most things I do is also custom, especially since I have a JDM Evo5 and everything doesn't always bolt up, you surely take it to a whole different level though.
Again, very nice build, can't wait to see more.
Thread Starter
Evolved Member
iTrader: (62)
Joined: Feb 2004
Posts: 3,336
Likes: 6
From: Redmond - Lake Tapps ,WA
Did a little work out in the 32 degree garage. Trimmed the excess material off the ends using the little air saw, it was really easy. Then used a sanding wheel on the grinder to smooth the ends of the wing after cutting. I clamped some angle to the trailing edge to make a guide for cutting - again the air saw was money.

After cutting.

I put a coat of satin black paint on the wing and drilled and tapped the ends for endplate mounting. I just need to paint the endplates and I'm done. Overall it looks OK, not perfect. But I'm positive it is going to make the downforce and it was a great way to learn about composite fabricating. So the overall project has been pretty good.
After cutting.
I put a coat of satin black paint on the wing and drilled and tapped the ends for endplate mounting. I just need to paint the endplates and I'm done. Overall it looks OK, not perfect. But I'm positive it is going to make the downforce and it was a great way to learn about composite fabricating. So the overall project has been pretty good.


Thread Starter
Evolved Member
iTrader: (62)
Joined: Feb 2004
Posts: 3,336
Likes: 6
From: Redmond - Lake Tapps ,WA
^^^ Yeah it's going to look sick sitting in the garage. I still need to swap out the head gasket, and maybe build a cage... I'm running low on motivation though, and even lower on time. Baby number two is going to be in effect in about a month.