


Intermittent Starting Problems - Mysterious Cause Identified and Fixed


It's never a bad idea to check your battery connections periodically, but that isn't the issue for most who experience this problem. When it arises, using jumper cables usually doesn't help, because the issue isn't a lack of battery power.
When this problem arises, take the car out of gear and engage the parking brake. Pop the cover to the relay box, and pull the starter relay. Using a jumper wire, connect BAT + terminal to the pin #5 socket in the box. If it cranks right away, you know the problem isn't your battery, your starter, or your starter solenoid. The problem is the starter circuit. When the problem is the starter circuit, it is oftentimes the slipping starter switch in the column, or, like in my case, not enough current through the starter relay to engage the starter solenoid. Both are intermittent problems, which makes them particularly annoying.
When this problem arises, take the car out of gear and engage the parking brake. Pop the cover to the relay box, and pull the starter relay. Using a jumper wire, connect BAT + terminal to the pin #5 socket in the box. If it cranks right away, you know the problem isn't your battery, your starter, or your starter solenoid. The problem is the starter circuit. When the problem is the starter circuit, it is oftentimes the slipping starter switch in the column, or, like in my case, not enough current through the starter relay to engage the starter solenoid. Both are intermittent problems, which makes them particularly annoying.


I had the ignition switch in my hand, turning it with a flathead screw driver  And the relay is all of 5 days old. I'll try the relay jump next time. I couldn't really hear whether the relay clicks from inside the cabin.
And the relay is all of 5 days old. I'll try the relay jump next time. I couldn't really hear whether the relay clicks from inside the cabin.
It doesn't matter if you hear the relay click. It probably isn't the relay itself, but the reality that there isn't enough current going through it to actuate the starter solenoid. Jumping BAT + to the starter relay pin #5 terminal answers that question definitively.

Ted B
Thanks again as soon as I was posting my reply I was thinking universal 30A 5-pin relay and pigtail myself. Yea I got a jumper wire that I will keep in the car forever now just in case. Ya straight to battery would be a very very bad idea especially if you happened to leave it in gear and the relay took a sh*t.
Thanks again as soon as I was posting my reply I was thinking universal 30A 5-pin relay and pigtail myself. Yea I got a jumper wire that I will keep in the car forever now just in case. Ya straight to battery would be a very very bad idea especially if you happened to leave it in gear and the relay took a sh*t.
So the starter wasn't turning over just now and I jumped batt+ to terminal #5. The starter started turning, for a good 5 seconds. (but the engine didn't start. The key was not in the ignition. I guess that might be the reason?)
So this means that the ignition wiring isn't supplying enough voltage for the starter solenoid to do its part? I think I read that the solenoid needs at least 11.8v to turn the starter.
I'm also not sure what voltage the relay needs to complete its circuit. So I'm not sure whether there's not enough voltage for the relay or the solenoid, or whether it even matters.
So this means that the ignition wiring isn't supplying enough voltage for the starter solenoid to do its part? I think I read that the solenoid needs at least 11.8v to turn the starter.
I'm also not sure what voltage the relay needs to complete its circuit. So I'm not sure whether there's not enough voltage for the relay or the solenoid, or whether it even matters.
The engine doesn't start without key in the ignition and in the 'on' position, because that's what energizes the ECU.
The factory relay is easy to check with a resistance meter. Or, you can simply test it with jumpers and a 12V battery.
You can check voltage to the starter solenoid by disconnecting the plug at the solenoid, and using a long jumper to check topside with a voltmeter as the key is turned to 'start'. Chances are you'll see correct voltage there, but the circuit doesn't support enough current to engage the solenoid.
The factory relay is easy to check with a resistance meter. Or, you can simply test it with jumpers and a 12V battery.
You can check voltage to the starter solenoid by disconnecting the plug at the solenoid, and using a long jumper to check topside with a voltmeter as the key is turned to 'start'. Chances are you'll see correct voltage there, but the circuit doesn't support enough current to engage the solenoid.
Does the service manual list the amperage and voltage requirements? I didn't see anything. Troubleshooting steps were pretty brief, mainly jumping straight to battery to see if the starter turns over, and continuity on relay, ignition switch and solenoid terminals.
It does not, but it's unimportant. That jumping direct to battery got the starter going tells you everything you need to know ... assuming the relay is good and there are no other faults.

Hey Ted, I hope you do a detailed writeup of your new relay. I might have to do that eventually.
Do you have a link to the parts you're talking about? Does the pigtail accept a standard 5 pin relay?
Also, do you not think it's worthwhile to troubleshoot the ignition wiring for where the amperage drops? It seems like this starts out of nowhere (mine has 75k miles, no issue since 45k when I got it). Or is it too much of a pain.
Do you have a link to the parts you're talking about? Does the pigtail accept a standard 5 pin relay?
Also, do you not think it's worthwhile to troubleshoot the ignition wiring for where the amperage drops? It seems like this starts out of nowhere (mine has 75k miles, no issue since 45k when I got it). Or is it too much of a pain.
As for where the power goes, if you have an alarm, stereo gear, and anything else that taps into the key 'on' power source, that is the most likely cause of current drain.
I will install the relay and make a writeup with photos today.
I will install the relay and make a writeup with photos today.
One thing that needs to be set straight, is the factory manual procedure for checking the starter relay is WRONG about the starter relay being normally open (NO). In fact, it is normally closed (NC).
The factory manual says:
Resistance between pins #2 and #5 should be NO, and become a connection only when voltage is applied across #1 and #3. This is WRONG. The connection between pins #2 and #5 is NC at rest, and becomes an open circuit when voltage is applied across #1 and #3. I have verified this with four known working relays.
When the key is turned to 'start', current flows through Pins #1 & #3, through the clutch switch (NC) to ground, and the starter relay is OPEN.
When the clutch is depressed, that breaks the circuit to ground, which stops current flow through pins #1 & #3, and CLOSES the starter relay.
FYI
The factory manual says:
Resistance between pins #2 and #5 should be NO, and become a connection only when voltage is applied across #1 and #3. This is WRONG. The connection between pins #2 and #5 is NC at rest, and becomes an open circuit when voltage is applied across #1 and #3. I have verified this with four known working relays.
When the key is turned to 'start', current flows through Pins #1 & #3, through the clutch switch (NC) to ground, and the starter relay is OPEN.
When the clutch is depressed, that breaks the circuit to ground, which stops current flow through pins #1 & #3, and CLOSES the starter relay.
FYI
How to Install a Heavy Duty Starter Relay
You'll need:
- Wire cutting and stripping pliers
- Soldering iron and solder
- Heat shrink tubing and heat gun
- Crimp connectors
- Plastic conduit tubing
- Electrical tape
- M5 mounting screw, washers, and locking nut
And of course, you'll need a 30/40A 12V SPDT relay and pigtail. You can get this at a local car audio shop, or you can get one on Ebay for well under $10 shipped. Just search, "12V DC SPDT 30/40A Relay Socket Harness", and you'll find them.

You will need to locate the long, slim relay box, which is under the hood, adjacent to the fuse box. For an image, see:
https://www.evolutionm.net/forums/ev...l#post10538792
You need to remove the top cover first, then gently pry the release tabs that anchor it to the fuse box.
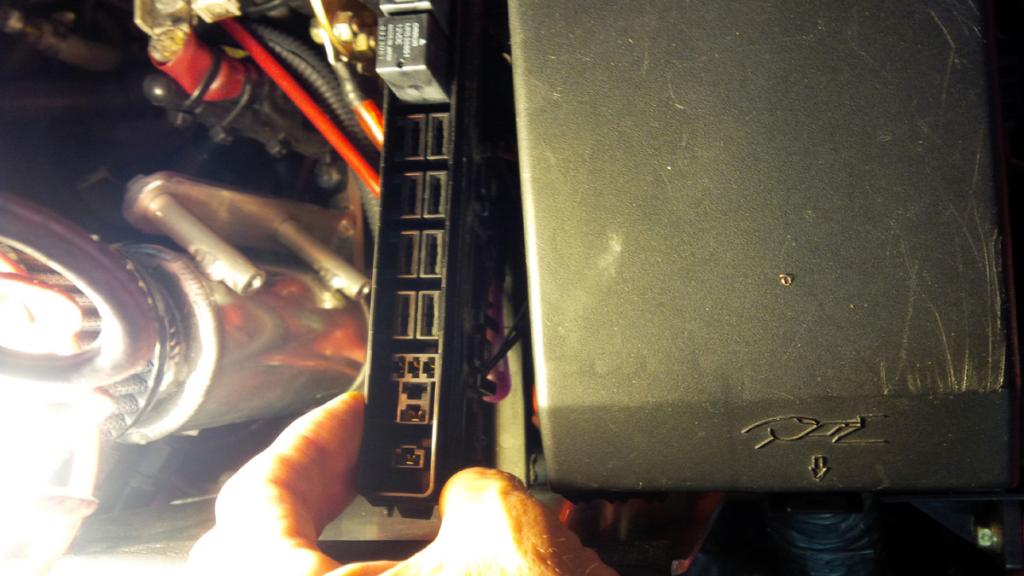
When you get it loose, gently pry the release tabs that separate the upper and lower halves. This allows you to get into the wiring.
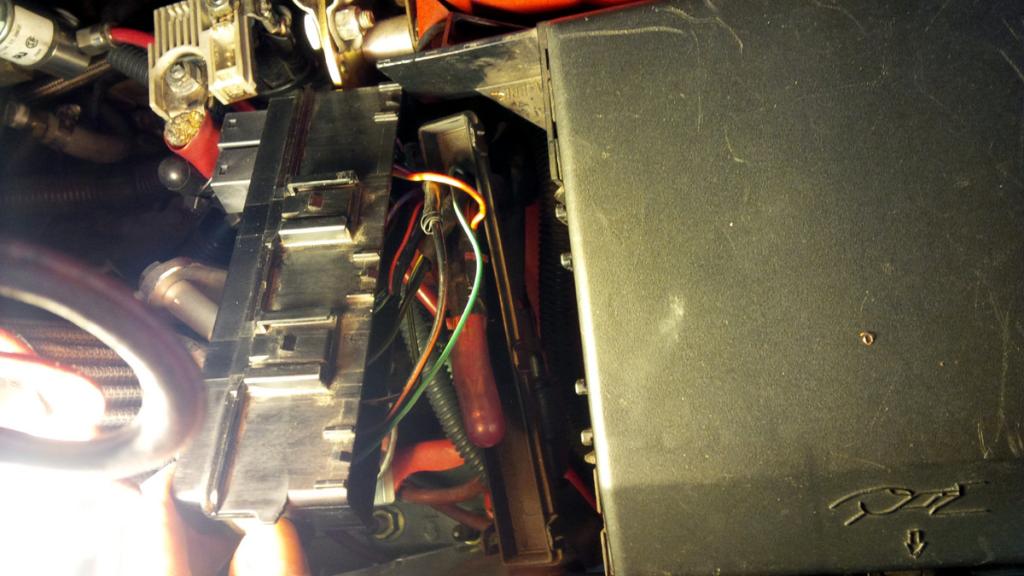
Look under the top section, and locate the black wire w/red stripe that goes to pin #5 of the starter relay. This is the only wire you will disturb.

Next, take a look at the relay scheme. In this image, terminals 85 and 86 are the low trigger, which makes a connection between 30 and 87. Also note that when the relay is not activated, there is a connection between 30 and 87a. This is IMPORTANT to remember, because 87a will be energized ALL THE TIME, except for when you engage the starter. We need to make sure 87a never comes into contact with anything.

So, our connections are as follows:
- Starter relay pin (#5) side of Blk/Red wire to 85
- 86 to Ground
- 30 to BAT+
- Other side of Blk/Red wire to 87
When the key is turned to 'start', the factory starter relay makes a connection to ground, which triggers full BAT+ power to the starter solenoid.
Mine looked like this just before I installed it. Since I mounted mine to a grounding buss, I simply crimped a loop on to 86 and was able to ground it using the mounting screw. You can also see that I sealed the end of 87a (red) and left it in the conduit, although I could have just cut it to the terminal.

Here is my relay mounted, with both ground (black) and BAT + (yellow) connections visible.
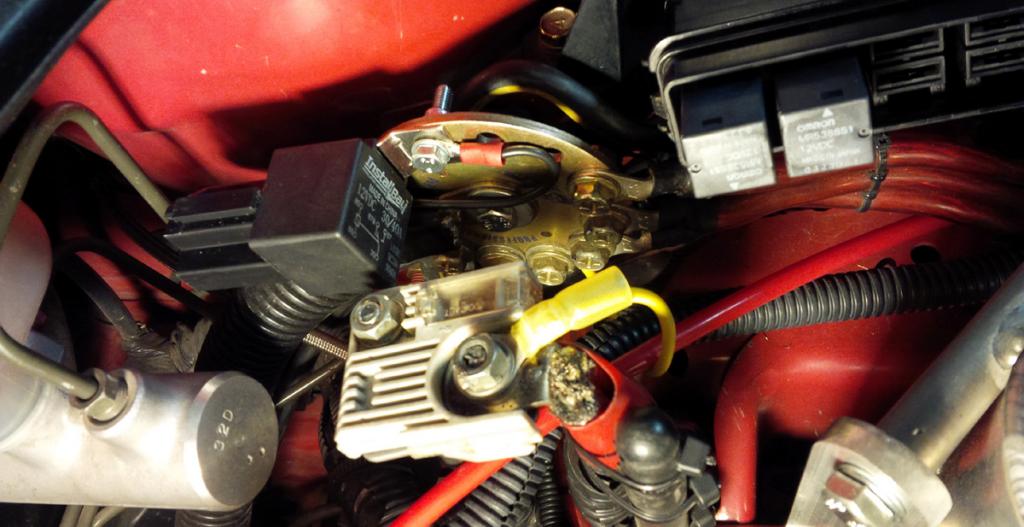
Next, you'll need to cut the black/red wire that goes to starter relay pin #5. There is virtually no slack in this wire, so be sure you have enough relay wire to make the connections before you snip. The relay wires will pass through the same opening in the side of the box as the factory wires.

I prefer solder for something this important, but that's just me. If you brave it with crimp connections, you better make darn sure they won't work their way loose!

After the shrink tubing is set:
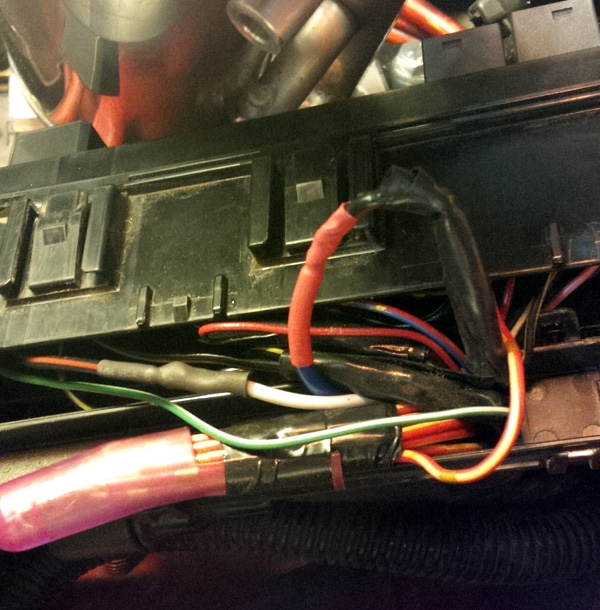
Next, you will need to carefully get those wires tucked back into the upper half of the relay box, and carefully sandwich the two halves together, double checking that no wires are caught in the seam. Mine looked something like this when finished.

I've started the car several times, and it seems the starter solenoid is quicker to engage when I turn the key. So far, so good...
You'll need:
- Wire cutting and stripping pliers
- Soldering iron and solder
- Heat shrink tubing and heat gun
- Crimp connectors
- Plastic conduit tubing
- Electrical tape
- M5 mounting screw, washers, and locking nut
And of course, you'll need a 30/40A 12V SPDT relay and pigtail. You can get this at a local car audio shop, or you can get one on Ebay for well under $10 shipped. Just search, "12V DC SPDT 30/40A Relay Socket Harness", and you'll find them.

You will need to locate the long, slim relay box, which is under the hood, adjacent to the fuse box. For an image, see:
https://www.evolutionm.net/forums/ev...l#post10538792
You need to remove the top cover first, then gently pry the release tabs that anchor it to the fuse box.

When you get it loose, gently pry the release tabs that separate the upper and lower halves. This allows you to get into the wiring.

Look under the top section, and locate the black wire w/red stripe that goes to pin #5 of the starter relay. This is the only wire you will disturb.

Next, take a look at the relay scheme. In this image, terminals 85 and 86 are the low trigger, which makes a connection between 30 and 87. Also note that when the relay is not activated, there is a connection between 30 and 87a. This is IMPORTANT to remember, because 87a will be energized ALL THE TIME, except for when you engage the starter. We need to make sure 87a never comes into contact with anything.

So, our connections are as follows:
- Starter relay pin (#5) side of Blk/Red wire to 85
- 86 to Ground
- 30 to BAT+
- Other side of Blk/Red wire to 87
When the key is turned to 'start', the factory starter relay makes a connection to ground, which triggers full BAT+ power to the starter solenoid.
Mine looked like this just before I installed it. Since I mounted mine to a grounding buss, I simply crimped a loop on to 86 and was able to ground it using the mounting screw. You can also see that I sealed the end of 87a (red) and left it in the conduit, although I could have just cut it to the terminal.

Here is my relay mounted, with both ground (black) and BAT + (yellow) connections visible.

Next, you'll need to cut the black/red wire that goes to starter relay pin #5. There is virtually no slack in this wire, so be sure you have enough relay wire to make the connections before you snip. The relay wires will pass through the same opening in the side of the box as the factory wires.

I prefer solder for something this important, but that's just me. If you brave it with crimp connections, you better make darn sure they won't work their way loose!

After the shrink tubing is set:

Next, you will need to carefully get those wires tucked back into the upper half of the relay box, and carefully sandwich the two halves together, double checking that no wires are caught in the seam. Mine looked something like this when finished.

I've started the car several times, and it seems the starter solenoid is quicker to engage when I turn the key. So far, so good...


Newbie
Joined: Aug 2013
Posts: 55
Likes: 0
From: Florida
It's never a bad idea to check your battery connections periodically, but that isn't the issue for most who experience this problem. When it arises, using jumper cables usually doesn't help, because the issue isn't a lack of battery power.
When this problem arises, take the car out of gear and engage the parking brake. Pop the cover to the relay box, and pull the starter relay. Using a jumper wire, connect BAT + terminal to the pin #5 socket in the box. If it cranks right away, you know the problem isn't your battery, your starter, or your starter solenoid. The problem is the starter circuit. When the problem is the starter circuit, it is oftentimes the slipping starter switch in the column, or, like in my case, not enough current through the starter relay to engage the starter solenoid. Both are intermittent problems, which makes them particularly annoying.
When this problem arises, take the car out of gear and engage the parking brake. Pop the cover to the relay box, and pull the starter relay. Using a jumper wire, connect BAT + terminal to the pin #5 socket in the box. If it cranks right away, you know the problem isn't your battery, your starter, or your starter solenoid. The problem is the starter circuit. When the problem is the starter circuit, it is oftentimes the slipping starter switch in the column, or, like in my case, not enough current through the starter relay to engage the starter solenoid. Both are intermittent problems, which makes them particularly annoying.
I don't know if it's the dongles that sap key 'on' power, if it's resistance from carbon buildup in the switch, or just the fact that the circuit seems rather flimsy for its purpose. I could invest quite a lot of time in trying to figure out why, but that wouldn't necessarily fix anything.
What I do know is since installing this heavy duty relay, the starter solenoid jumps into action every time. So far, so good.
What I do know is since installing this heavy duty relay, the starter solenoid jumps into action every time. So far, so good.