
HOW TO: Install Factory Bluetooth into Evo X GSR

HOW TO: Install Factory Bluetooth into Evo X GSR
HOW TO INSTALL FACTORY BLUETOOTH INTO EVO X GSR
Please note that any work you do on your own may void your warranty so do so at your own risk and only if you know what you're doing!
Level of diffilculty from 1-10 (1 being easy): 8
PARTS NEEDED:
LANCER/OUTLANDER BLUETOOTH KIT Part # MZ313819 (All three items in the picture below are included)

STEERING WHEEL VOICE CONTROL SWITCH Part # 8750A122

STEERING WHEEL AUDIO CONTROL SWITCH Part # 8701A193

CENTER CONSOLE SWITCH PANEL Part # 8011A267

BLANK BUTTON PLUG Part # 8050A018(You will need 2 of these)

AWC CENTER CONSOLE SWITCH Part # 8610A019

TOOLS NEEDED:
- PHILLIPS SCREWDRIVER
- 17MM SOCKET and RATCHET
- PLIERS
- DREMEL WITH CUTTING TOOL
- JB WELD or SIMILAR ADHESIVE
- T30 TORX SCREWDRIVER
STEPS:
1) Remove the negative terminal from the battery in the trunk
2) Remove glovebox by squeezing the sides towards each other. As the glovebox starts to drop down, take note to the right side of it, there is an airshock attached to it.
Remove that by pulling towards the drivers side. Now the entire glovebox should drop down on its hinge. Pull towards you to remove.


2) Remove the glovebox liner by taking off 4 phillips screws along the top, and one plastic clip in towards the rear.

3) Look through the glove box "void" and pay attention towards the left drivers side. There should be an unused harness taped with blue electrical tape. This harness will connect to the handsfree module supplied in the Bluetooth kit.

4) Install the bluetooth module inside the dash with the 2 provided phillips screws and plug the harness you found into it.


5) Remove the map light console from the roof by prying the entire assembly downwards. Disconnect it from the harness.
6) Install the microphone included with the bluetooth kit to the map light console.


7) Locate the unused harness taped by blue electrical tape and plug that into the microphone.

8) Plug the map light harness, and re-install map light console.
9) Reverse steps 2 through 1 to re-assemble the glove box compartment.
(Thats the end of the "easy" part)
RELOCATION OF THE AWC SWITCH TO CENTER CONSOLE AND INSTALLATION OF AUDIO CONTROL SWITCH ON STEERING WHEEL
In order for the bluetooth to work, we need to move the AWC switch on the steering wheel and replace it with the radio audio control switch.
1) Start by pulling out the center console tray. Pull straight up and it will come out. Notice an unused harness attached to it. Disconnect it.

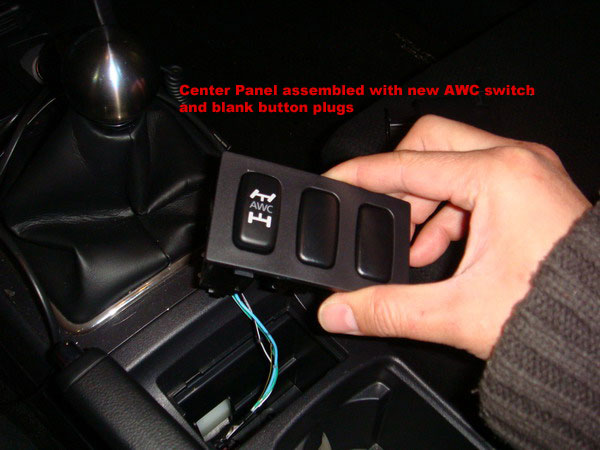
2) Replace the tray with the center console panel. Assemble it with the blank button inserts along with the new AWC switch. Plug the harness you just found, and plug it into the AWC switch.


Continued on the next thread....
Please note that any work you do on your own may void your warranty so do so at your own risk and only if you know what you're doing!
Level of diffilculty from 1-10 (1 being easy): 8
PARTS NEEDED:
LANCER/OUTLANDER BLUETOOTH KIT Part # MZ313819 (All three items in the picture below are included)
STEERING WHEEL VOICE CONTROL SWITCH Part # 8750A122
STEERING WHEEL AUDIO CONTROL SWITCH Part # 8701A193
CENTER CONSOLE SWITCH PANEL Part # 8011A267
BLANK BUTTON PLUG Part # 8050A018(You will need 2 of these)
AWC CENTER CONSOLE SWITCH Part # 8610A019
TOOLS NEEDED:
- PHILLIPS SCREWDRIVER
- 17MM SOCKET and RATCHET
- PLIERS
- DREMEL WITH CUTTING TOOL
- JB WELD or SIMILAR ADHESIVE
- T30 TORX SCREWDRIVER
STEPS:
1) Remove the negative terminal from the battery in the trunk
2) Remove glovebox by squeezing the sides towards each other. As the glovebox starts to drop down, take note to the right side of it, there is an airshock attached to it.
Remove that by pulling towards the drivers side. Now the entire glovebox should drop down on its hinge. Pull towards you to remove.
2) Remove the glovebox liner by taking off 4 phillips screws along the top, and one plastic clip in towards the rear.
3) Look through the glove box "void" and pay attention towards the left drivers side. There should be an unused harness taped with blue electrical tape. This harness will connect to the handsfree module supplied in the Bluetooth kit.
4) Install the bluetooth module inside the dash with the 2 provided phillips screws and plug the harness you found into it.
5) Remove the map light console from the roof by prying the entire assembly downwards. Disconnect it from the harness.
6) Install the microphone included with the bluetooth kit to the map light console.
7) Locate the unused harness taped by blue electrical tape and plug that into the microphone.
8) Plug the map light harness, and re-install map light console.
9) Reverse steps 2 through 1 to re-assemble the glove box compartment.
(Thats the end of the "easy" part)
RELOCATION OF THE AWC SWITCH TO CENTER CONSOLE AND INSTALLATION OF AUDIO CONTROL SWITCH ON STEERING WHEEL
In order for the bluetooth to work, we need to move the AWC switch on the steering wheel and replace it with the radio audio control switch.
1) Start by pulling out the center console tray. Pull straight up and it will come out. Notice an unused harness attached to it. Disconnect it.
2) Replace the tray with the center console panel. Assemble it with the blank button inserts along with the new AWC switch. Plug the harness you just found, and plug it into the AWC switch.
Continued on the next thread....
Last edited by antics22; Feb 20, 2008 at 10:02 AM.
...Continuation:
REMOVING THE STEERING WHEEL
(It gets harder and harder at this point)
Best thing to do at this point is to study this diagram and familiarize yourself with the different components of the steering wheel and how to take it apart....
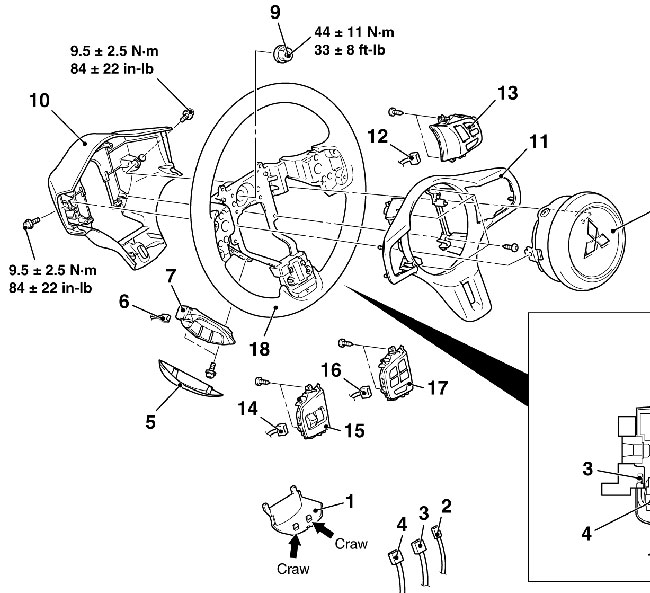
1) Look at the bottom of the steering wheel, and remove the access panel (#1 on diagram) in order to reach the Airbag harness and Horn Harness...
2) Unclip the yellow Airbag harness taking care not to damage it. It is held by a "slip-type" harness.

3) Unclip the black horn harness
4) using a Torx T30 screwdriver, remove the airbag by loosening the two torx screws... one on each side of the steering wheel. It helps to wiggle the Airbag Unit as you loosen the 2 screws on each side. The screws will keep turning and feel "long". They are locked in place and will not come out completely... so keep loosening, and it will release the airbag unit...


5) Carefully take off the airbag, exposing the 17mm nut holding the steering wheel and another "Gray" harness attached to the steering wheel position sensor.
MAKE SURE NOT TO MOVE THE STEERING WHEEL SENSOR THAT THE GRAY HARNESS IS ATTACHED TO.
IT WILL SWING FREE ONCE THE STEERING WHEEL IS REMOVED.

6) Remove the 17MM nut and the steering wheel will come off. Make sure to mark the position of the steering wheel with a sharpie so you know the exact position to place it in when re-installing...

7) With the steering wheel off the car, we will now disassemble the steering wheel by removing the 4 phillips screws.

8) Pay attention to the drivers side section of the steering wheel housing and dremel the necessary section out to accomodate the steering wheel voice control switch.


9) Locate the orange unused harness. Plug it into the voice control switch.

10) Once you have the switch fitted, Use adhesive to attach the switch. I used JB Weld. Test fit everything twice before gluing...

The finished product should look like this....

11) Next, flip the steering wheel around and disconnect the AWC switch harness. Its RED in color

12) Take off 4 Phillips screws on the BACK SIDE of the steering wheel. The front silver part should come apart exposing the switch.

13) Remove 2 phillips screws holding the AWC steering wheel switch and remove the switch carefully. It is also clipped-in on three sides.

14) Replace with Audio Control Switch and re-use the RED harness to plug into it.

15) Re-assemble the steering wheel by reversing steps 13 through 7.
16) Re-install the steering wheel by reversing steps 7 through 1.
CONTINUED BELOW....
REMOVING THE STEERING WHEEL
(It gets harder and harder at this point)
Best thing to do at this point is to study this diagram and familiarize yourself with the different components of the steering wheel and how to take it apart....
1) Look at the bottom of the steering wheel, and remove the access panel (#1 on diagram) in order to reach the Airbag harness and Horn Harness...
2) Unclip the yellow Airbag harness taking care not to damage it. It is held by a "slip-type" harness.
3) Unclip the black horn harness
4) using a Torx T30 screwdriver, remove the airbag by loosening the two torx screws... one on each side of the steering wheel. It helps to wiggle the Airbag Unit as you loosen the 2 screws on each side. The screws will keep turning and feel "long". They are locked in place and will not come out completely... so keep loosening, and it will release the airbag unit...
5) Carefully take off the airbag, exposing the 17mm nut holding the steering wheel and another "Gray" harness attached to the steering wheel position sensor.
MAKE SURE NOT TO MOVE THE STEERING WHEEL SENSOR THAT THE GRAY HARNESS IS ATTACHED TO.
IT WILL SWING FREE ONCE THE STEERING WHEEL IS REMOVED.
6) Remove the 17MM nut and the steering wheel will come off. Make sure to mark the position of the steering wheel with a sharpie so you know the exact position to place it in when re-installing...
7) With the steering wheel off the car, we will now disassemble the steering wheel by removing the 4 phillips screws.
8) Pay attention to the drivers side section of the steering wheel housing and dremel the necessary section out to accomodate the steering wheel voice control switch.
9) Locate the orange unused harness. Plug it into the voice control switch.
10) Once you have the switch fitted, Use adhesive to attach the switch. I used JB Weld. Test fit everything twice before gluing...
The finished product should look like this....
11) Next, flip the steering wheel around and disconnect the AWC switch harness. Its RED in color
12) Take off 4 Phillips screws on the BACK SIDE of the steering wheel. The front silver part should come apart exposing the switch.
13) Remove 2 phillips screws holding the AWC steering wheel switch and remove the switch carefully. It is also clipped-in on three sides.
14) Replace with Audio Control Switch and re-use the RED harness to plug into it.
15) Re-assemble the steering wheel by reversing steps 13 through 7.
16) Re-install the steering wheel by reversing steps 7 through 1.
CONTINUED BELOW....
Continuation To Final Steps...
FINISHING THE BLUETOOTH INSTALL.
1) Take apart the center console by opening the arm rest. Reach into that, and the cup holders and firmly pull up. The center console is held in by clips.

2) Find the center harness that is terminated by a black harness loop with 1 blue wire, and 1 black wire. (Its right in the middle UNDER the cup holders...)

3) Unclip the harness. We will have to modify the black harness attached to the car.
4) Study the back of the harness and note how the wires are clipped in. We will have to move pins 4 to 3 and pins 6 to 7. This will re-route the signal of the steering wheel switch from operating the AWC to operating the radio controls.

5) Re-attach the harness, and re-assemble the center console.
6) Re-attach the car battery.
7) Have dealer program the car with the MUT-III scantool program to recognize the bluetooth module. It will literally take 10 minutes for them to do.
8) Test all the functions and enjoy your new FACTORY BLUETOOTH.
The hardest part is probably custom-fitting the voice control switch and also modyfing the loop harness. I love the new Evo 10 and the CAN-BUS system it runs on. Everything is pre-wired in the car and its wonderful to know
FINISHING THE BLUETOOTH INSTALL.
1) Take apart the center console by opening the arm rest. Reach into that, and the cup holders and firmly pull up. The center console is held in by clips.
2) Find the center harness that is terminated by a black harness loop with 1 blue wire, and 1 black wire. (Its right in the middle UNDER the cup holders...)
3) Unclip the harness. We will have to modify the black harness attached to the car.
4) Study the back of the harness and note how the wires are clipped in. We will have to move pins 4 to 3 and pins 6 to 7. This will re-route the signal of the steering wheel switch from operating the AWC to operating the radio controls.
5) Re-attach the harness, and re-assemble the center console.
6) Re-attach the car battery.
7) Have dealer program the car with the MUT-III scantool program to recognize the bluetooth module. It will literally take 10 minutes for them to do.
8) Test all the functions and enjoy your new FACTORY BLUETOOTH.
The hardest part is probably custom-fitting the voice control switch and also modyfing the loop harness. I love the new Evo 10 and the CAN-BUS system it runs on. Everything is pre-wired in the car and its wonderful to know
Last edited by antics22; Feb 20, 2008 at 09:45 AM.
This actually works out better, because when the switch was on the steering wheel, it was easy to hit it by accident during turns.... Now, the steering wheel controls are all flush and I get to control my radio on the left, and my cruise on the right....
Thanks for the compliments. The AWC is controlled here now...
This actually works out better, because when the switch was on the steering wheel, it was easy to hit it by accident during turns.... Now, the steering wheel controls are all flush and I get to control my radio on the left, and my cruise on the right....
This actually works out better, because when the switch was on the steering wheel, it was easy to hit it by accident during turns.... Now, the steering wheel controls are all flush and I get to control my radio on the left, and my cruise on the right....

Trending Topics
Yes, pretty much works just like the IX ACD button. You cycle through the settings by pressing the button...
Not sure I understand the first question but Ill assume youre talking about just relocating the AWC switch to the center console and replacing it with a radio audio control?
If all you're doing is replacing the AWC, theres no programming required, just some patience in taking apart the steering wheel and removing the current switch on it, and putting the radio audio control switch in its place.
Then, you have to get the center console panel with the new AWC switch and plug that in... it will work immediately without any need for dealer programming.
Finally, you do have to modify the connector (C-31) to re-route the signal from teh switch to the radio, vs the AWC-ECU....
Dealer programming is only required if youre adding bluetooth. It needs the car to acknowledge that the bluetooth module is present on the CAN BUS system.
Cost for parts should be as follows:
Bluetooth Module Hands Free kit : $200~$250-ish
Steering Wheel Audio Control Switch: $56-ish
New AWC switch: $28-ish dollars
button blanks: $5~6-ish dollars x2
center switch panel: $2-ish
finally
Bluetooth voice Switch (the steering wheel one): $60~70ish
Total cost was under $400. Im ballparking everything from memory because I did not keep track of what I was spending...
Last edited by antics22; Feb 20, 2008 at 05:03 PM.
