
Evo X Boost Gauge Install ,No splicing, No firewall drilling,Pics+Vid= Clean As Hell

 So your way would be needed for that as nobody wants to run 5+ ft of boost tube through the car.
Standalone is electrical. It requires no control unit. And comes with a sensor box just for the gauge alone a small black box which a sensor wire runs from the gauge to the sensor box then the boost tube runs from the sensor box to the boost tap in. Not a standalone electrical gauge will require the use of a control box you can usually search it.

Non-standalone is nice as all the sensors run from the control unit and the gauges can link to each gauge then route to the control unit. You basically can hook up a boost, egt, temp together then only run one wire to the control unit and all three gauges will read from their own sensor in the control unit. Can also record and playback everything. Also can set up warnings on every gauge and buzz at you when something is going beyond its point.
 Sorry if you already knew this i got carried away
Last edited by ZWingerRyRy; Oct 11, 2008 at 07:21 PM.

you could have hooked it up to the cig lighter wires in the center console, there is power and ground, and for the turbo line there is a firewall access next to the turbo. install takes about 20 mins.
Black was grounded to a bolt
White was hazard
Red was power door locks
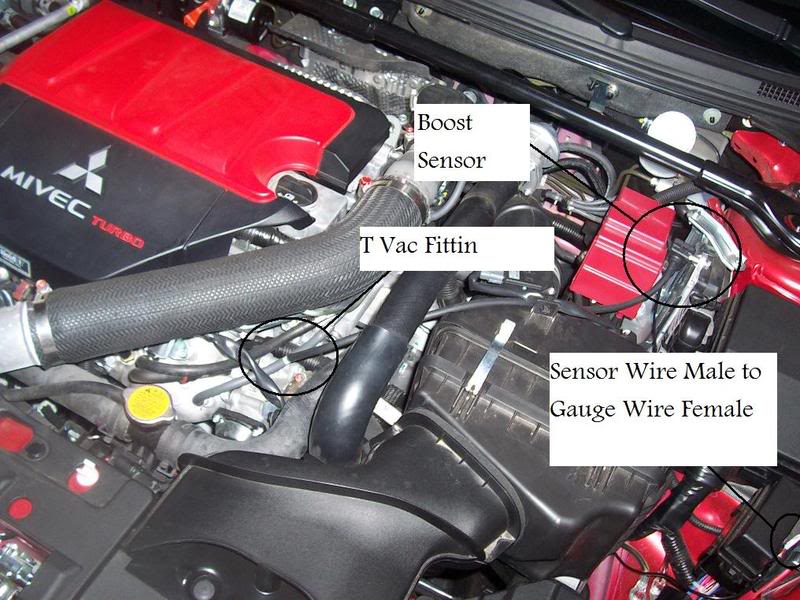
Tube is ran from the sensor box not the gauge, its a standalone.
Only the sensor wire from Gauge>Sensor Box was routed to the engine.
Evolving Member
Joined: Jun 2008
Posts: 152
Likes: 0
From: Fresno, Ca
I plan on installing my gauge this weekend, I already have my V1 using the cig/12v for my powersource. Do you think adding the defi gauge would take too much power from it? Here's my V1 hardwired
https://www.evolutionm.net/forums/sh...7&postcount=22
https://www.evolutionm.net/forums/sh...7&postcount=22
Evolving Member
Joined: Jun 2008
Posts: 152
Likes: 0
From: Fresno, Ca
Instead of using your arm to push the wire up the fender, I went the other way. I ran the wire from the top of the fender and then ran it down (gravity is my friend  ) other than that everything was straight forward from the diy, thanks again ZWingerRyRy! Also to steinvb12 for an idea for gauge placement


Also, why does most people (I think all?) put the boost gauge on the right side?
) other than that everything was straight forward from the diy, thanks again ZWingerRyRy! Also to steinvb12 for an idea for gauge placementAlso, why does most people (I think all?) put the boost gauge on the right side?
Last edited by cchan3761; Oct 24, 2008 at 05:49 PM.
lol dont know usually i drive with left hand so i felt i would be blocking my view of it somewhat Congrats on the install glad everything worked out for ya. Did it take you very long? someone was commenting that it was to much work for a gauge.
Congrats on the install glad everything worked out for ya. Did it take you very long? someone was commenting that it was to much work for a gauge.
chan - looks good!
It always takes a little longer when working on new cars. You need to find the best way to run all the wires all over again. If I had to do it again, it would take much less time, since I know where everything is now.
It's just a learning curve for the new car...
It's just a learning curve for the new car...
Evolving Member
Joined: Jun 2008
Posts: 152
Likes: 0
From: Fresno, Ca
chan - looks good!
It always takes a little longer when working on new cars. You need to find the best way to run all the wires all over again. If I had to do it again, it would take much less time, since I know where everything is now.
It's just a learning curve for the new car...
It always takes a little longer when working on new cars. You need to find the best way to run all the wires all over again. If I had to do it again, it would take much less time, since I know where everything is now.
It's just a learning curve for the new car...