When you click on links to various merchants on this site and make a purchase, this can result in this site earning a commission. Affiliate programs and affiliations include, but are not limited to, the eBay Partner Network.
To be honest, I used to be until I picked up a second car and pieced together an emergency emissions legal parts kit. Basically I kept all the stock parts and recently bought a stock turbo just in case I get reffed again. I have had it happen before during the first year I owned the car when driving through a DUI check point (wasn't drinking). I didn't have too many mods, but I still had to go back to stock, fight a $500.00 charge in court (which I won) and get signed off by a state referee who are extremely thorough and will turn you away until they see nothing but old, rusty, oem parts.
It's a nightmare, but having your hood popped with a quiet and stock appearing exhaust is rare. Here are a few good responses that have gotten me off the hook multiple times. The key is respect and having a polite tone of voice. Basically you can't be a dick because they can be even worse than you
Officer: "Do you have any idea why I pulled you over today? " Most of the time we know why, but I answer like this. " Officer, I apologize and I should have been smarter than that." This is a kind and ambiguous statement that does not technically admit guilt and is a good ice breaker between you and the cop.
Officer: "Do you have anything done to the car?" Never lie to a cop, it will **** them off and many times they can tell. Just tell them one legal mod or take my approach and tell them something they can't see that is neither here nor there. "Yes sir, I had the car dyno tuned." Again, be polite, but don't give them too much. It just might be enough for them to send you on your way with a warning.
Officer: "Can you pop the hood for me?" This is very rare, but if it happens you still have a chance of not getting shafted if the cop likes you. "Yes sir, may I step out of the car?"
The key is to let them think they are in control the entire time, but remember that you made a choice to modify your car in CA and will need to own up to it. The goal is to drive home with the car and not get it impounded. Tickets are the least of your worries.
Other useful tips:
1. Don't drive past 77mph.
2. Don't attend burnt out car meets.
3. Don't run a loud exhaust in CA.
4. If a group of ricers appear next to you on the freeway, slowly back away from them so that law enforcement does not think you are a part of their group.
5. Only accelerate hard when there are little to no cars in site.
6. If you see a cop going your route, take an alternate route. Why even risk it? Out of site, out of mind.
Having been pulled over a lot, I can share some more legally defensive answers to cops questions:
Officer: "Do you have any idea why I pulled you over today? " "Sir I'm sure you are going to tell me" They have to, and their timer for how long they can detain you doesn't start until they do.
Officer: "Do you have anything done to the car?" "Sir I do not wish to be interrogated without my attorney present, and I will not be consenting to any searches. I fully intend to cooperate with any lawful order Sir." You don't have to answer their questions, and you certainly don't have to admit guilt to anything. From the moment they start talking to you they are on a fishing expedition, give them nothing. Just my .02. Always be polite, and respectful, but your time is valuable too and you don't need to be subjected to an interrogation.
I like your approach with these statements and I might just have to give them a try next time I get pulled over. It's basically reminding them of what they can and cannot do while maintaining a level of professionalism. There are so many kids these days that will fall into the laws traps.
I like your approach with these statements and I might just have to give them a try next time I get pulled over. It's basically reminding them of what they can and cannot do while maintaining a level of professionalism. There are so many kids these days that will fall into the laws traps.
I was one of those kids. I learned.There are tons of good youtube videos about this subject that can do a far better job at explaining then I can. I would encourage everyone to watch at least a few if you are unfamiliar with how to handle cops during a traffic stop. Look for ones from actual lawyers and not sovereign citizens Just search for "Don't talk to police"
Last edited by Biggiesacks; Feb 26, 2019 at 02:15 PM.
As I am waiting for my 4G64 block and crank to come back from the machine shop, I felt like doing some experimenting with a spare 64 block. I originally tried to sell it locally, but since I didn't get my asking price and didn't want to ship it, I decided to F!@# with it and then use it as a test mule for my actual block....then a table/anvil later.
I wanted to see just how hard it would be to install oil squirters/jets into the 4G64 block using a drill press. You read that right, not a MILL, a DRILL press. My two local machine shops refused to do the work so I wanted to see why they were so afraid of botching the job. I didn't want to ship my block to the only machine shop in Socal that has a CNC program for it either (Lesco). The oil galley is already there, you just have to hit it and smooth the top of the bolt holes so that you get a decent seal between the oil galley and the squirter. The Evo oil squirters don't even use crush washers.
Some eliminate the oil jets from the 4g63 due to clearance issues or the fact that higher quality forged pistons don't necessarily need the extra cooling. This has been proven time and time again. The negative side effect, however, is high oil pressure which could cause your turbo to leak oil and your seals to hurt. English Racing has a solution, which is a custom made oil pump gear used to underdrive the oil pump. The oil pump housing will need slight modification to make it fit. Keep in mind that your actual oil pressure will vary greatly on oil weight, bearing clearances, and oil pump age.
However, what if you didn't want to buy an extra gear and still wanted to provide additional cooling to your forged pistons and wrist pin even if they didn't need it? There had to be a way without spending a fortune and here is what I discovered.
-The drill and tap size you need is: 27/64" and M12 x 1.25 . Use between 500 to 700 rpm to drill the holes and the cast iron will cut like butter.
-The depth of cut when drilling and prior to smoothing is: 0.53" to 0.55" This will get you to the oil galley which opens up on one side of the hole (towards the middle of the block).
-If you drill straight into the center of the casting marks, you WILL hit the oil galley, which is what you want. Look at pictures of the 4G63 oil jets for approximations.
-Remove the large BSPT Allen oil plug on the side of the block to confirm you hit your drill mark and help with clean up. I shined a light through the galley to confirm this as well.
-Use a sanding bit to smooth the top of the oil jet holes prior installation for a good enough seal. This is the part where you really can't use a hand drill. Believe it or not, I used a carbide forstner bit for this part on low speed and it got me nearly there. In a mill, they use a large boring bit.
-Make a stencil out of cardboard to drill the small 4mm hole for the oil jet locator tab. Secure the cardboard to the block using the banjo bolt and drill through the hole you made for the tab.
If all goes right and you are pretty good with a drill press, you'll have yourself a 4G64 block with oil squirters. If there is enough interest, I will turn this into a "How To:"
Proving the theory: 4G64 flipped on its head and setup.
First hole drilled. Cobalt Bit.
More holes drilled. First hole tapped.
First oil jet in after smoothing. 2" flat Sanding Disk Smoothing before (left) and after (right) Sanding disks used: 80 to 180 to 240 to 600 to 800. Completed Smoothing
Install Complete
Testing:
Other than that, the evo is still doing great and I don't have any more big plans for it at the moment. Just enjoying the ride.
Last edited by Pal215; Apr 16, 2019 at 04:47 PM.
Reason: added pictures
Have you tried pressure testing them to see if they leak?
I have not, but I expect they should have some level of leakage without a crush washer in place. The 6 bolt block uses crush washers as oem while the 7 bolt does not have them. I don't know why they would take them out. I am going to place a single oem crush washer between the squirter and block and let the top of the banjo bolt/valve do what it wants on the top of the oil squirter. I would have to locate and block off every vein going to that oil galley to test it for sure. I'll update with some photos of the smoothing process.
Last edited by Pal215; Mar 11, 2019 at 10:36 AM.
Reason: photos added to first post
Been just under a month since my last update. I followed through with my promise to build a spare motor just in case that Billet crank decides to randomly eat itself. Specifically a 2.4LR using a fully balanced OEM 100mm forged crank, K1 Billet H beam 156mm rods (balanced to within 0.1 of a gram), and Wiseco 9.4:1 1400HD pistons. The K1 rods are not stronger than the "turbo tuff" I beams I have in my current running block, but they are a hell of a lot lighter. While building it, I blueprinted the entire block and the specs are as follows:
Piston, wrist pin, rings, and rod assemblies after balancing:
C1: 987.6g
C2: 987.5g
C3: 987.6g
C4: 987.6g
Top Ring Gap: 0.018"
Bottom Ring Gap: 0.022"
PTW: 0.005"
Main Bearing Clearance: 0.0021" - 0.0025" (Used +0.001" oversized in cradle)
Rod Bearing Clearance: 0.0022" - 0.0023" (Used +0.001" oversized bearings)
Crankshaft Endplay: 0.004"
This should be a happy and torquey motor when the day comes I have to drop it in. Likely good for 500 to 600 hp, and just under 8200 rpm. Needless to say, the FP Black will not be pushed with this motor and instead kept to safer boost levels. The 2.4LR has a rod ratio of 1.56, which is better than my current 2.3L rod ratio of 1.50. This makes it a little better for high reving, but it doesn't come near the levels of the destrokers. Around town it will get me my boost addiction fix.
After receiving the 4G64 from the machine shop, I noticed that they had added a complimentary coat of engine enamel after cleaning the block. I was not too crazy about the color or the fact that they sprayed over the rust without chipping off and removing the dead metal first. I got to work sanding, scrubbing, chipping, and prepping for paint.
When it came time to paint, I masked parts off, sprayed the block down with brake cleaner, and used compressed air to clean out all the crevices. I primed the block and chose a gloss black base coat (of course). One coat of clear engine enamel went on after.
The next immediate step was to install the freeze plugs. I have a freeze plug installer tool that allows me to seat the freeze plugs flush with the block, but they actually need to go about 1 mm past the chamfered edge. For those extra two hits I used a socket that is very slightly smaller than the OD of the freeze plug.
Now she is starting to look decent...
Next I started to think about the main bearing clearances. I measured the crank main journals as well as the main bores with the bearings installed and did the math.
While I was in the mood to play with the dial bore gauge and micrometers, I found the rod bearing clearances as well. Always remember to achieve proper bolt stretch before taking the smallest ID of the rod bore with bearings installed. I've noticed that 55 ft lbs on my toque wrench, which is very well calibrated, gets me to the desired stretch.
Piston Rod in padded vice:
Oil squirters about to go in with oem washers beneath them. Milled blocks do not require the washers. Recall that in my block I manually drilled and tapped for oil jets and then used a sanding bit in a drill press to create a flat recessed region for the oil squirter to sit on. To account for any sealing issues, i'm throwing them in as a precaution.
Next up was the crankshaft assembly, but only after a nice final cleaning with coffee filters, denatured alcohol, and compressed air.
Main bearings installed in the crank cradle and lubed up.
Crankshaft in its new home.
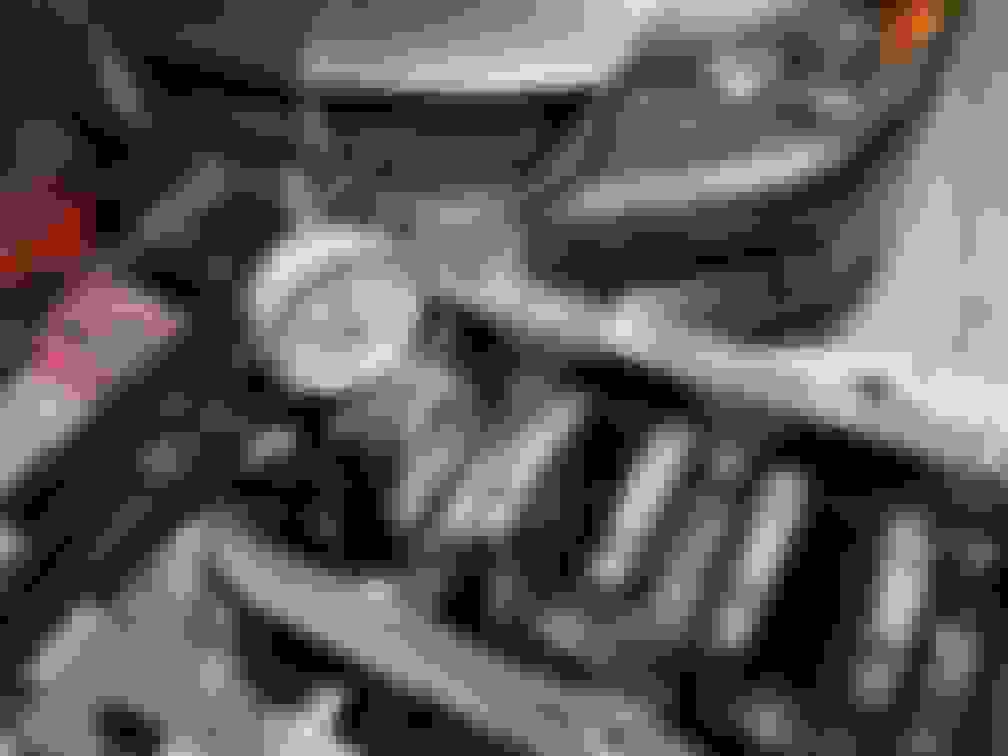
After installing the main cradle and torquing the ARP studs to 60ft lbs in 3 equal steps, in the pattern suggested, it was time to install the piston and rod assembly. For more information on gapping rings and setting up the proper ring positions prior to installation, see my previous engine build in this thread.
Here you can see where I had to bend the oil squirters to clear the piston, rod, and crank weights. There is a very specific position that these need to be in and you have to take your time to find it.
He posted in a thread in the engine section asking what rods to have MAP put in the short block they're building him. I advised he get his money back and directed him to this thread to show him why.
He posted in a thread in the engine section asking what rods to have MAP put in the short block they're building him. I advised he get his money back and directed him to this thread to show him why.