
Walbro 450 lph e85 fuel pump diy evo 8/9

Walbro 450 lph e85 fuel pump diy evo 8/9
Due to the lack of thorough DIYS on this pump I decided to make one.
I replaced my aeromotive 340 after its second failure and after talking to the techs there it should not be run with e85 period.
Car died 15 feet away from my garage this morning so I was able to source a new Walbro 450 e85 pump around noon today.
On a scale of 1-10 id say this was a 2 or 3 since it is pretty straight forward.
I TAKE NO RESPONSIBILITY FOR YOU ****ING UP YOUR PUMP OR HOUSING, THIS WORKED FOR ME AND WILL WORK FOR YOU IF YOU TAKE YOUR TIME. PLEASE POST QUESTIONS OR PM ME BEFORE YOU MAKE A MISTAKE.
THIS DIY ASSUMES THAT YOU KNOW HOW TO REMOVE YOUR PUMP FROM THE FUEL TANK WHICH CAN BE FOUND HERE
http://www.evomoto.com/tech_info.php...36f08072afe3bd
Tools/supplies needed:
Flat Heat Screw driver
Syringe
Pliers
Dremel with cutoff wheel
Soldering iron
Wire cutter/stripper
Solder
Heatshrink
Zipties
Compressed Air
Note all you need as far as the fuel pump goes is
the pump, 2x Fuel Injector O ring, worm gear clamp
and a new oem sock filter (optional: can reuse your old one)
There is no need to buy any of those install kits, everything is useless. The bigger sock filter will not work either because it will bottom out in the tank and starve your pump, trust me I tried that.
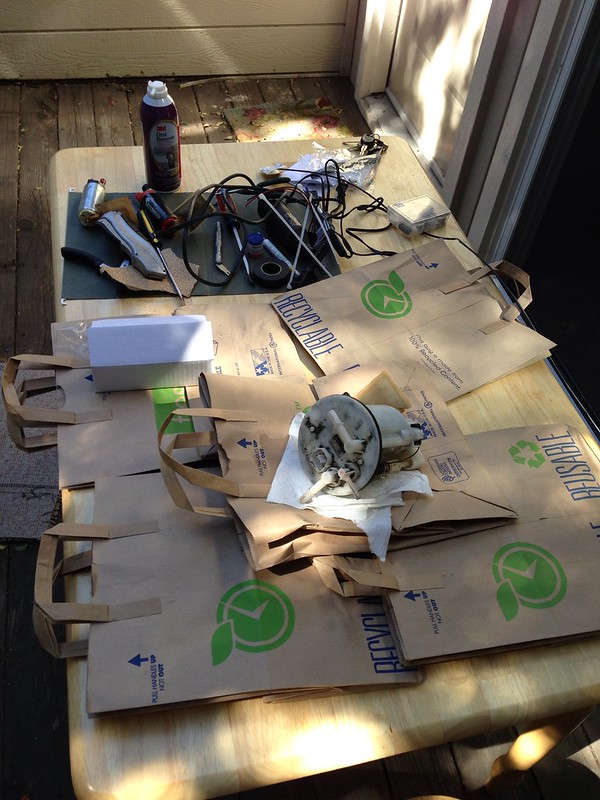
1. Lay it all out in a clean work area and try to get as much fuel out as possible
2. Remove return assembly, 2 hose clamps along with the bottom retainer.
3. Remove the pump
4.Remove leveler, be careful not to break the hangar
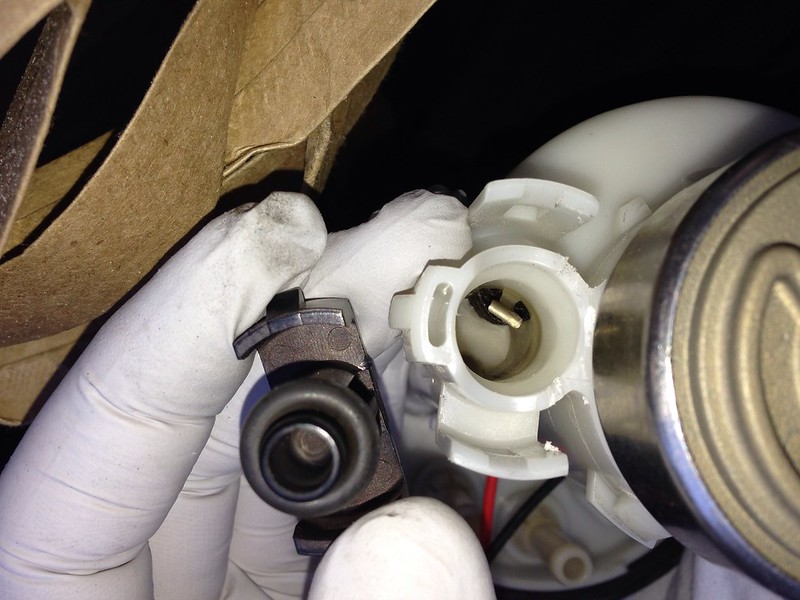
5. Remove low fuel level indicator, dont forget to remove the O ring and put it back on the indicator.
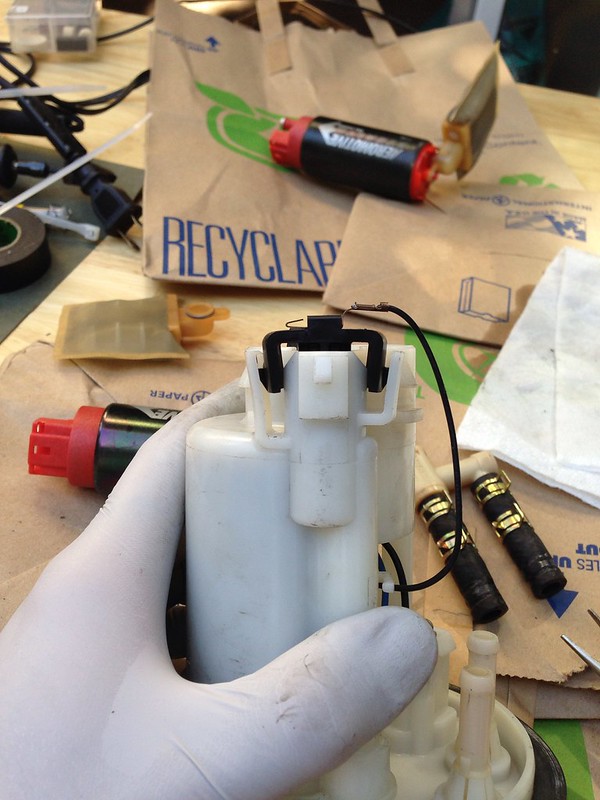
6. Unplug the harness from the housing
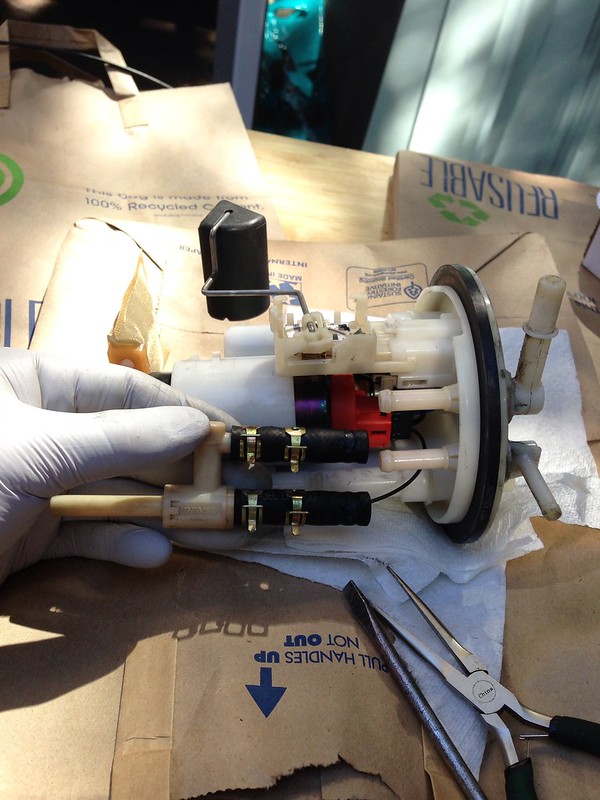
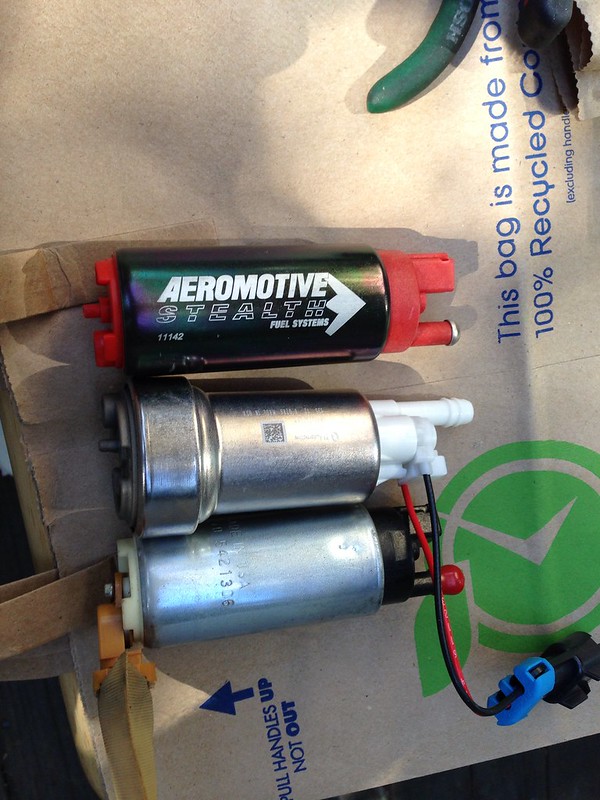
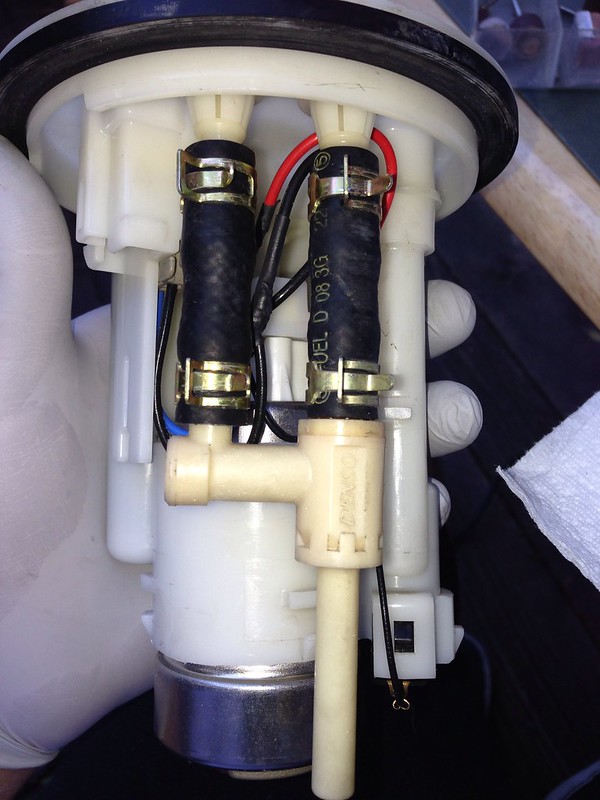
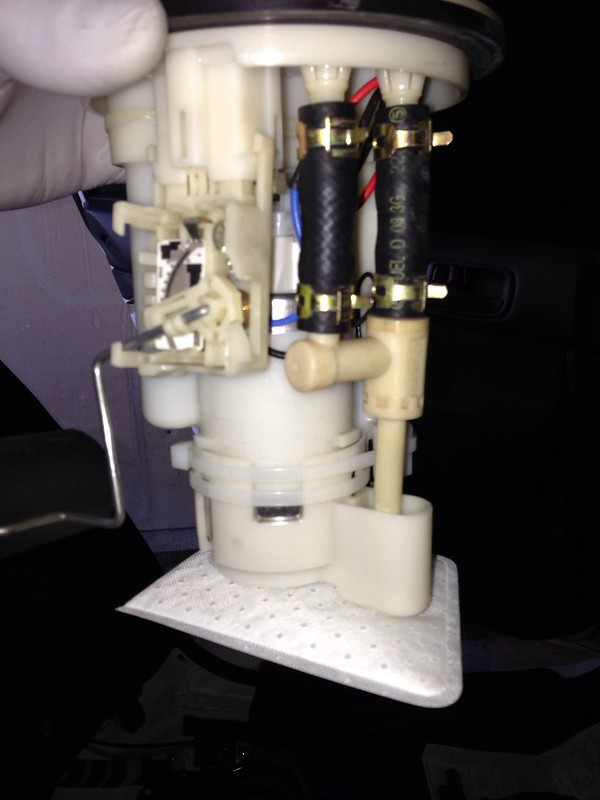
7. heres a comparison, you can see how long the pump is.
8.Test fit, as you can see trimming is needed.

9.Cut off the first barb, I used this syringe because I didn't want shavings to get inside the pump.
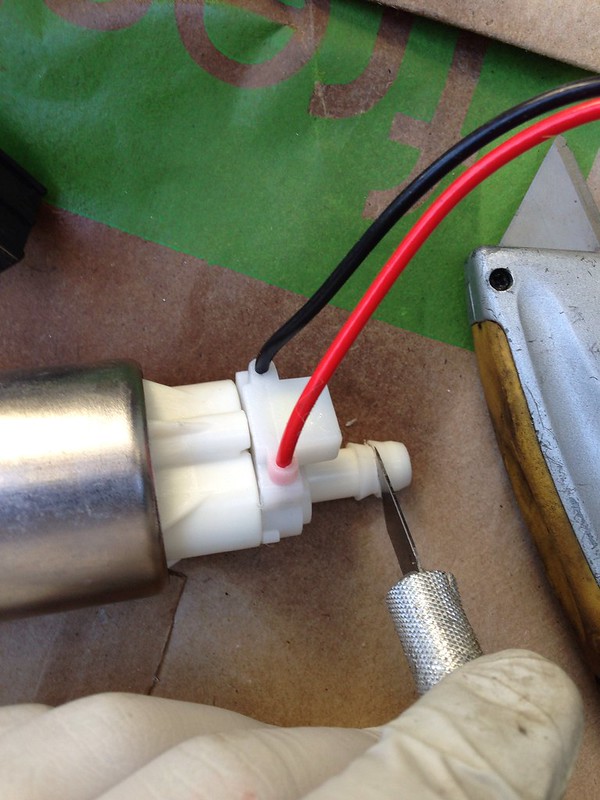
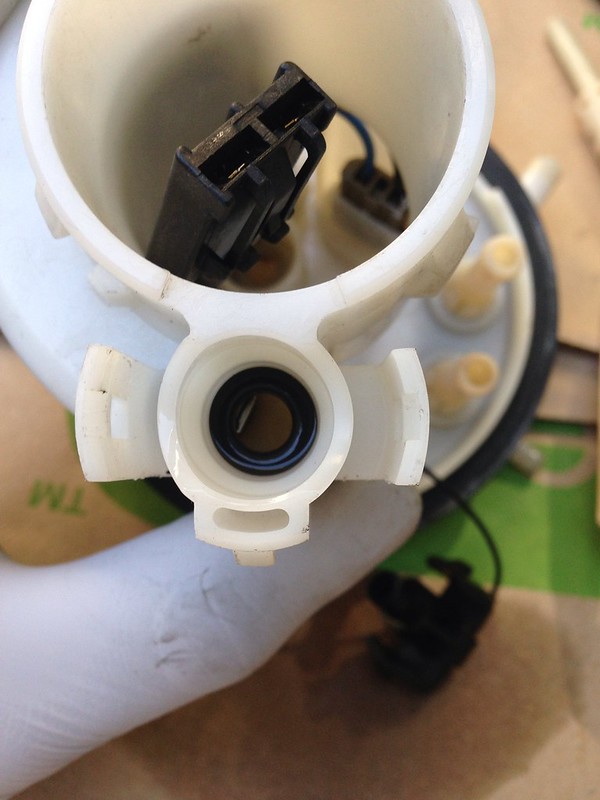
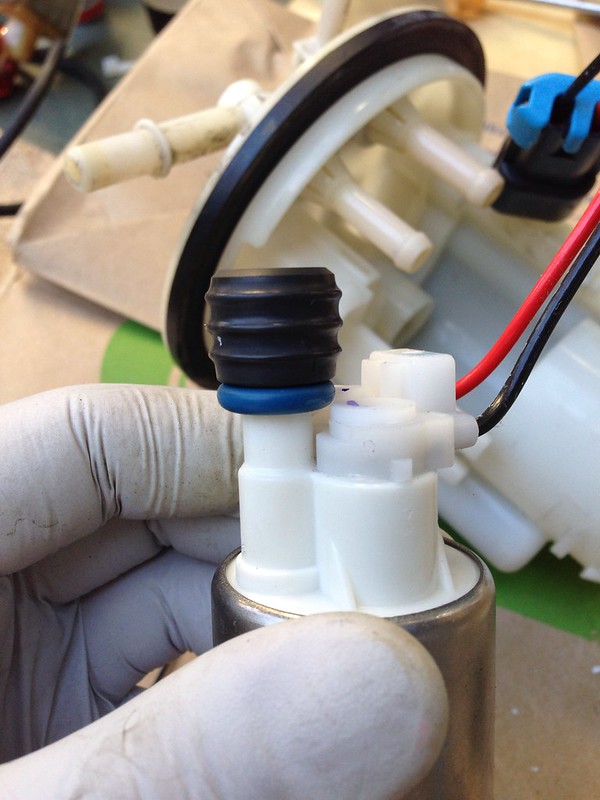
10. 2xO ring plus reuse the oem rubber grommet

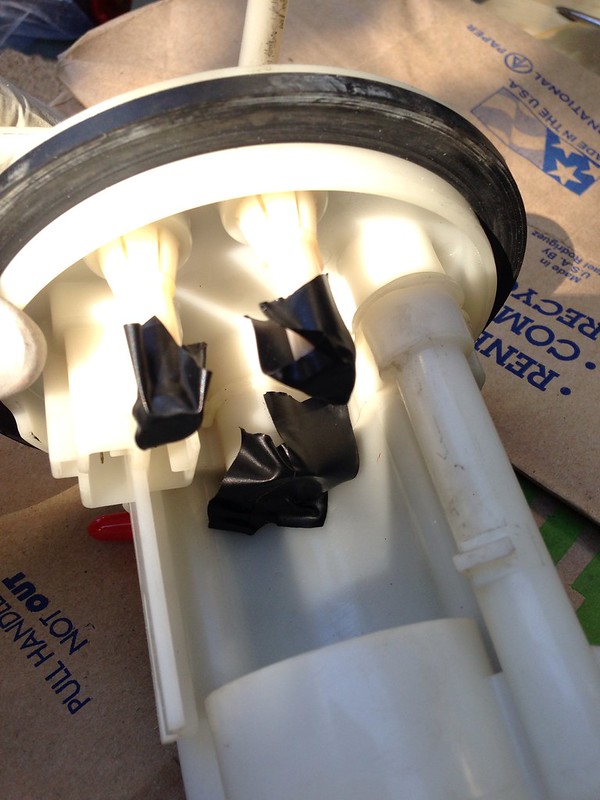
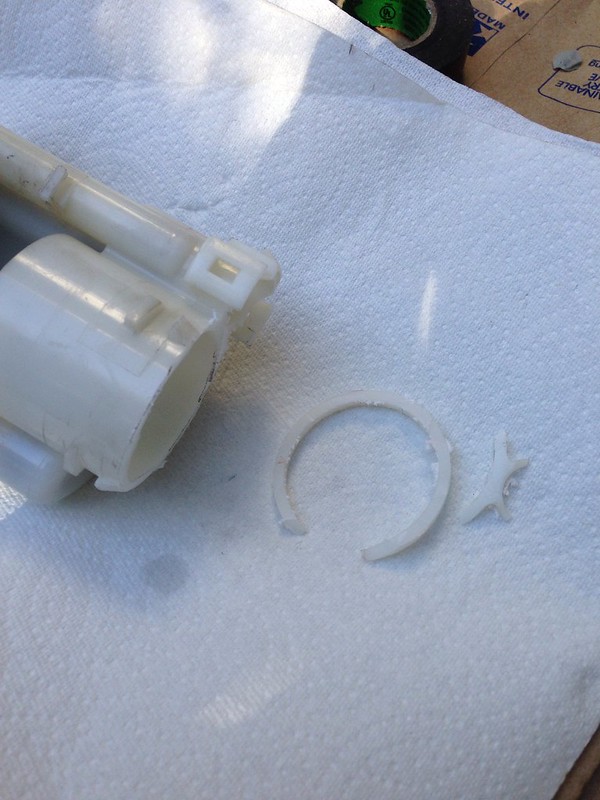
11. Seal off the holes with tape.
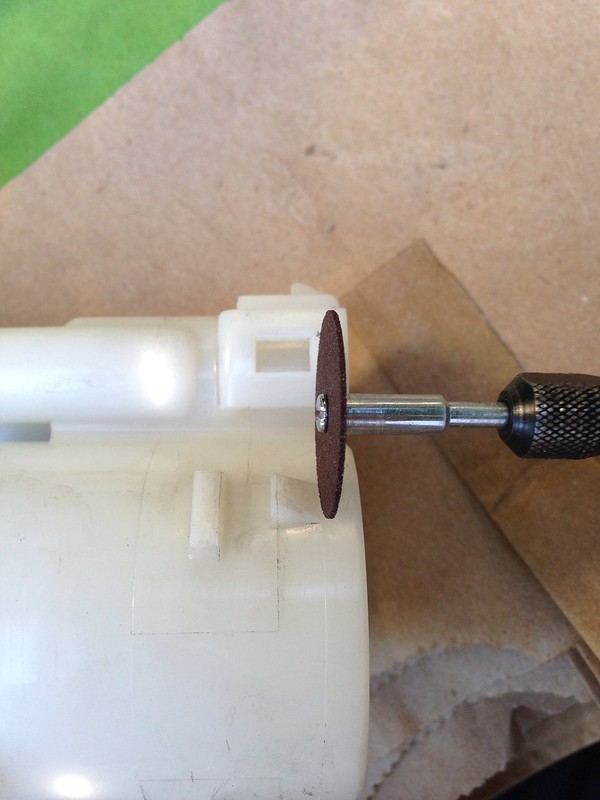
12.Dremel time, cut all the way around the housing right below the clips.
13.Heres the aftermath.
14. I used a box cutter to bevel the edge in order to clean it up nicely. NOTE: I am using the blow duster to get all the dust off between these steps.
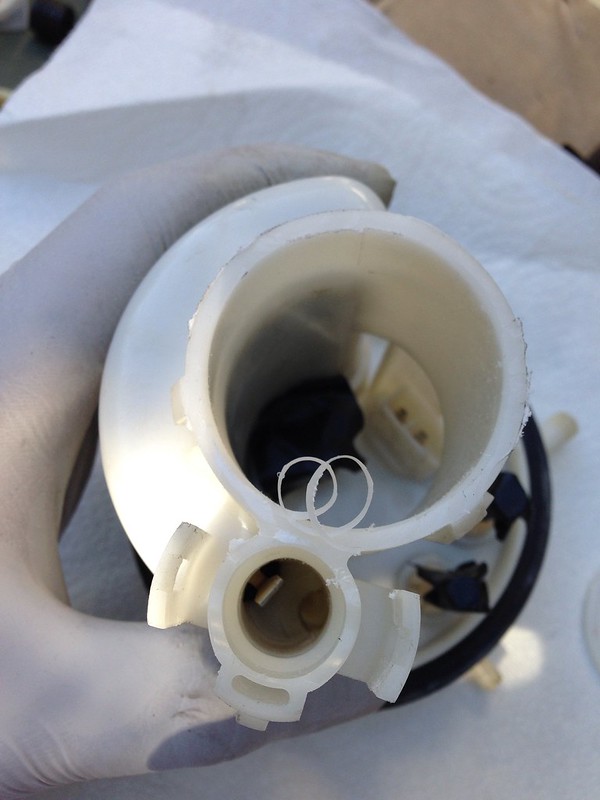
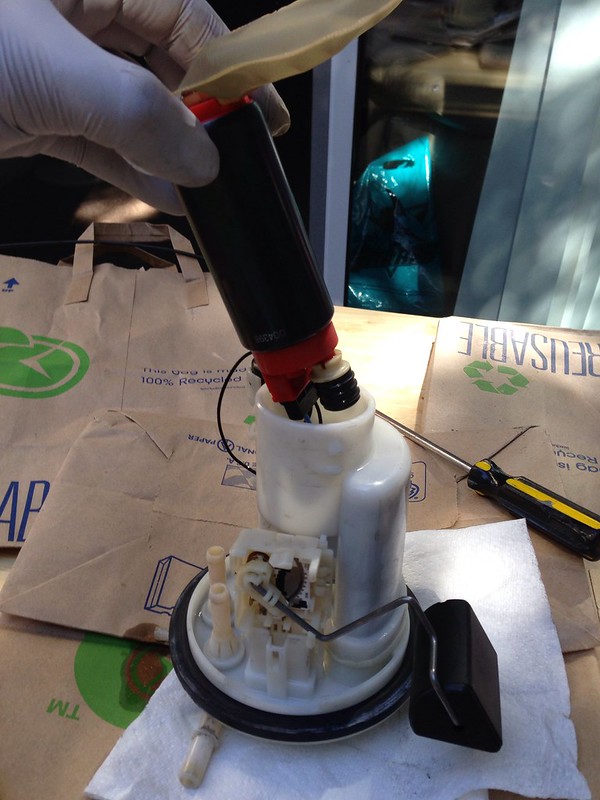
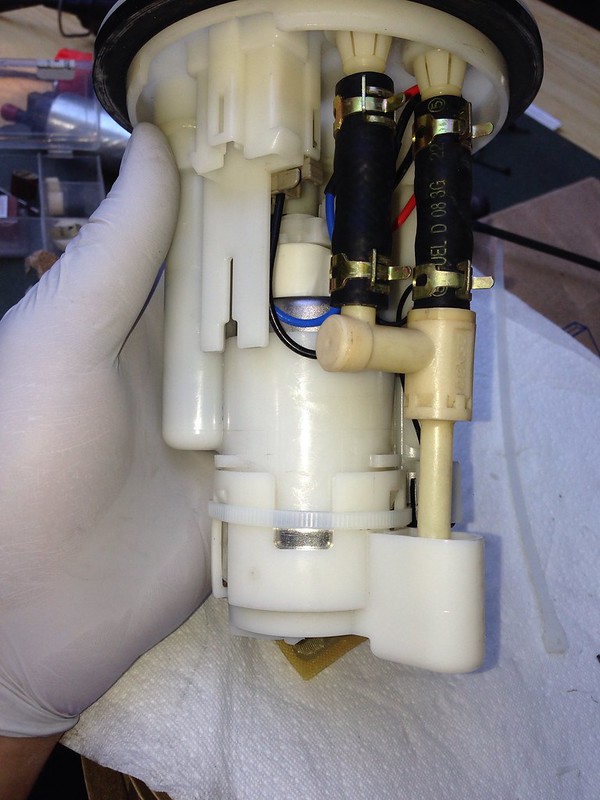
15. Test fit, first times a charm, it should be snug. Also the black rubber grommet should not be visible if the pump is all the way in.
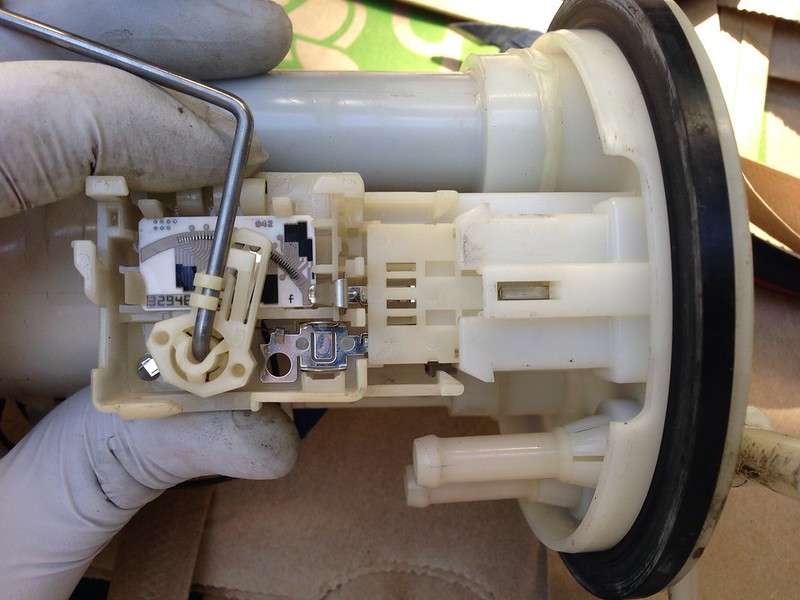
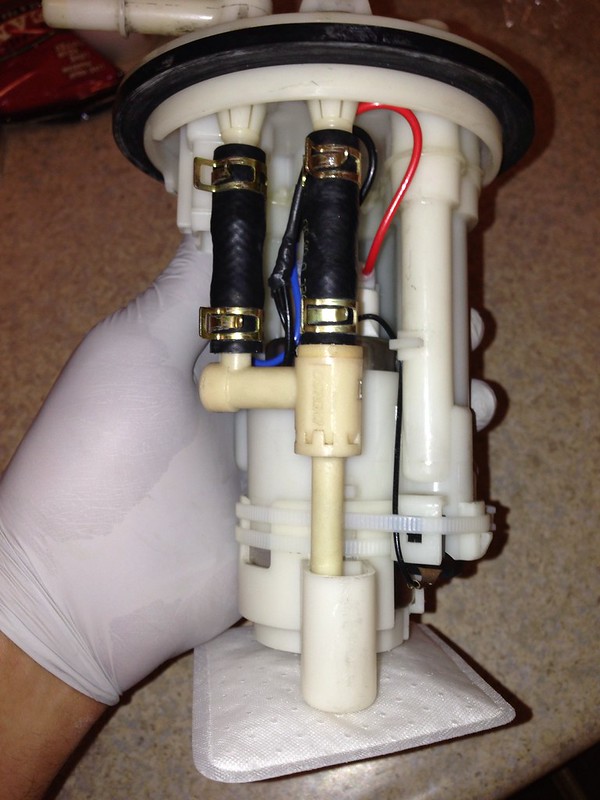
16. Time for wiring, cut the connector off, its useless.

17. Cut these 3 wires from the connector on the wiring harness.
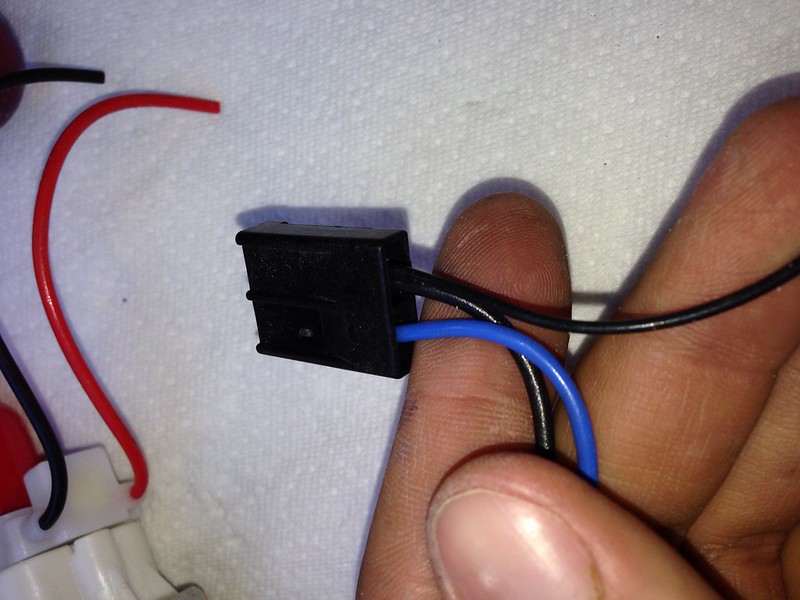
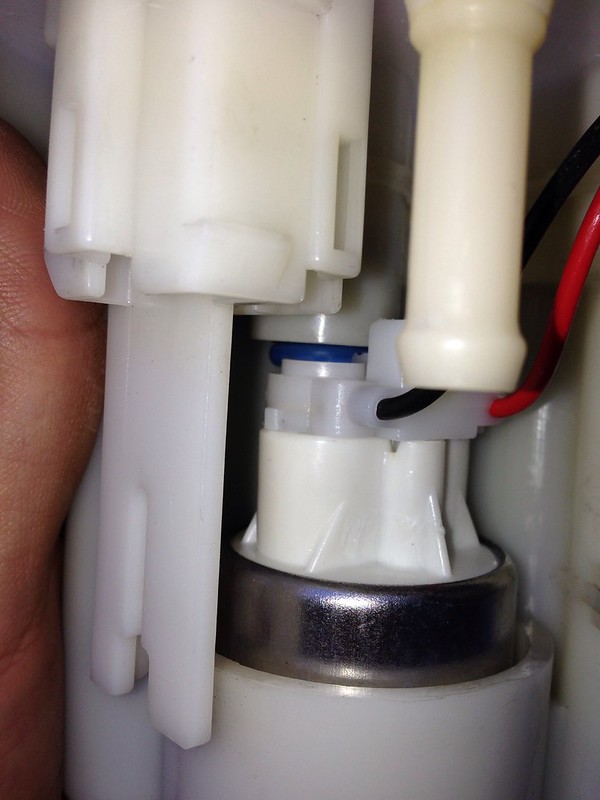
18. Solder the blue wire with the red wire and heat shrink it, then the black wire to the black wire from the pump harness and the low tank wire. DO it right the first time, this is a critical connection.

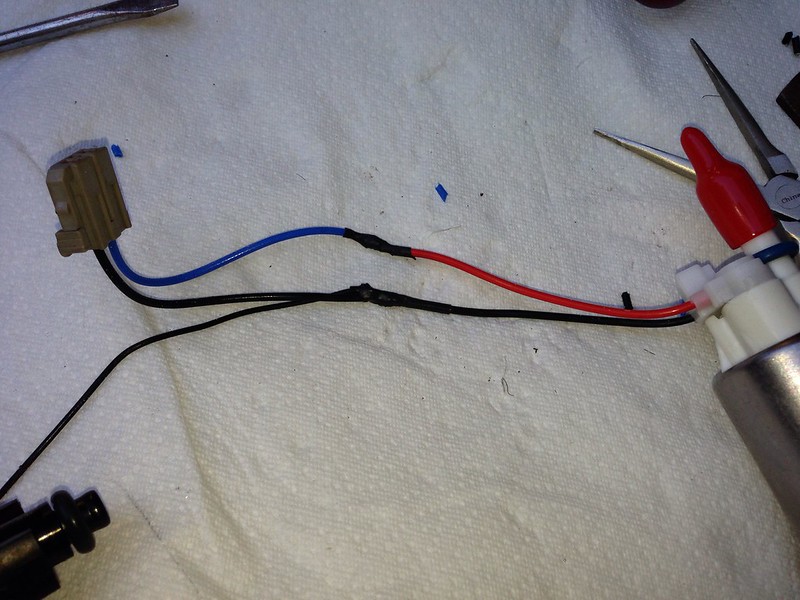
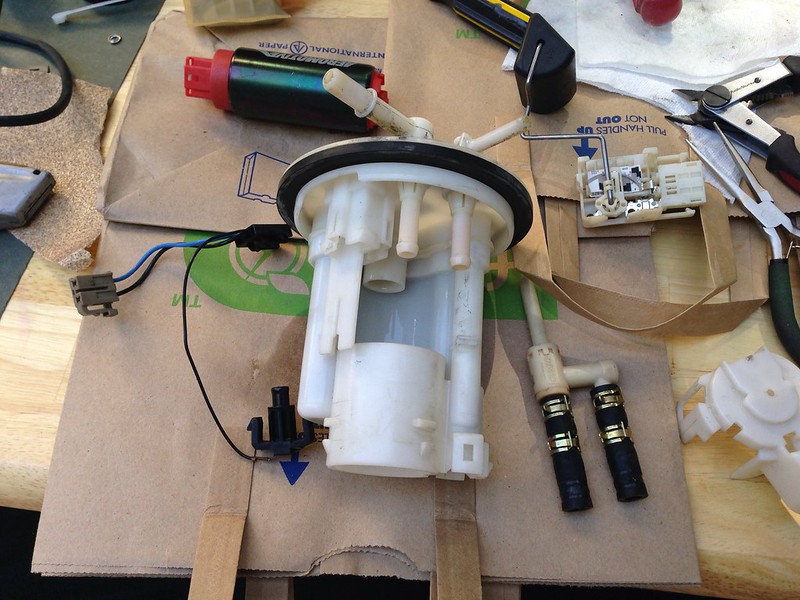
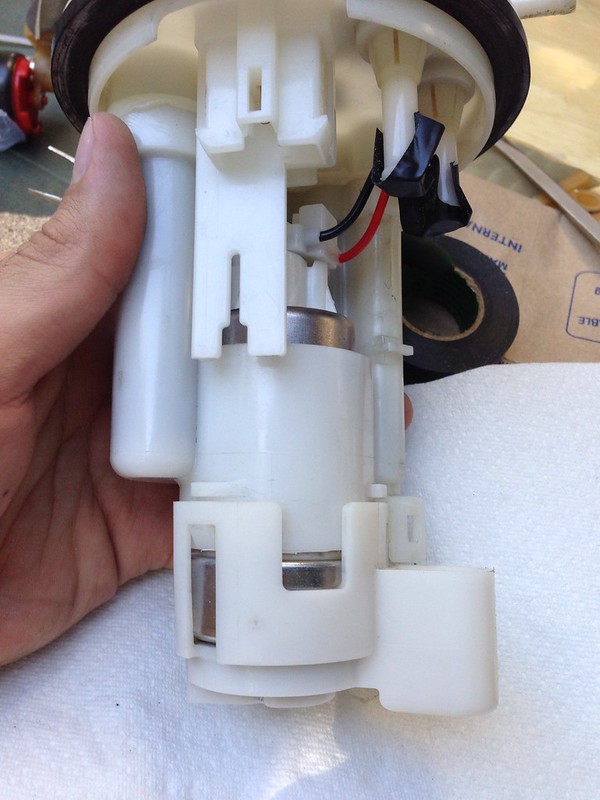
19. Now reinstall the pump and the wiring harness, don't forget the o ring i mentioned earlier.
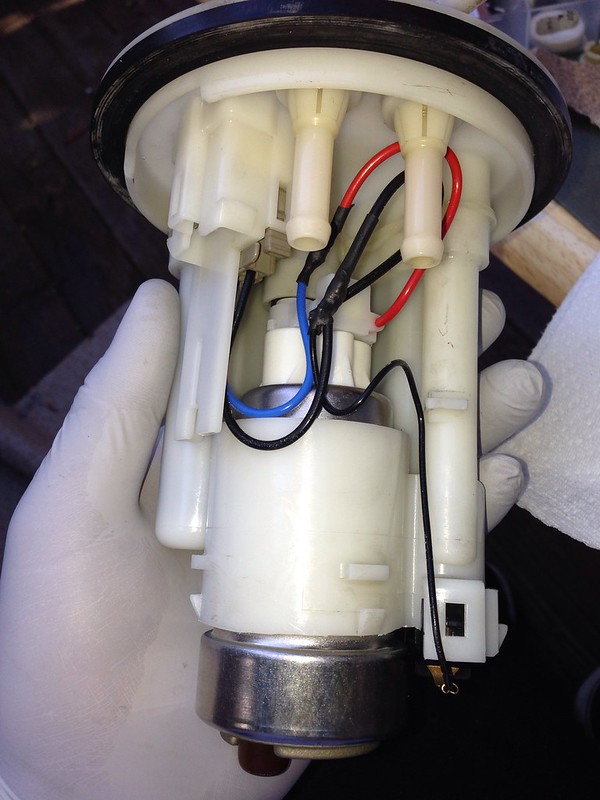
20. Reconnect the return lines
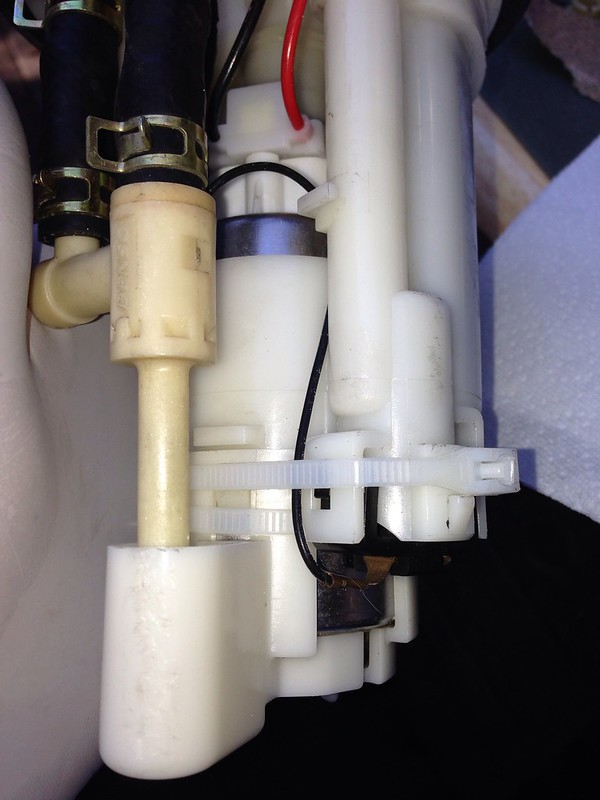
21. Attach the lower retainer, AND YOUR FILTER SOCK and put one worm gear claml around the pump. IT IS NOT SHOWN BECAUSE I TRIED ADDING THE BIGGER SOCK.
another angle
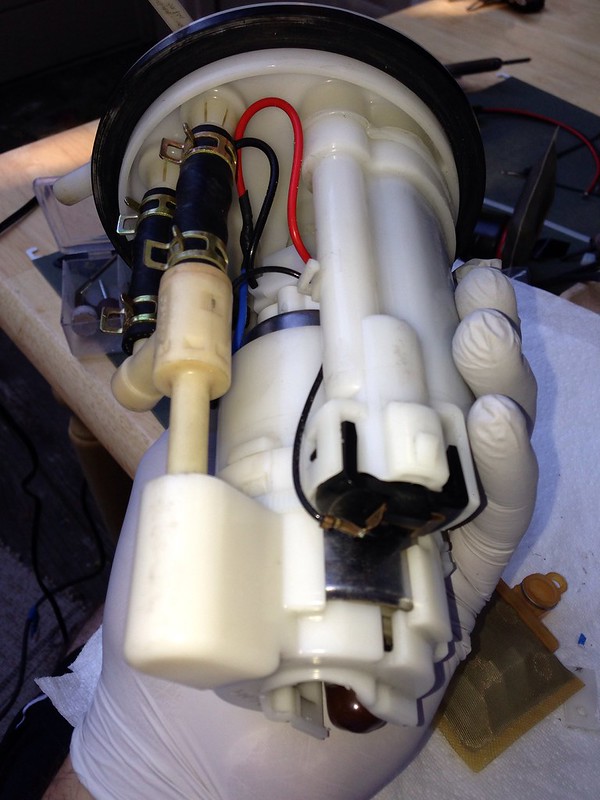
22. Heres my second zip tie for good measure. EDIT one worm gear clamp instead which is shown at the bottom of the post.
23. Add the leveler and the filter sock and you should be good to go!
I TRIED USING THE SUPPLIED SOCK BUT AS MENTIONED EARLIER IT WILL NOT WORK BECAUSE IT HITS THE BOTTOM OF THE TANK.
ALL done!
It took me around 3 hours from the time i removed the pump from the car and reinstalled it. I really took my time because you can mess up really easily.
It may take a few cranks but your car should start if not your wiring is bad or you may need a new base map due to the extra flow.
At the very least such as in my case I will need a touch up tune to fix the fuel trims.
I had my aeromotive rewired as with this pump and it seems like the stock fpr is handling it fine. It isnt much louder either.
Big thanks to FFTEC for supplying the pump within a few hours of me calling and thanks to Dave, Aaron and Mike for giving me some install tips.
Good luck, hope this helps!
Slight revision!
Added a worm gear clamp instead of zip ties! As well as a second o ring underneath the rubber grommet.
Pics
I replaced my aeromotive 340 after its second failure and after talking to the techs there it should not be run with e85 period.
Car died 15 feet away from my garage this morning so I was able to source a new Walbro 450 e85 pump around noon today.
On a scale of 1-10 id say this was a 2 or 3 since it is pretty straight forward.
I TAKE NO RESPONSIBILITY FOR YOU ****ING UP YOUR PUMP OR HOUSING, THIS WORKED FOR ME AND WILL WORK FOR YOU IF YOU TAKE YOUR TIME. PLEASE POST QUESTIONS OR PM ME BEFORE YOU MAKE A MISTAKE.
THIS DIY ASSUMES THAT YOU KNOW HOW TO REMOVE YOUR PUMP FROM THE FUEL TANK WHICH CAN BE FOUND HERE
http://www.evomoto.com/tech_info.php...36f08072afe3bd
Tools/supplies needed:
Flat Heat Screw driver
Syringe
Pliers
Dremel with cutoff wheel
Soldering iron
Wire cutter/stripper
Solder
Heatshrink
Zipties
Compressed Air
Note all you need as far as the fuel pump goes is
the pump, 2x Fuel Injector O ring, worm gear clamp
and a new oem sock filter (optional: can reuse your old one)
There is no need to buy any of those install kits, everything is useless. The bigger sock filter will not work either because it will bottom out in the tank and starve your pump, trust me I tried that.
1. Lay it all out in a clean work area and try to get as much fuel out as possible
2. Remove return assembly, 2 hose clamps along with the bottom retainer.
3. Remove the pump
4.Remove leveler, be careful not to break the hangar
5. Remove low fuel level indicator, dont forget to remove the O ring and put it back on the indicator.
6. Unplug the harness from the housing
7. heres a comparison, you can see how long the pump is.
8.Test fit, as you can see trimming is needed.
9.Cut off the first barb, I used this syringe because I didn't want shavings to get inside the pump.
10. 2xO ring plus reuse the oem rubber grommet
11. Seal off the holes with tape.
12.Dremel time, cut all the way around the housing right below the clips.
13.Heres the aftermath.
14. I used a box cutter to bevel the edge in order to clean it up nicely. NOTE: I am using the blow duster to get all the dust off between these steps.
15. Test fit, first times a charm, it should be snug. Also the black rubber grommet should not be visible if the pump is all the way in.
16. Time for wiring, cut the connector off, its useless.
17. Cut these 3 wires from the connector on the wiring harness.
18. Solder the blue wire with the red wire and heat shrink it, then the black wire to the black wire from the pump harness and the low tank wire. DO it right the first time, this is a critical connection.
19. Now reinstall the pump and the wiring harness, don't forget the o ring i mentioned earlier.
20. Reconnect the return lines
21. Attach the lower retainer, AND YOUR FILTER SOCK and put one worm gear claml around the pump. IT IS NOT SHOWN BECAUSE I TRIED ADDING THE BIGGER SOCK.
another angle
22. Heres my second zip tie for good measure. EDIT one worm gear clamp instead which is shown at the bottom of the post.
23. Add the leveler and the filter sock and you should be good to go!
I TRIED USING THE SUPPLIED SOCK BUT AS MENTIONED EARLIER IT WILL NOT WORK BECAUSE IT HITS THE BOTTOM OF THE TANK.
ALL done!
It took me around 3 hours from the time i removed the pump from the car and reinstalled it. I really took my time because you can mess up really easily.
It may take a few cranks but your car should start if not your wiring is bad or you may need a new base map due to the extra flow.
At the very least such as in my case I will need a touch up tune to fix the fuel trims.
I had my aeromotive rewired as with this pump and it seems like the stock fpr is handling it fine. It isnt much louder either.
Big thanks to FFTEC for supplying the pump within a few hours of me calling and thanks to Dave, Aaron and Mike for giving me some install tips.
Good luck, hope this helps!
Slight revision!
Added a worm gear clamp instead of zip ties! As well as a second o ring underneath the rubber grommet.
Pics
Last edited by xXANCHORMONXx; May 3, 2013 at 08:07 AM.
Trending Topics
Are you certain that you used the ones made to Ethanol? Did you get refund/replacement from Walbro for those failed (E85 compatible) pumps?
Great writeup thanks man!
Couple questions; Is that extra o ring on the outlet needed? Or is it just there for good measure?
Also you say your stock regulator isn't being overrun with this pump rewired. Do you have a fuel pressure gauge. My regulator couldnt even handle a 255 rewired and my aeromotive fpr was being overrun before I drilled the siphon tube out.
Last edited by nikg; Apr 22, 2013 at 08:10 PM.
Great writeup thanks man!
Couple questions; Is that extra o ring on the outlet needed? Or is it just there for good measure?
Also you say your stock regulator isn't being overrun with this pump rewired. Do you have a fuel pressure gauge. My regulator couldnt even handle a 255 rewired and my aeromotive fpr was being overrun before I drilled the siphon tube out.
Couple questions; Is that extra o ring on the outlet needed? Or is it just there for good measure?
Also you say your stock regulator isn't being overrun with this pump rewired. Do you have a fuel pressure gauge. My regulator couldnt even handle a 255 rewired and my aeromotive fpr was being overrun before I drilled the siphon tube out.
That's weird no I don't have a gauge.
It's all stock with no fuel rail or any of that.
EvoM Guru
iTrader: (50)
Joined: Mar 2006
Posts: 9,675
Likes: 132
From: Tri-Cities, WA // Portland, OR
looks good.
i have never been able to find a reliable reference for what that black wire at the bottom of the housing does. my thought is that it makes contact with the bottom of the tank to provide an additional ground. how did you determine that its related to the low fuel light?
so you ended up using a stock size fuel sock?
is it possible to use a low profile hose clamp instead of zipties to secure the cup?
I had used one of each. The non E85 one lasted almost 6 months and I believe the E85 one was even shorter. We went through the wiring a second time too when we went to the double pumper. I am now of the opinion that a single "large" pump is not worth the hassle. There are a lot of great performing double pumpers that make it so there is no reason to waste time with the large single pumps.

I can tell you the little black wire isn't for the low fuel light, as I discarded it when i went double pumper and the low fuel light still works fine... pretty sure it is an extra ground, for what I have no clue...
looks good.
i have never been able to find a reliable reference for what that black wire at the bottom of the housing does. my thought is that it makes contact with the bottom of the tank to provide an additional ground. how did you determine that its related to the low fuel light?
so you ended up using a stock size fuel sock?
is it possible to use a low profile hose clamp instead of zipties to secure the cup?
i have never been able to find a reliable reference for what that black wire at the bottom of the housing does. my thought is that it makes contact with the bottom of the tank to provide an additional ground. how did you determine that its related to the low fuel light?
so you ended up using a stock size fuel sock?
is it possible to use a low profile hose clamp instead of zipties to secure the cup?
Yeah the bigger one will not fit, if you try to use it the pump assembly will not seat ok the fuel tank without pressure which is bad. Even if you bolted it in you can see that if the sock is compressed it will restrict flow immensely.
I believe you could I didn't have any handy. I'm going to pull the pump in 3k to put a new filter ands the put a metal clamp. It would have to be put on hand tight to avoid breaking anything.
Could be. But like I said its not a big deal to put it back in for a single pump. I never took a close look at the doublepumper setup.